
[BC Admin Guide] Users
Content
The Users tab in the administration area of the MOXIS Business Cloud displays the users. Here you can search for users, edit or delete them. This article introduces you to the topic.
Please note: The following instructions refer to the Business Cloud. The instructions are also applicable to the Now Cloud. However, please note that the Now Cloud is limited to the use of approvals, simple and advanced signatures.
1. User overview (Dashboard)
To access the user interface, open the administration area under the Users tab.
In addition to a detailed list of all (active and inactive) users, you will also find information here on how many users are activated (see figure 1 [1]). You can edit and manage these as needed.
Further editing options for activated users are: deactivating and password reset (see figure 1 [2]). Once deactivated, users can still be edited as follows: edit, activate or delete. In the search (see figure 1 [3]), you can search for users according to the following parameters:
login name
name
email
all groups
all statuses
Please note: To delete users, they must first be deactivated. Once a user has been deleted, they cannot be reactivated. Before users are permanently deleted from the system, you will be asked to confirm that you want to delete the entry in a pop-up window.
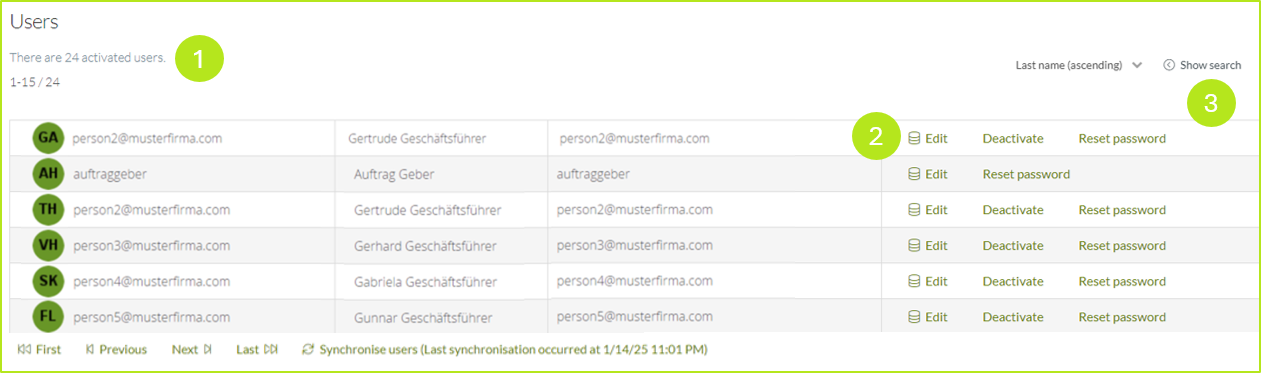
Figure 1: User interface in the MOXIS Business Cloud administration
1.1. Edit users
To edit a user, please click on Edit (see figure 1 [2)].
Please note: Even as an administrator, you need additional rights to be able to carry out all configurations. For example, if you do not have the moxisSigner permission (qualified signer), the Qualified Signature tab is not displayed.
You can configure the following settings (see figure 2):
User settings
Profiles for simple signatures
Profiles for qualified signatures
Signature type
Viewing parties
Notifications as a substitute
Editing a substitution
Notifications
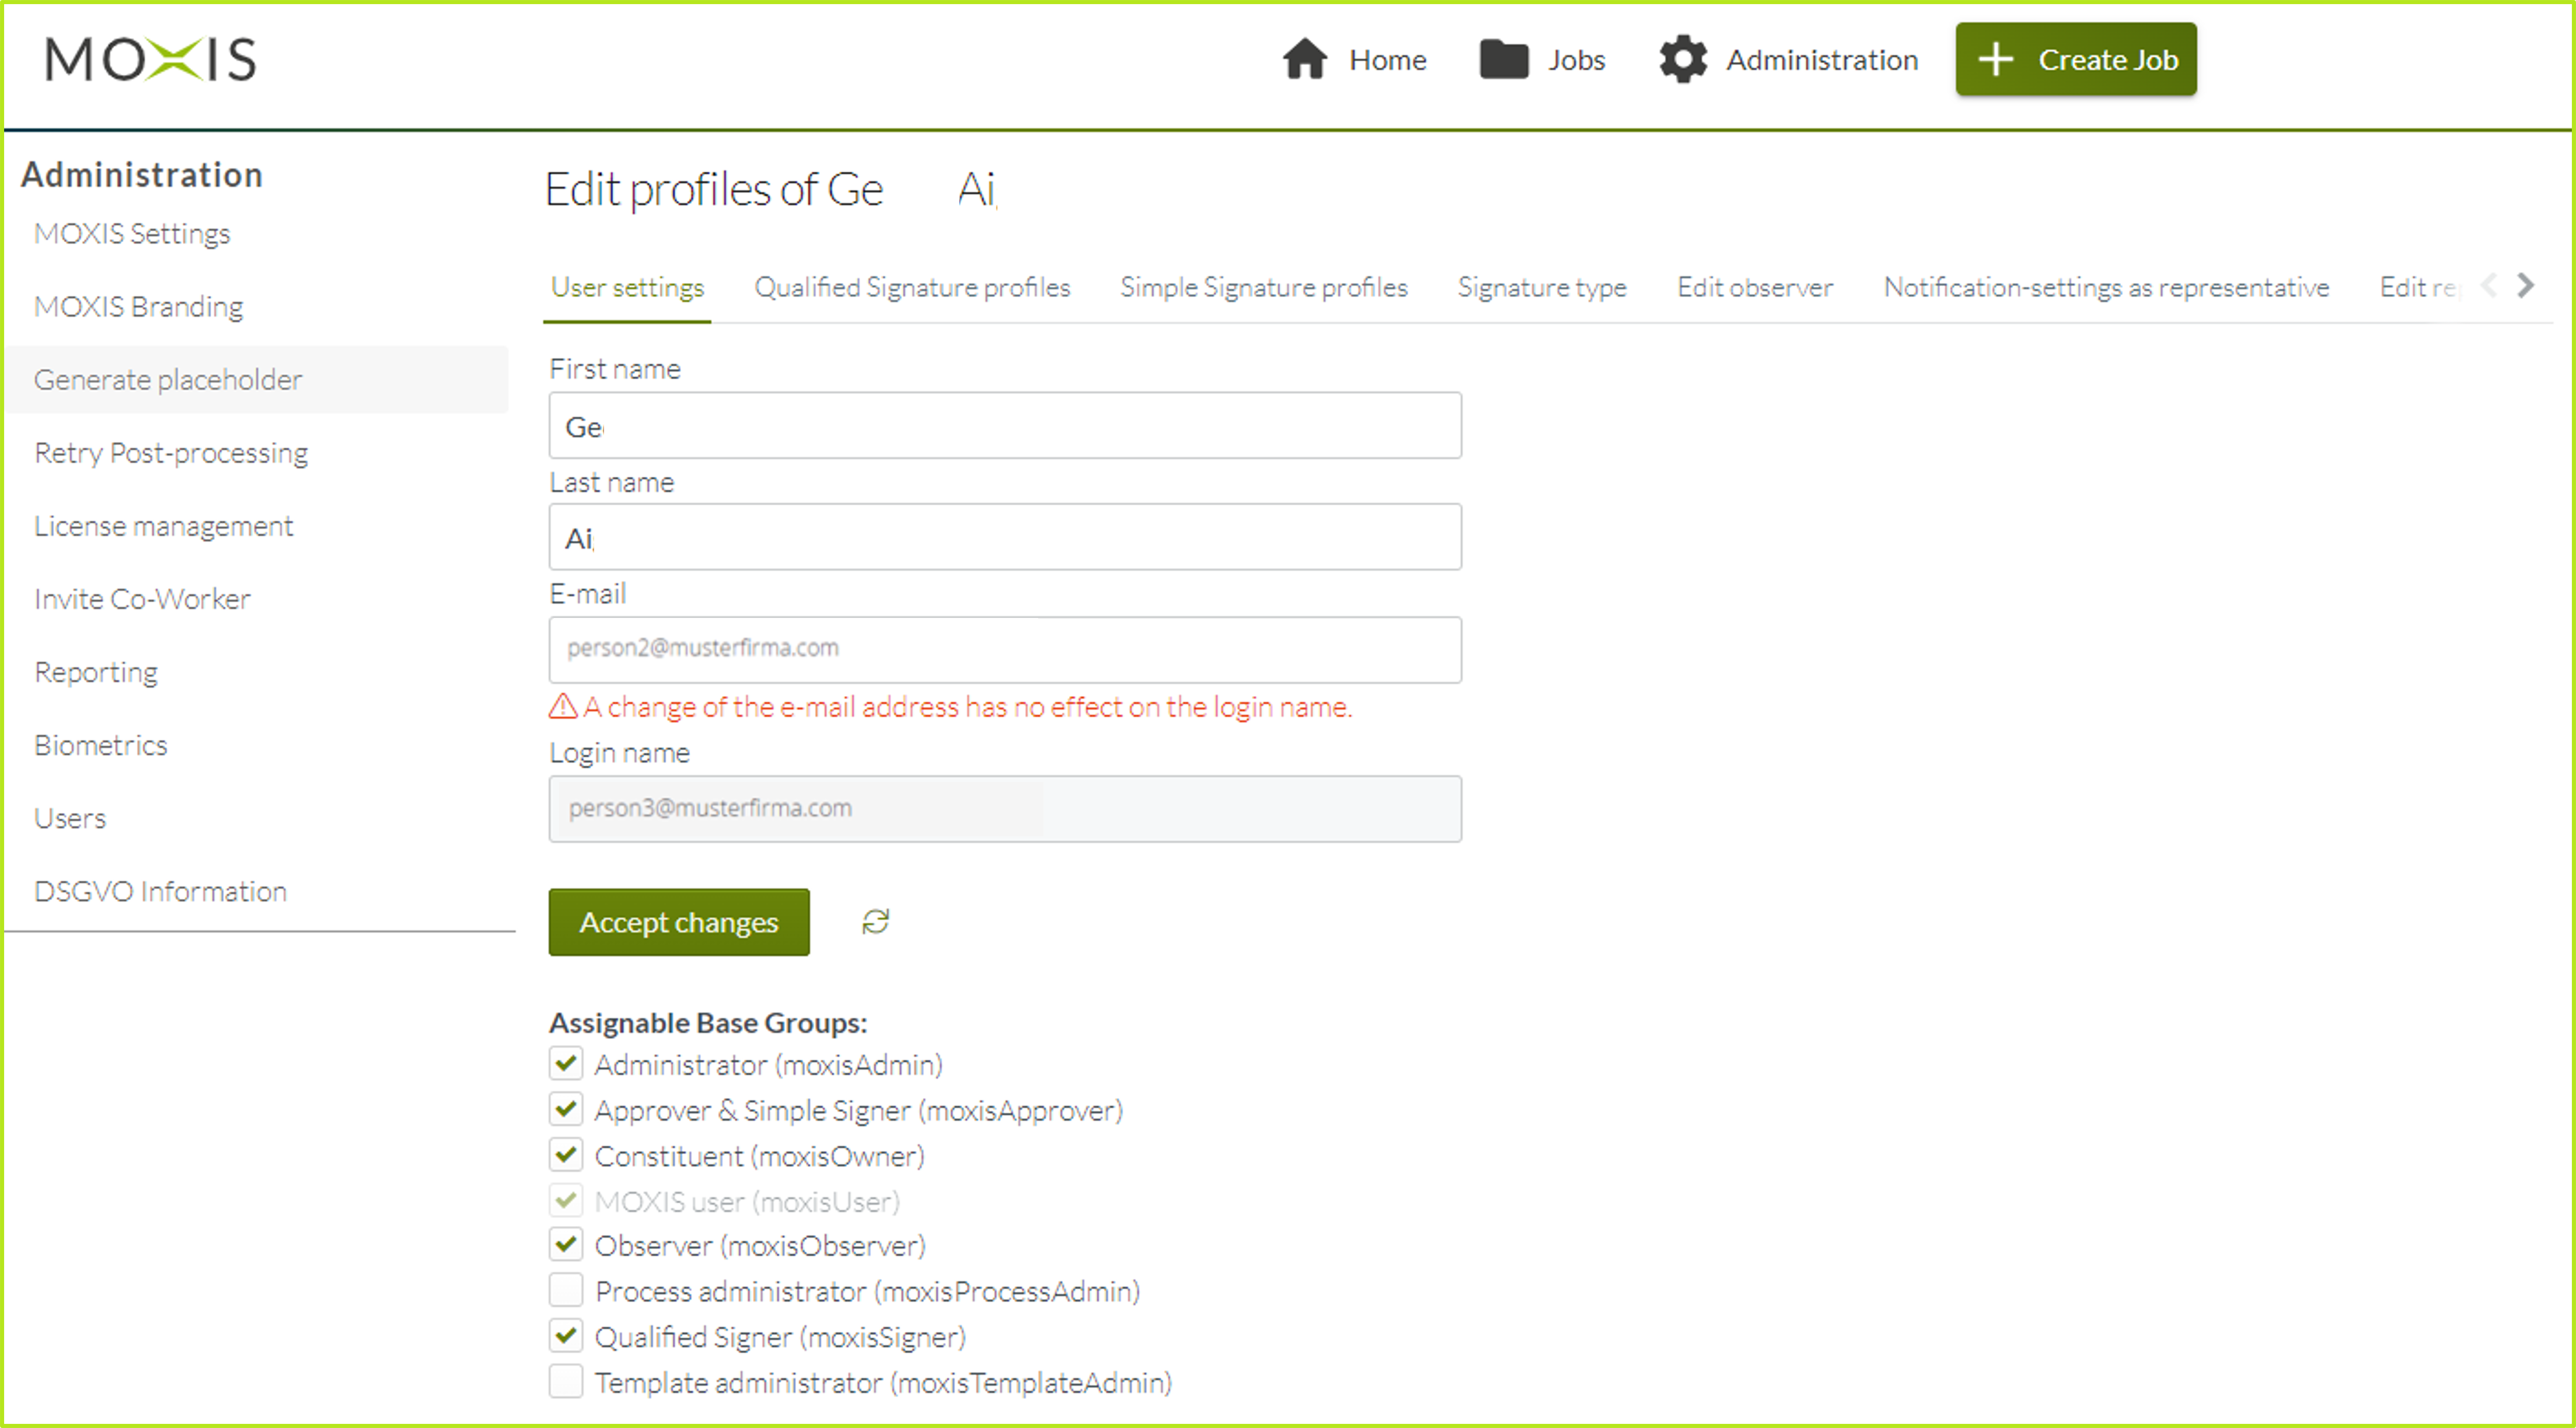
Figure 2: Edit users in MOXIS Business Cloud
1.1.1 User settings
In this section, you can change a user's first and last name or email address. As an administrator, you can also assign users to base groups. This allows you to assign certain rights to your users.
The MOXIS Business Cloud has so-called standard or base groups. These are predefined and linked to specific roles. They are not individually configurable.
The following basic roles are available in the MOXIS Business Cloud:
Administrator (moxisAdmin): Users are allowed to administer MOXIS Business Cloud instances.
Client (moxisOwner): Users in this group are allowed to create orders. In addition, these users have an overview of sent documents including their respective status.
Viewers (moxis Observer): Users in this group can view the folders of other users. They have no further rights. Please note: Users assigned to this basic group cannot automatically view signature folders, but must be invited.
Approver & Simple signer (moxisApprover): Users in this group are allowed to release orders and simply sign and have a digital release folder or folder for releasing simple signatures
MOXIS user (moxisUser): Users in this group are allowed to log in to the MOXIS Business Cloud. This role is assigned by default to each user.
Process administrator (moxisProcessAdmin): Users in this group can manage orders from other users in the process.
Qualified signer (moxisSigner): Users in this group can sign qualified and have a digital signature folder.
Template administrator (moxisTemplateAdmin): Users in this group can share their own templates and delete shared templates.
1.1.2 Profiles for Qualified Signatures
In this section, you can manage the profiles for qualified signatures in your instance. Here you can also see an overview of all the existing profiles (see figure 3 [1]) and create and modify rules.
If no rules are applied (see figure 3 [5]), the system profile is automatically applied. This is indicated by an information symbol (i in a circle; see figure 3 [2]).
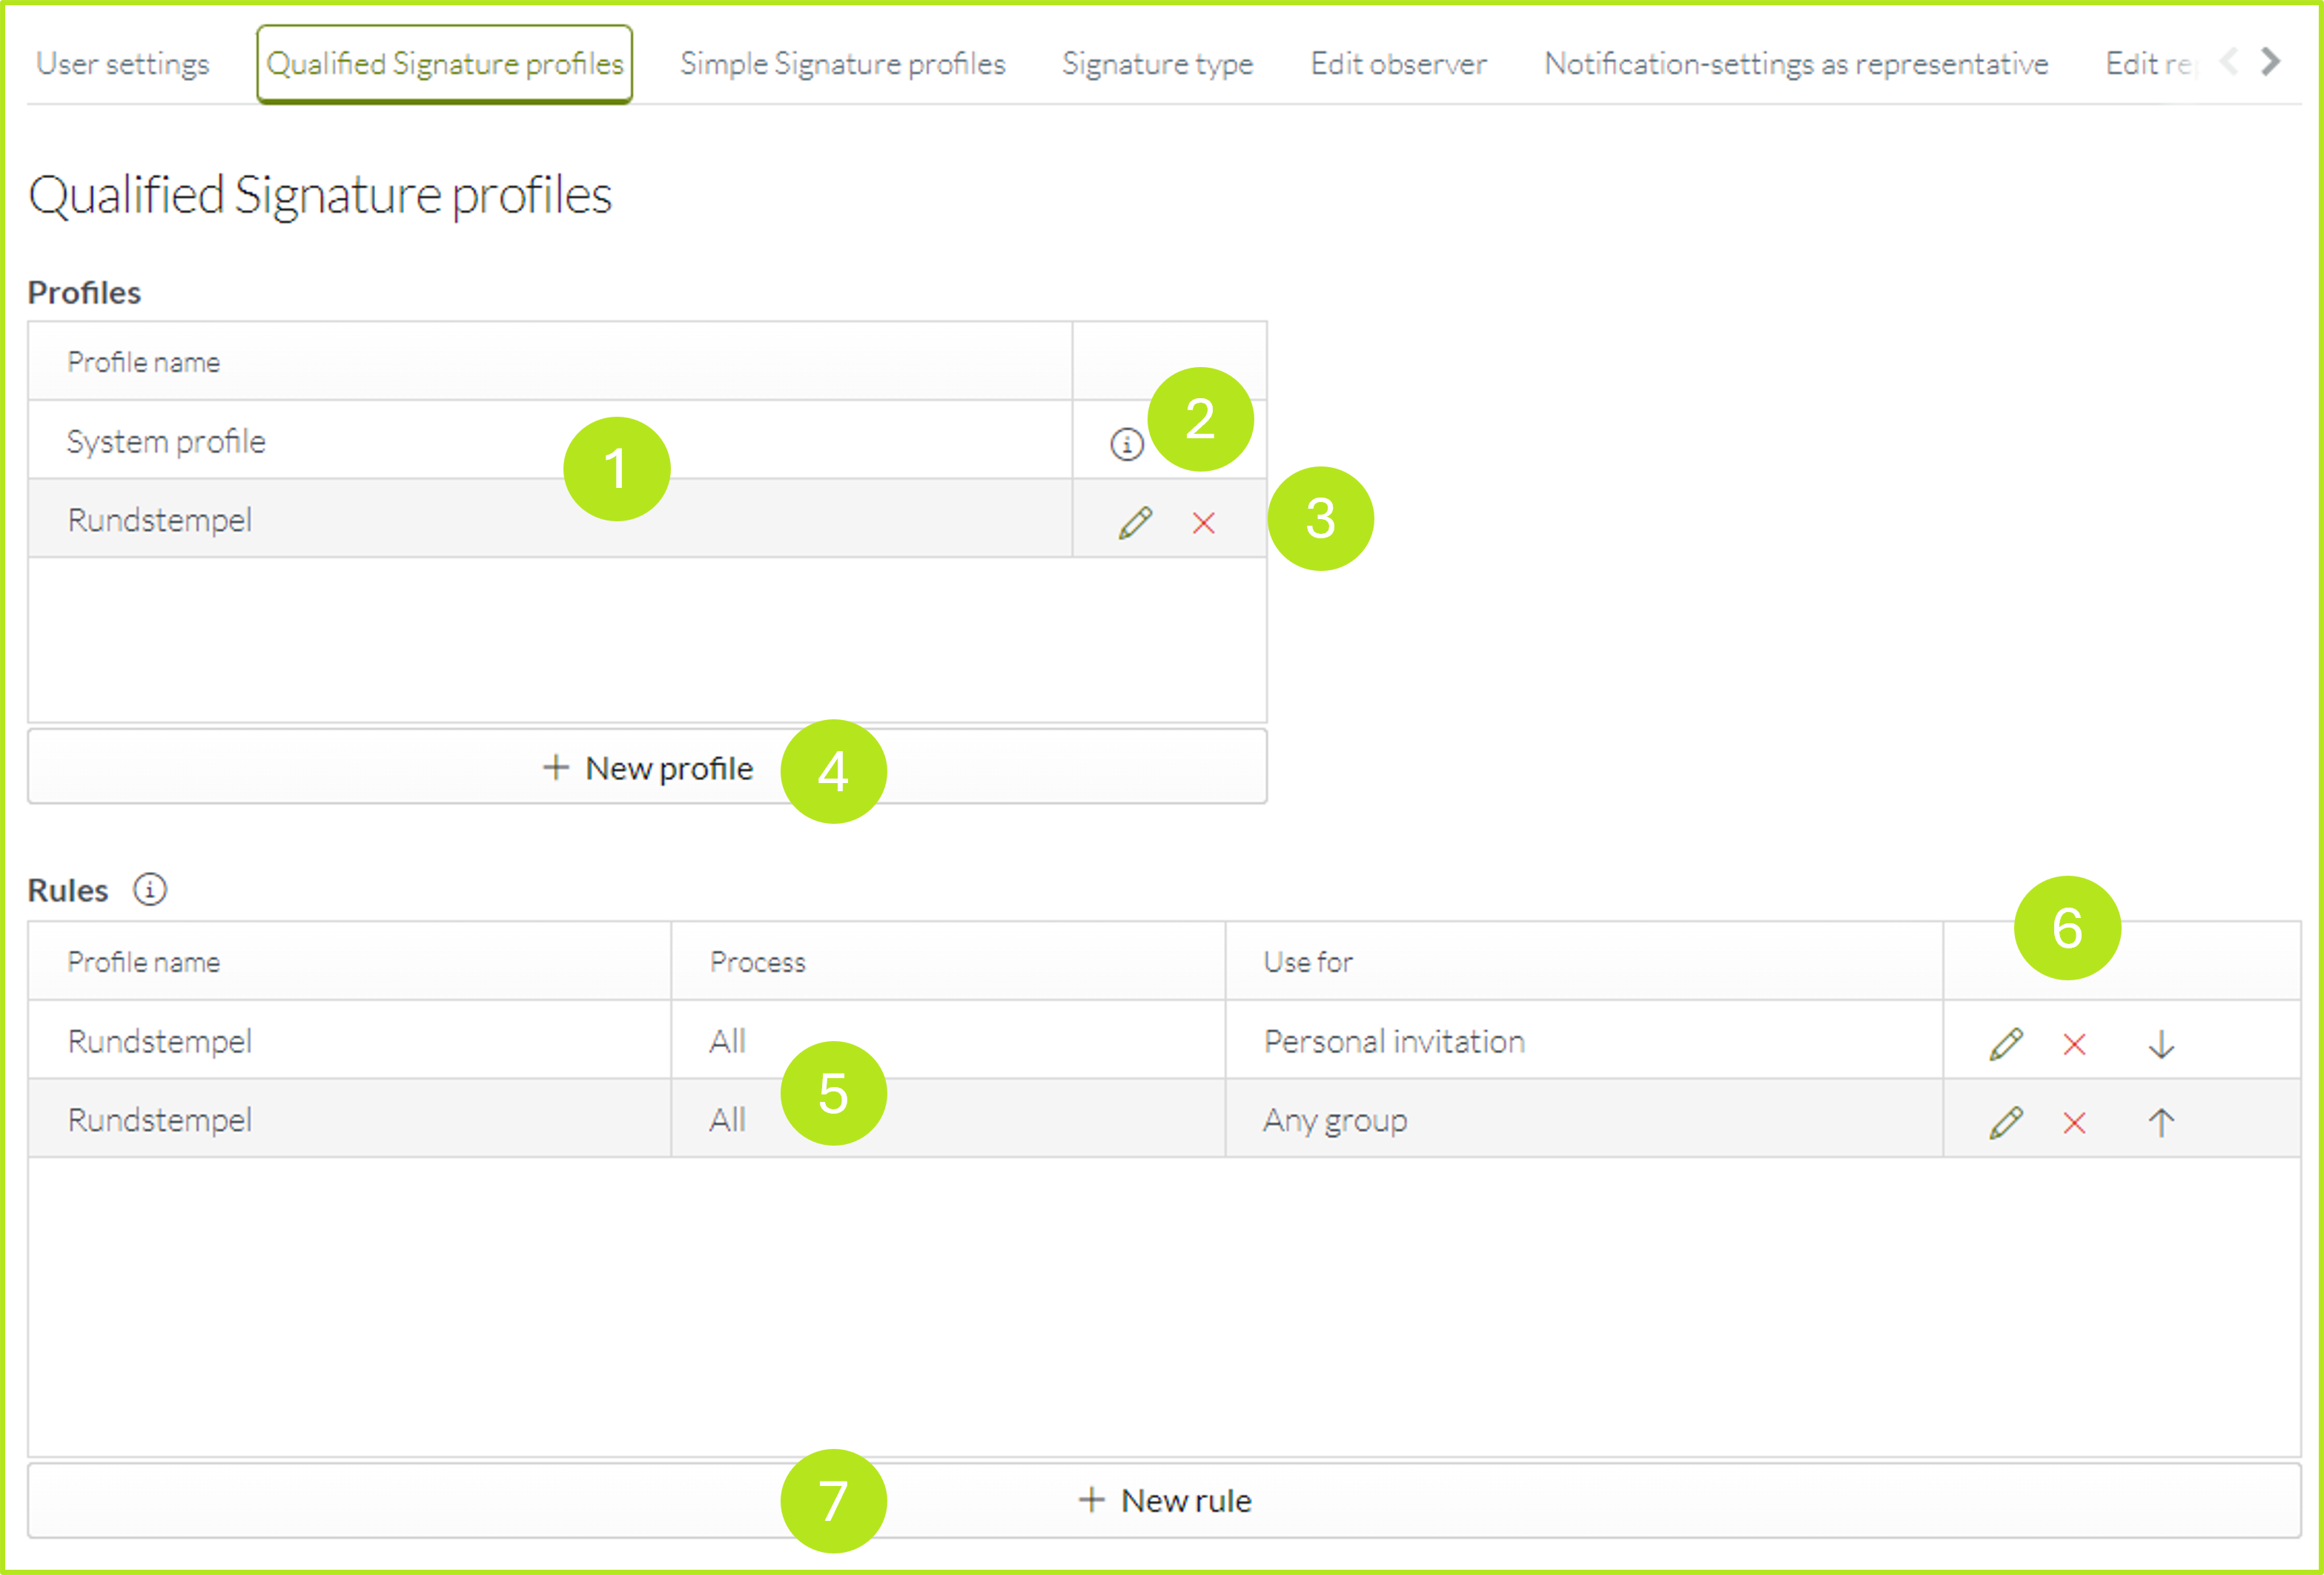
Figure 3: Overview and editing options for profiles for qualified signatures
1.2.1.1 Creating and editing profiles
Click on the pen icon (see figure 3 [3]) to edit the profile, or click on the x to delete it. Click on the [+ New profile] button to create a new profile. For more information on how to create and edit a signature profile, please refer to chapter 1.1.3.1 Modifying the default signature profile here.
1.2.1.1 Creating and Editing Rules
You can define rules for using your personal profiles under Rules (see figure 3 [5]). Please note that at least one rule must be available for a personal profile to be used. If no rule is defined, the system profile of the instance (see figure 3 [2]) is used.
You can modify rules by clicking on the pencil icon. You can delete a rule by clicking on the x. You can sort the rules by importance by moving the arrows (see figure 3 [6]). To create a new rule, click on the [+ Create new rule] button (see figure 3 [7]).
A dialogue box will then appear in which you can define the new rule (see figure 4). The dialogue box also opens when you want to edit a rule
In this window, define a profile that you assign to a process. You can then also define whether a personal invitation should be sent. If you have configured groups, you can also assign them to the profile. Click the [Save]-button to save your settings.
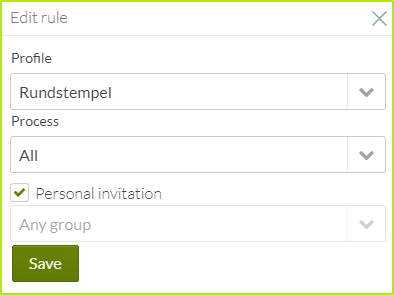
Figure 4: Configure or edit rule
1.1.3 Profiles for Simple Signatures
Simple signatures are processed in the same way as qualified signatures (see previous chapter). From here, chapter 1.1.3.1 Making Changes to the Signature Standard Profile you can also find out how to create and edit a signature profile.
1.1.4 Signature Type
If you have created a digital identity via A-Trust, D-Trust or Swisscom, you have to enter your login data every time you execute a signature. To reduce this effort, the MOXIS Business Cloud allows you to define a signature type in advance.
Please note: The number of signature types available to you depends on the configuration of your instance.
In the signature type menu, you can select your preferred trust centre (signature provider) from the drop-down menu (see figure 5 [1]). This is because if several signature types are active, you can specify which provider should be used by default for the signature. There is also a separate tab for each provider to configure the signature types (see figure 5 [2]). Currently (as of 01/2025), the following providers can be registered:
A-Trust (ID Austria)
D-Trust (signme)
Swisscom
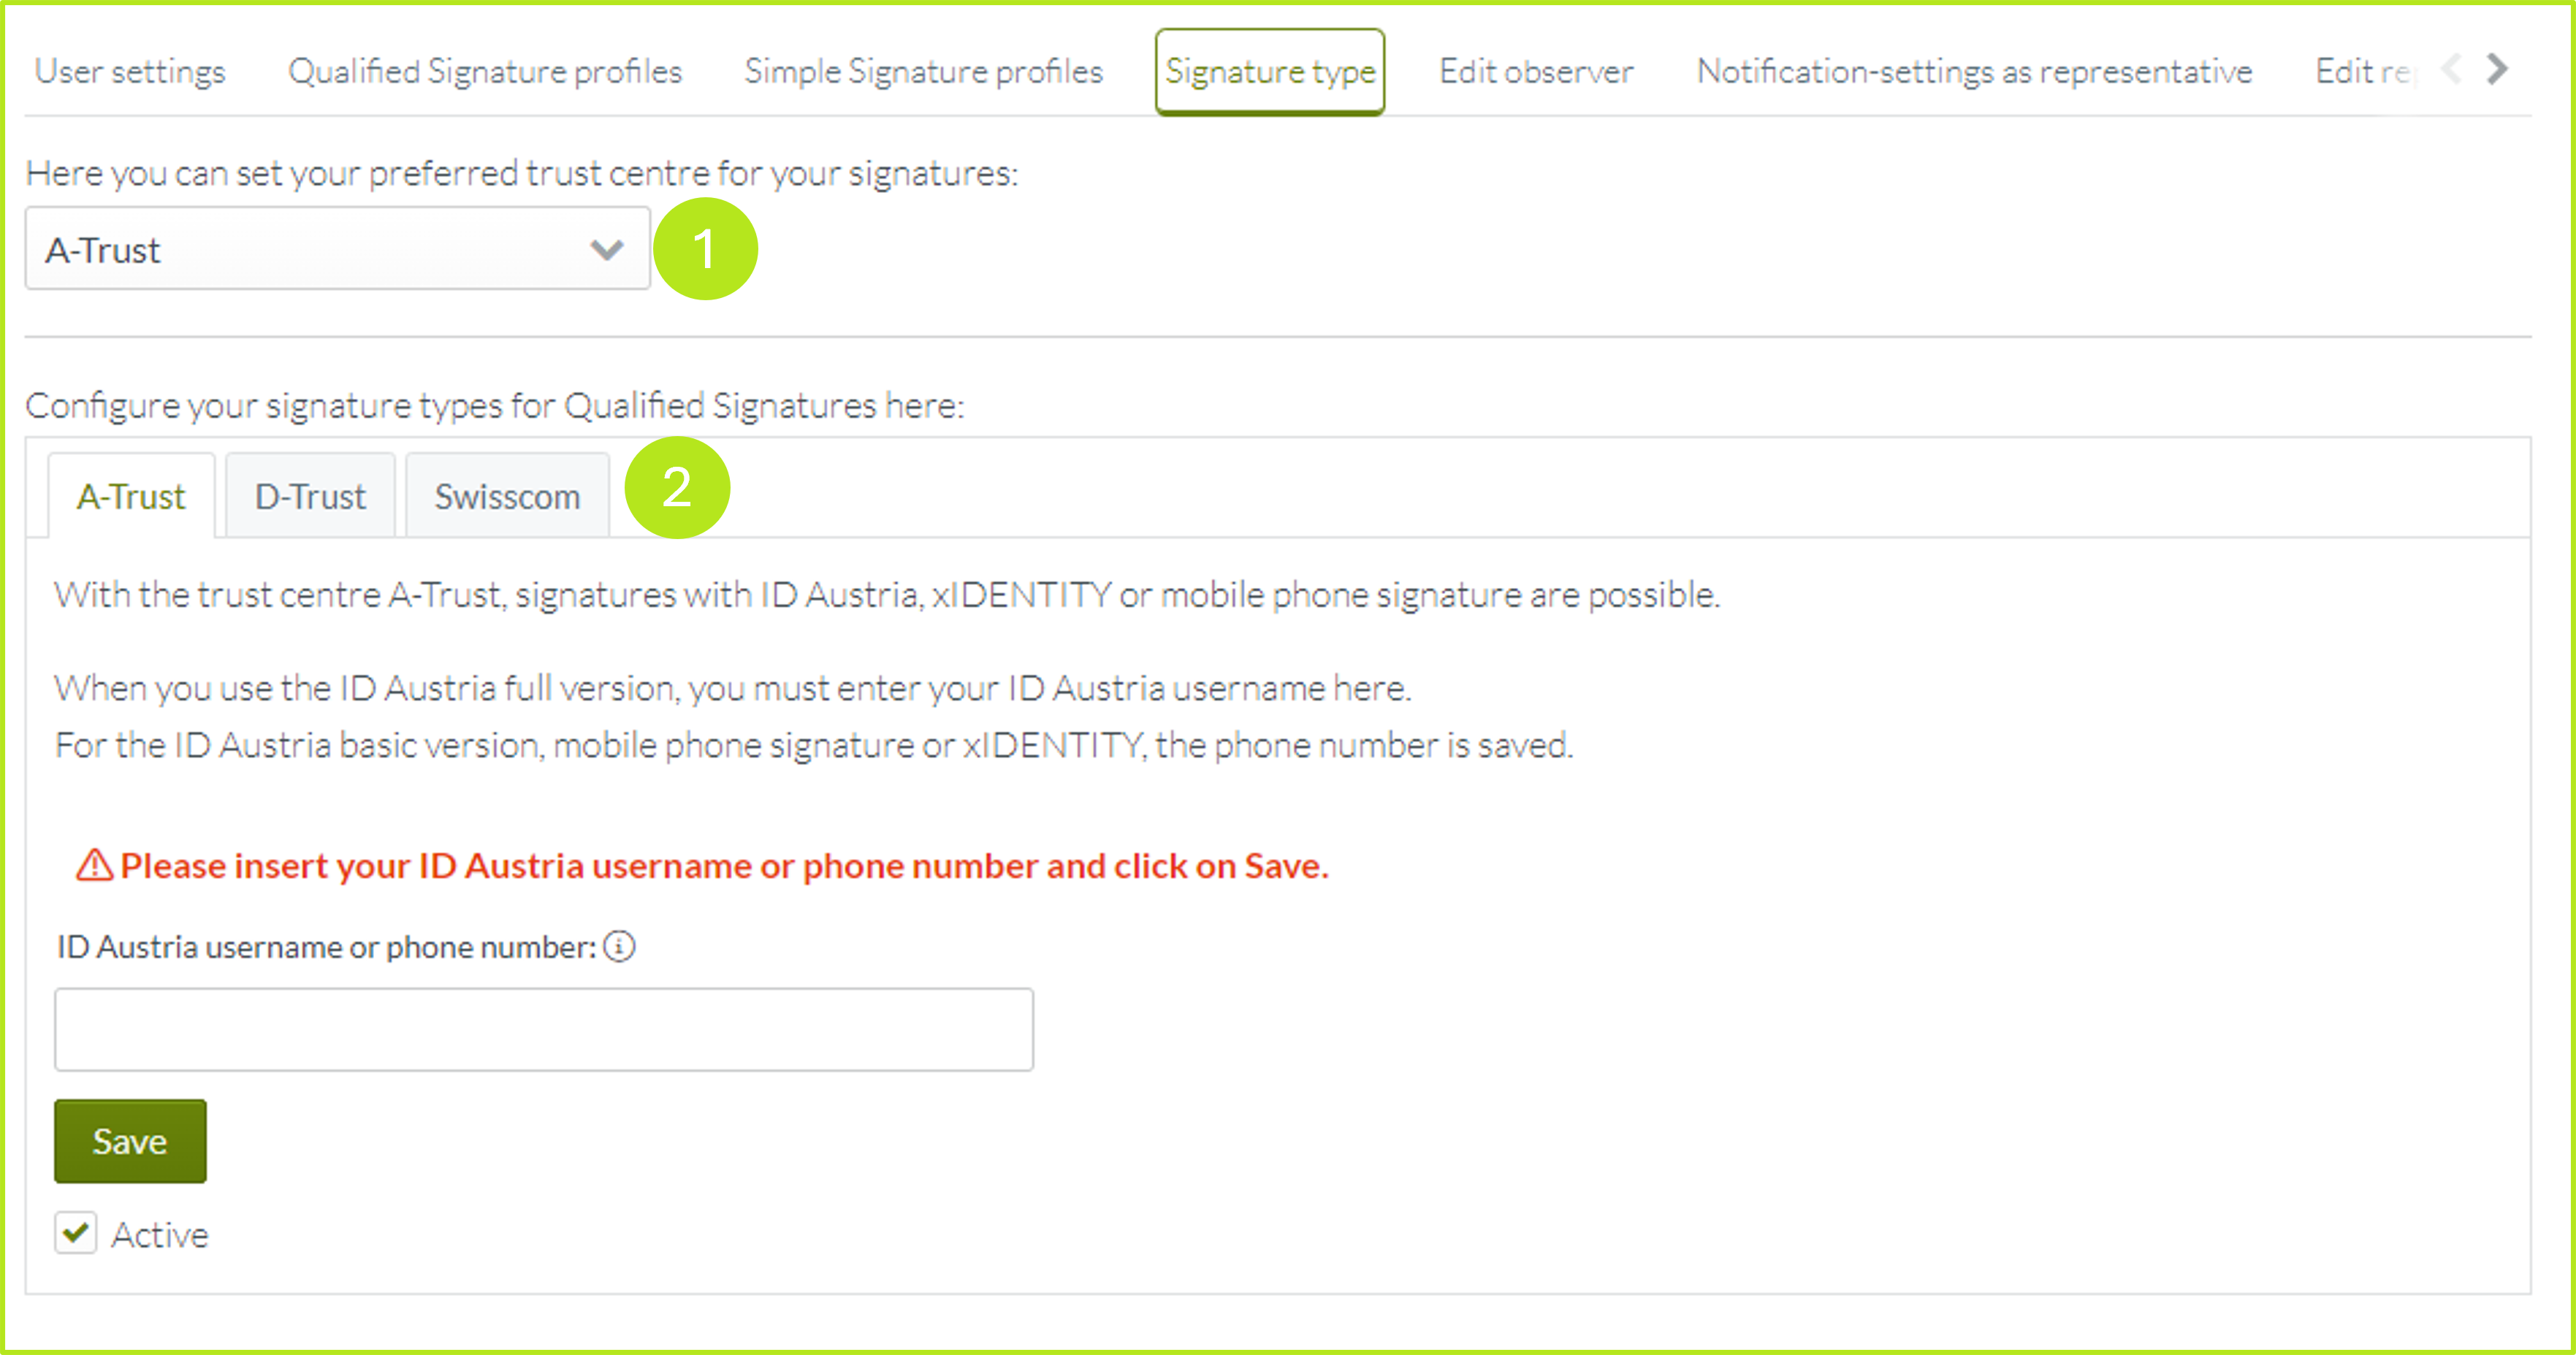
Figure 5: Setting up signature types in the MOXIS Business Cloud admin area
1.1.4.1 Setting up the A-Trust signature type
In the A-Trust tab (see figure 6 [1]), you can save the user name or telephone number for signature types according to A-Trust. With A-Trust, signatures with the ID Austria, xIDENTITY or mobile phone signature are possible
If you are using the ID Austria full version, you have to enter your ID Austria username here. For all other versions, you can alternatively enter a phone number in the ID Austria username or phone number field (see figure 6 [2]).
To complete the process, tick the Active-checkbox (see figure 6 [4]) and click the [Save]-button (see figure 6 [3]).
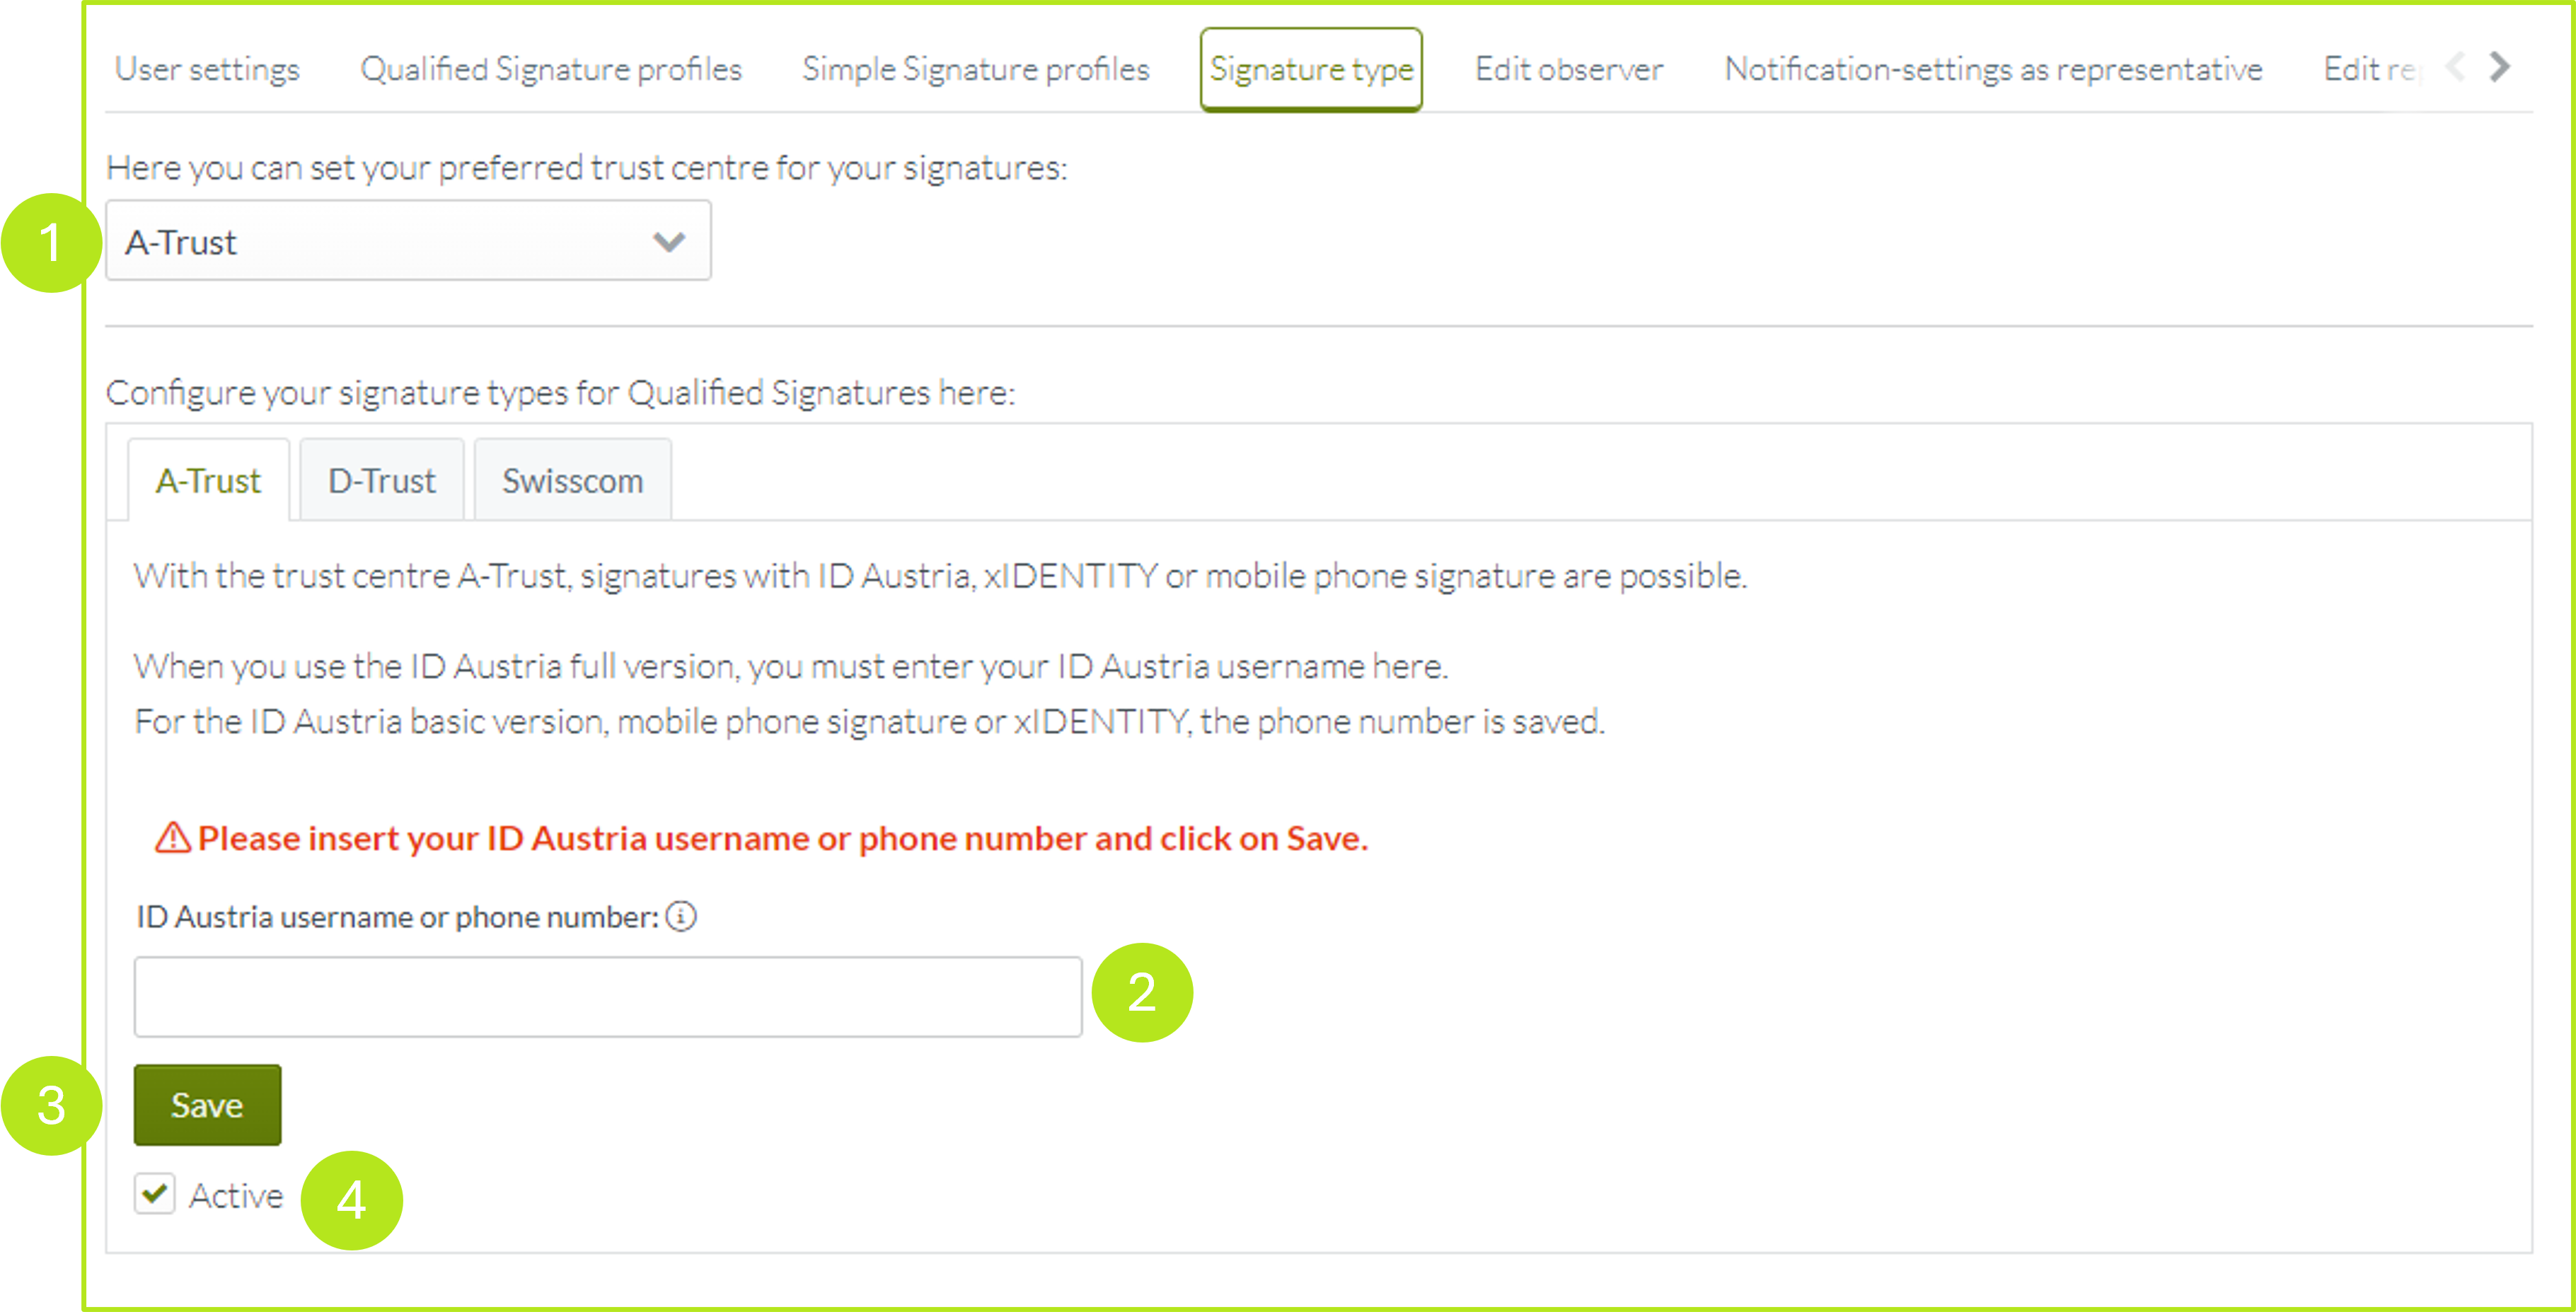
Figure 6: Setting up A-Trust as signature type
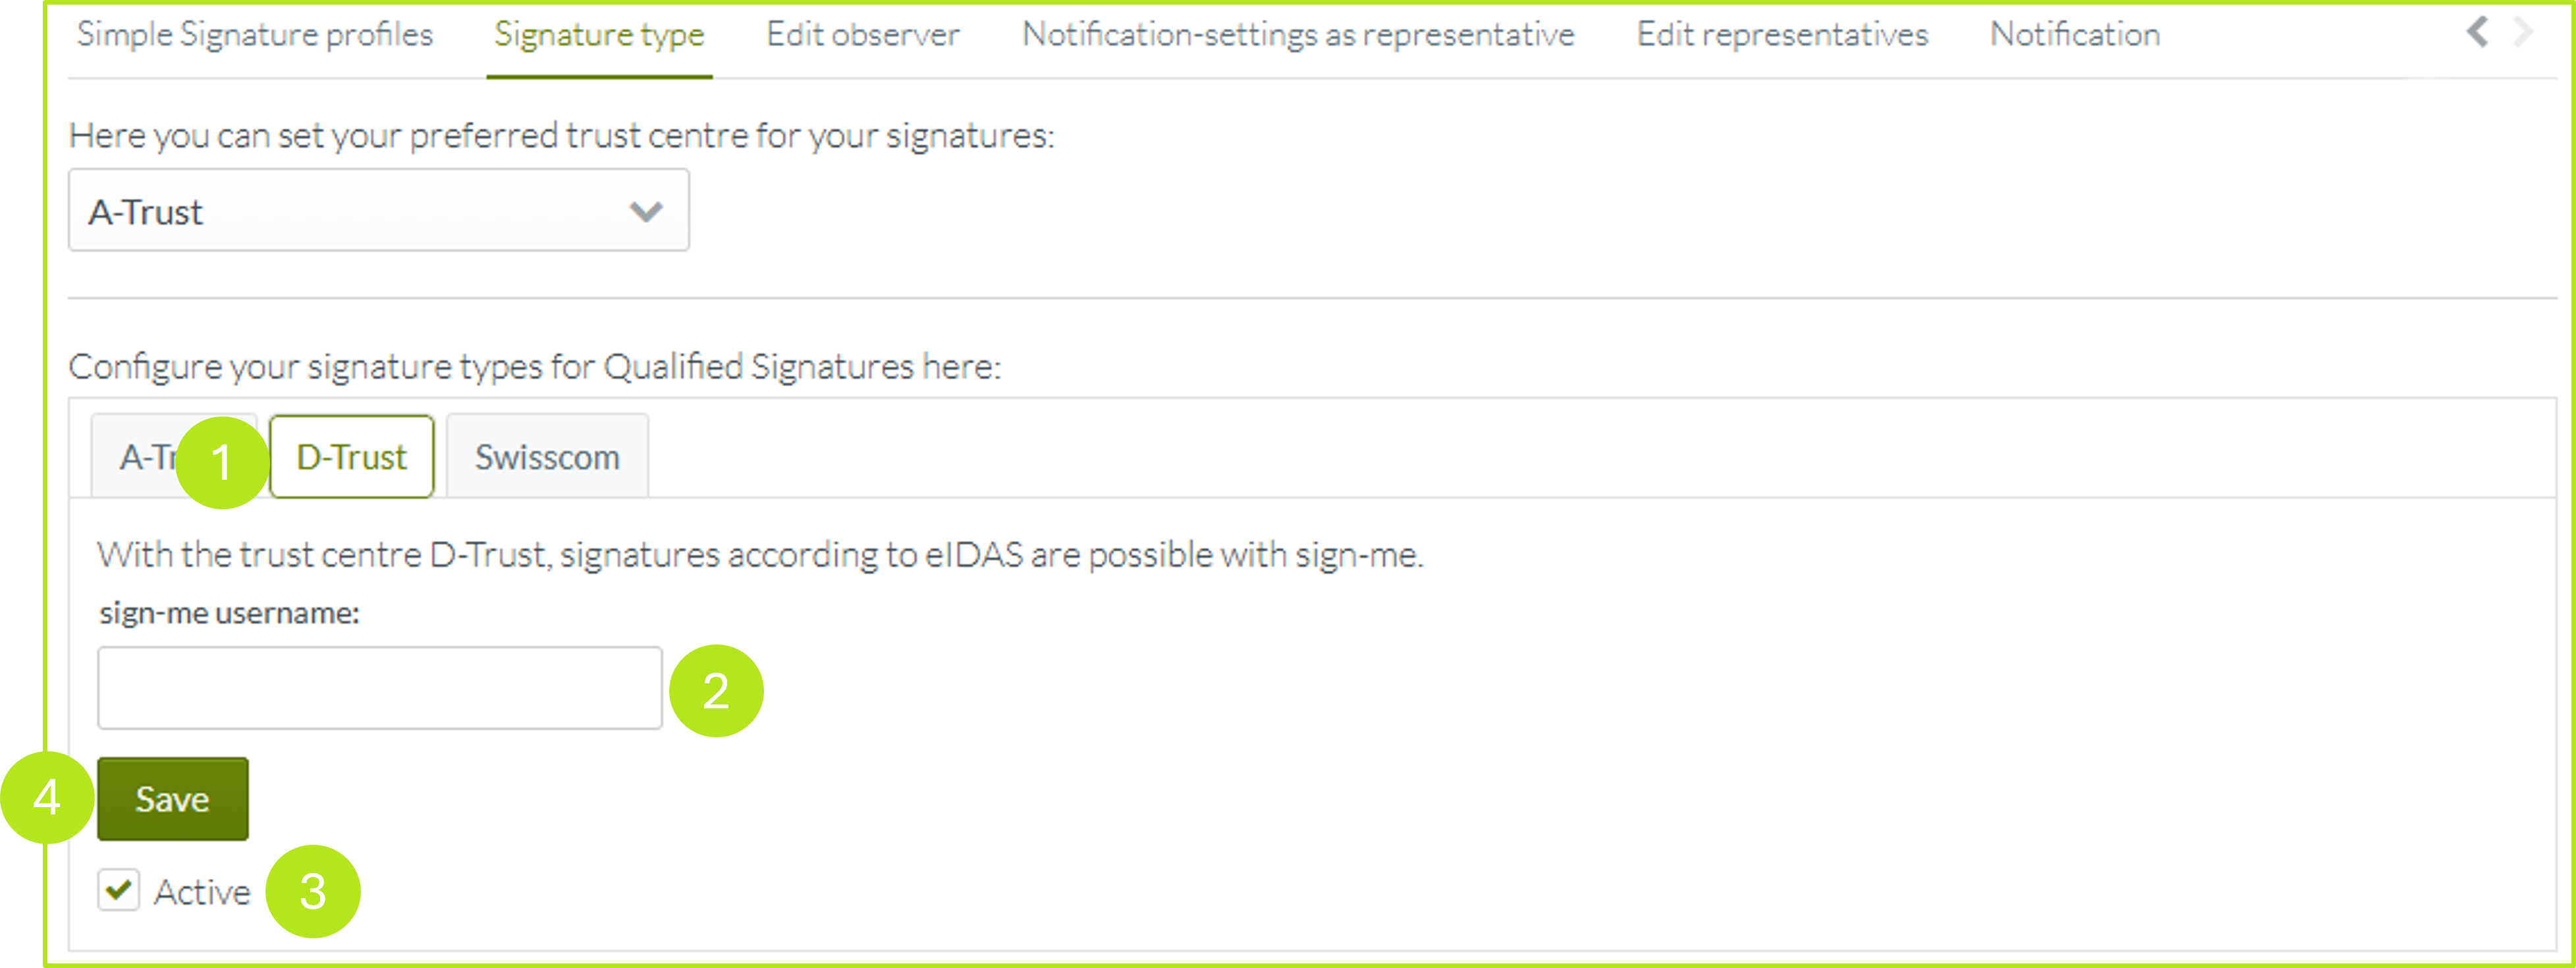
1.1.4.2 Setting up the D-Trust signature type
In the D-Trust tab (see figure 7 [1]), you can save the username for signature types according to D-Trust. With D-Trust, signatures are possible with sign-me.
Please enter your sign-me username here, tick the box next to Active (see figure 7 [3]) and click on the [Save]-button (see figure 7 [4]).
1.1.4.3 Setting up the Swisscom signature type
In the Swisscom tab (see figure 8 [1]), you can save the telephone number for signature types according to Swisscom. To save your data, please enter your telephone number in the mandatory field.
After entering the data, it is necessary to check it. Therefore, please click on the [Verify and Save]-button (see figure 8 [2]). If the data is correct, you will receive the message Verified. If the data is not correct, the entry will change to Not verified. Finally, you can specify the jurisdiction for which the Swisscom signature is used (EU/Switzerland). To do this, simply tick the appropriate box for ZertES (Switzerland), eIDAS (EU) or both (see figure 8 [3]).
Please note: Clicking the [Remove]-button will delete the entry. The data is already saved with the verification process.
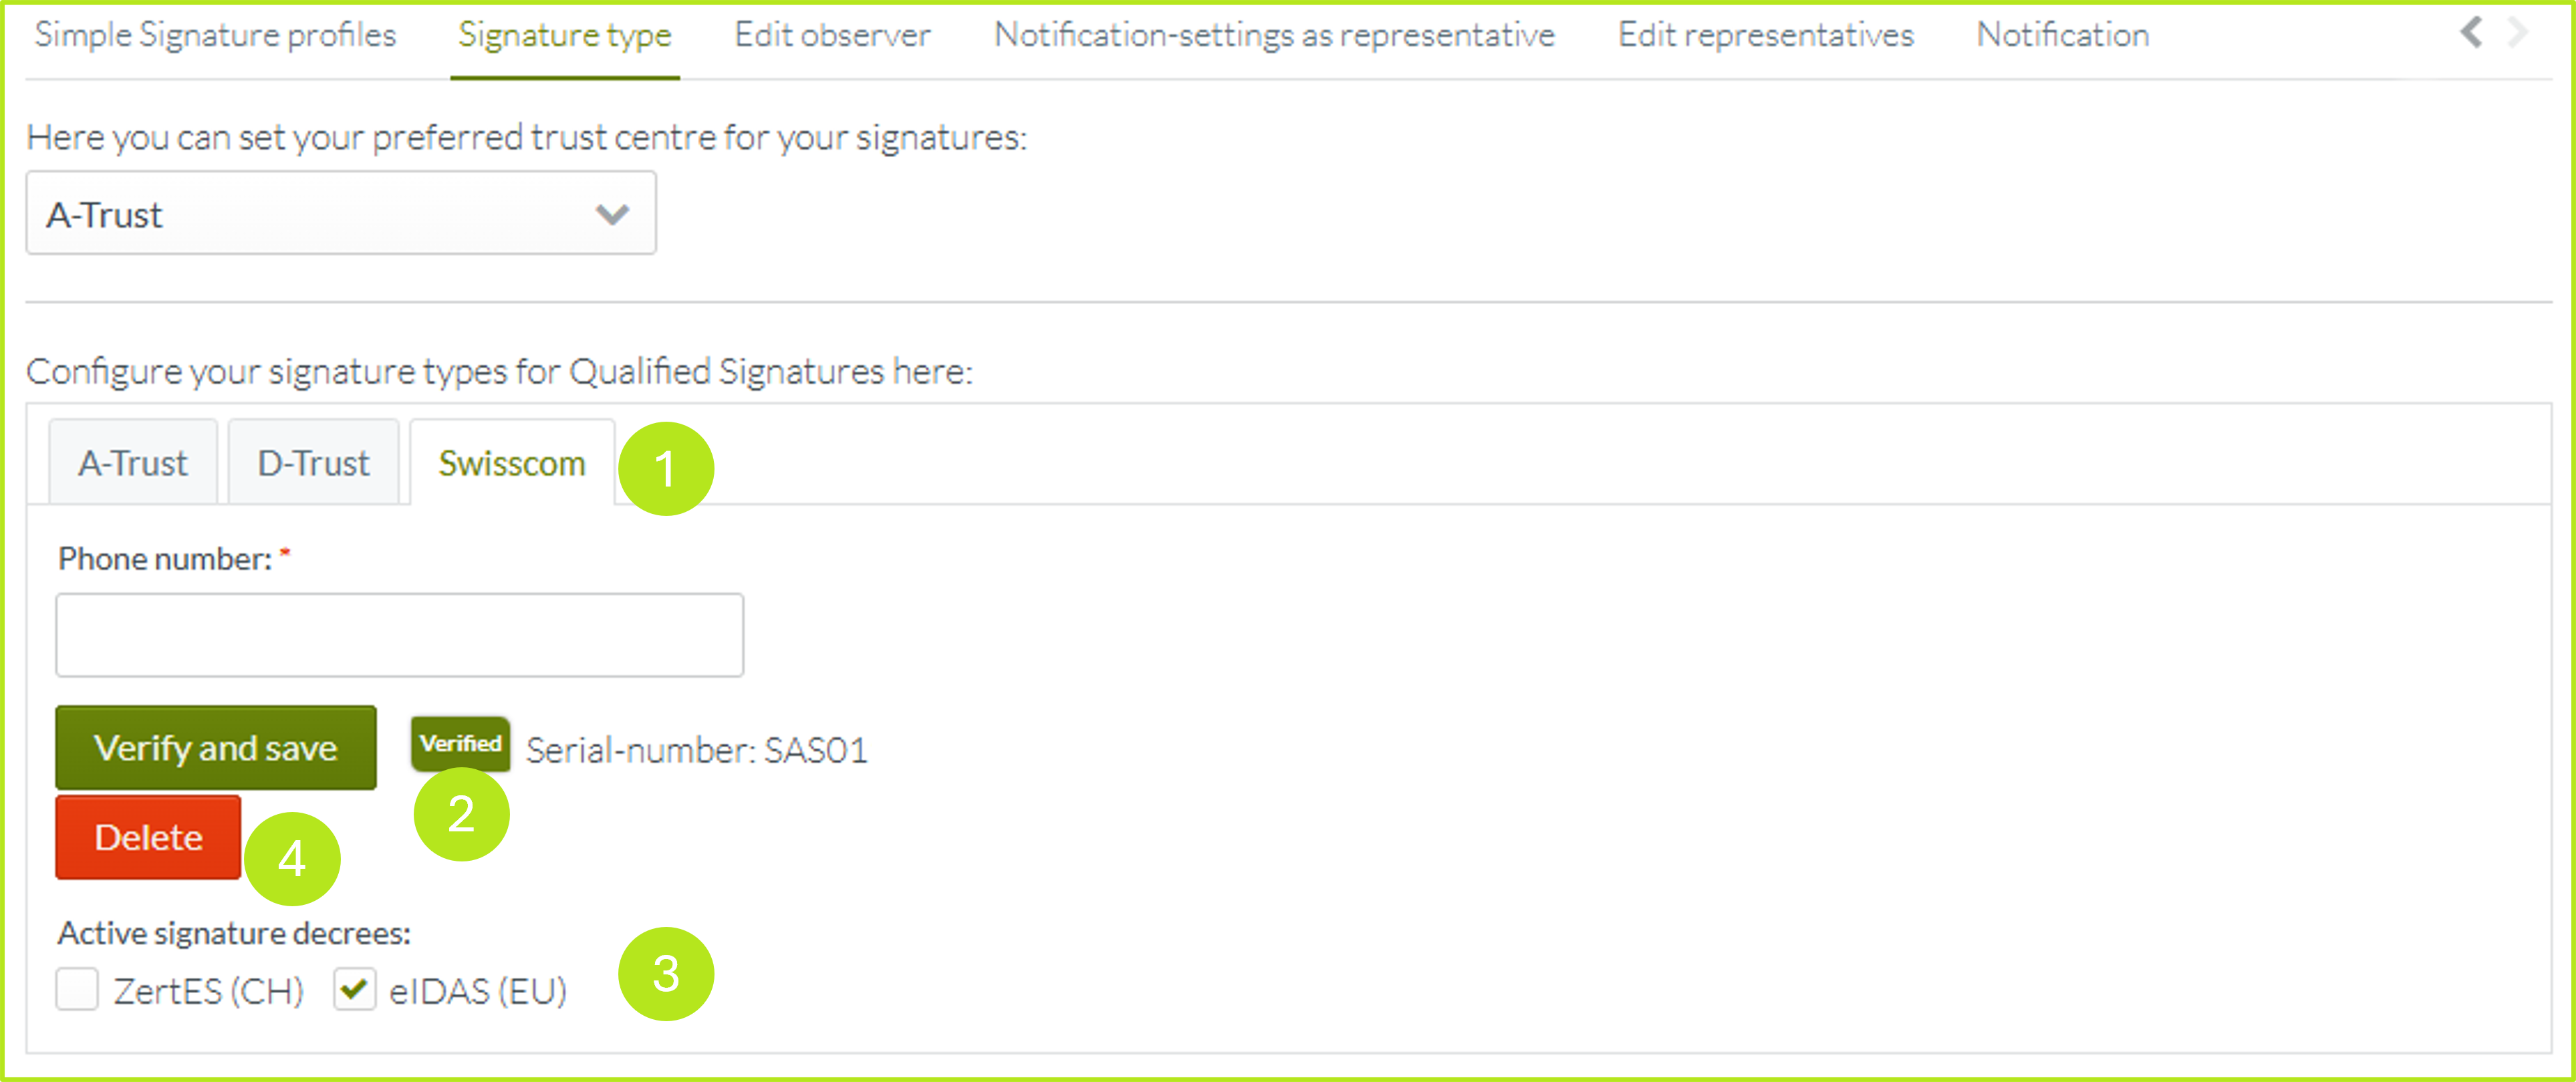
Figure 8: Set up Swisscom as signature type
1.1.5 Edit observers
Under this item, you can grant other users access to signature or approval processes.
Please note: Users do not have any access permissions to the processes they can see – they only have reading permissions.
To configure users to view your folder, simply click on the [+ Add observer]-button (see figure 9).
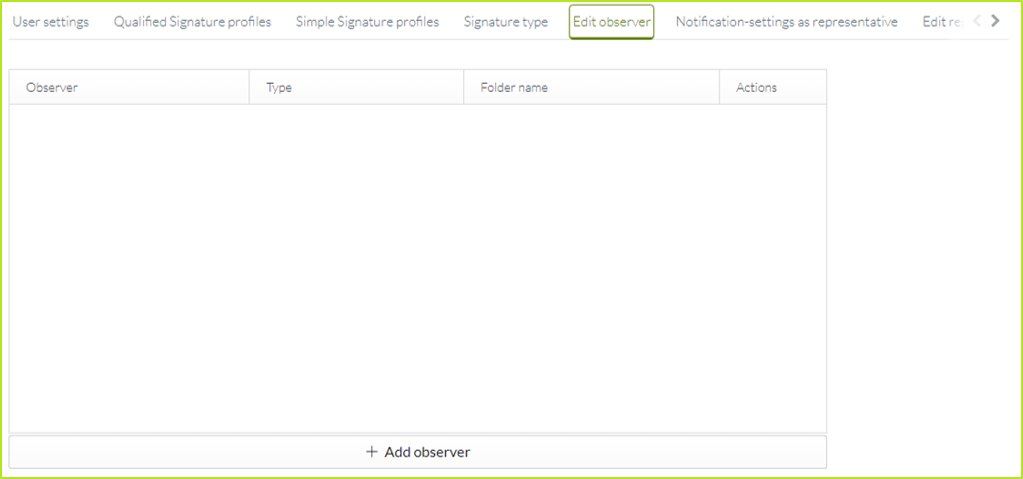
Figure 9: Add observer
A mask will then open in which you can configure the following data (see figure 10):
Type: Choose between your personal signature folder or release folder, or select both.
Name of folder: The folder is displayed to the observer under this name.
Viewer: You grant this person access to your folder. If you enter the first few letters of the name, the corresponding user will be displayed.
Please note: Each of these fields is a mandatory field. Click on the [Save]-button to save your changes.
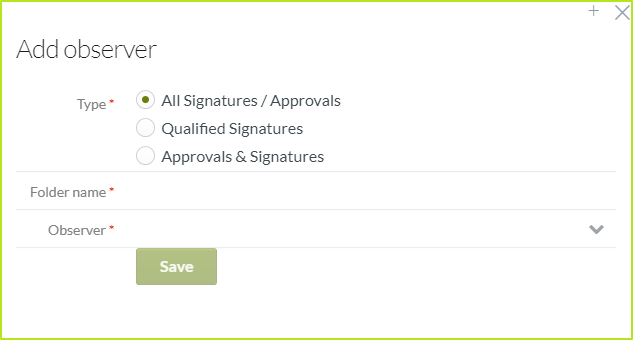
Figure 10: Configure data for the observer and save
Once you have created an observer, they will be displayed in the overview and you can edit the user (see figure 11 [1]). To edit an observer, click on the pen icon in the inspector edit overview. To delete them, click on the x icon.
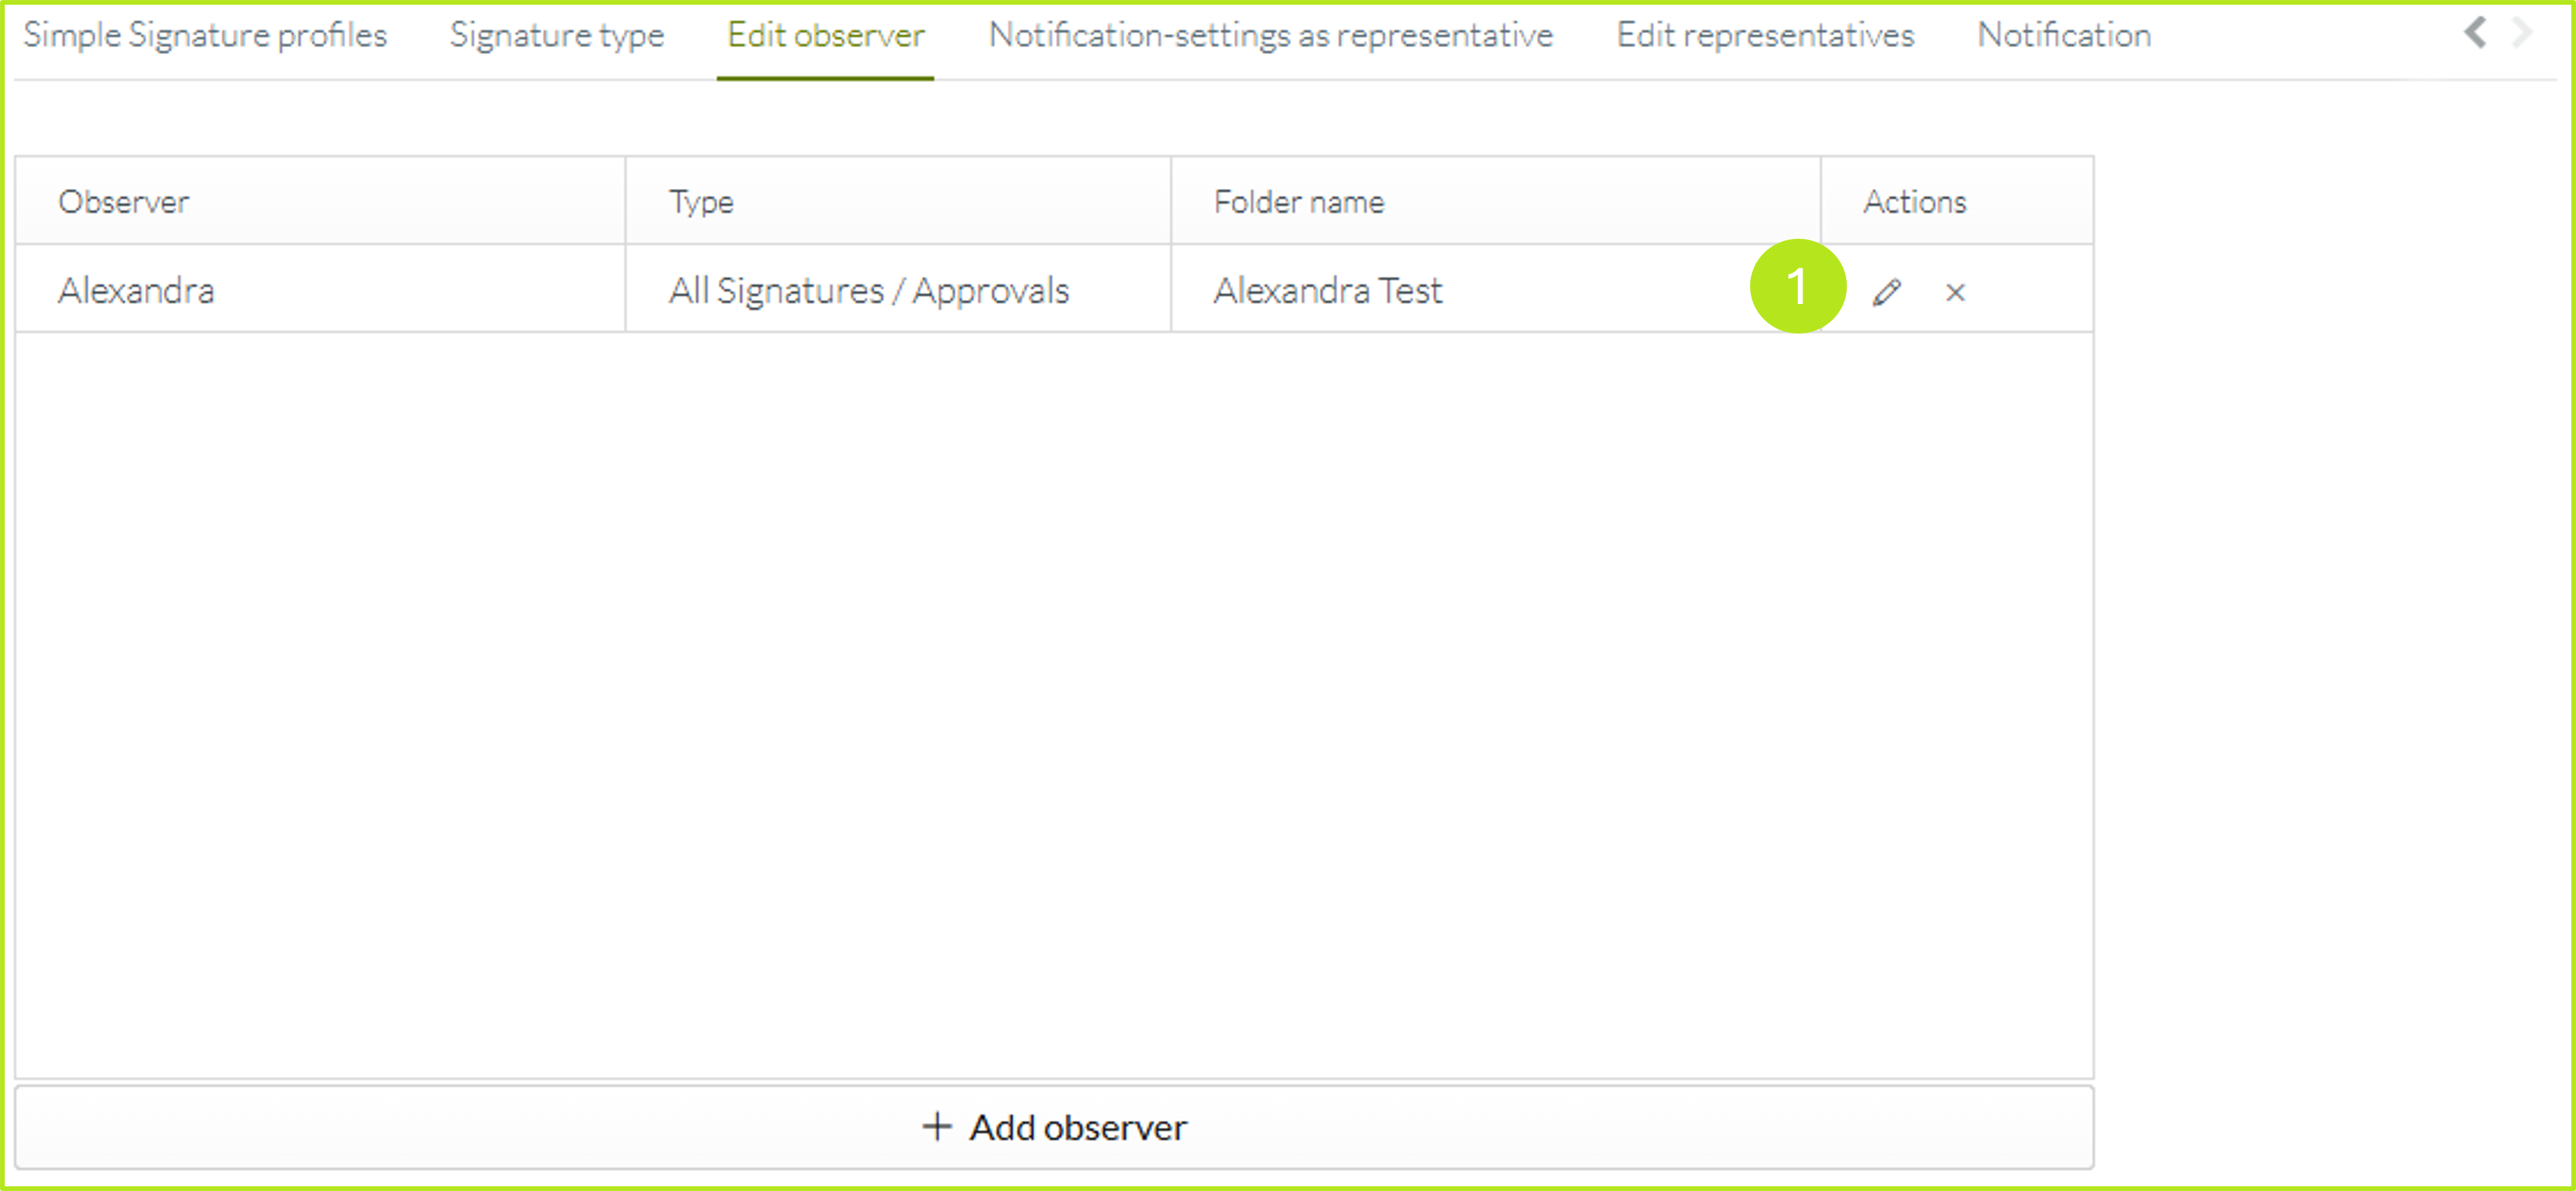
Figure 11: Edit observer
1.1.6 Notifications for the representation
In this window, you can configure notifications if you are registered as a representation for another MOXIS Business Cloud instance. You will then receive the notifications by email.
1.1.7 Manage substitution
In this tab, you can create and edit a substitution. For more information, see this article [Business & Now Cloud] Setting up representation.
1.1.8 Notifications
You can manage notifications via this tab.
1.1.8.1 Configuring process-dependent notifications
If you are authorised to use multiple processes, you must first select the process for which you want to define the settings (see figure 12 [1]).
Please note: The settings must be configured and saved individually for each process.
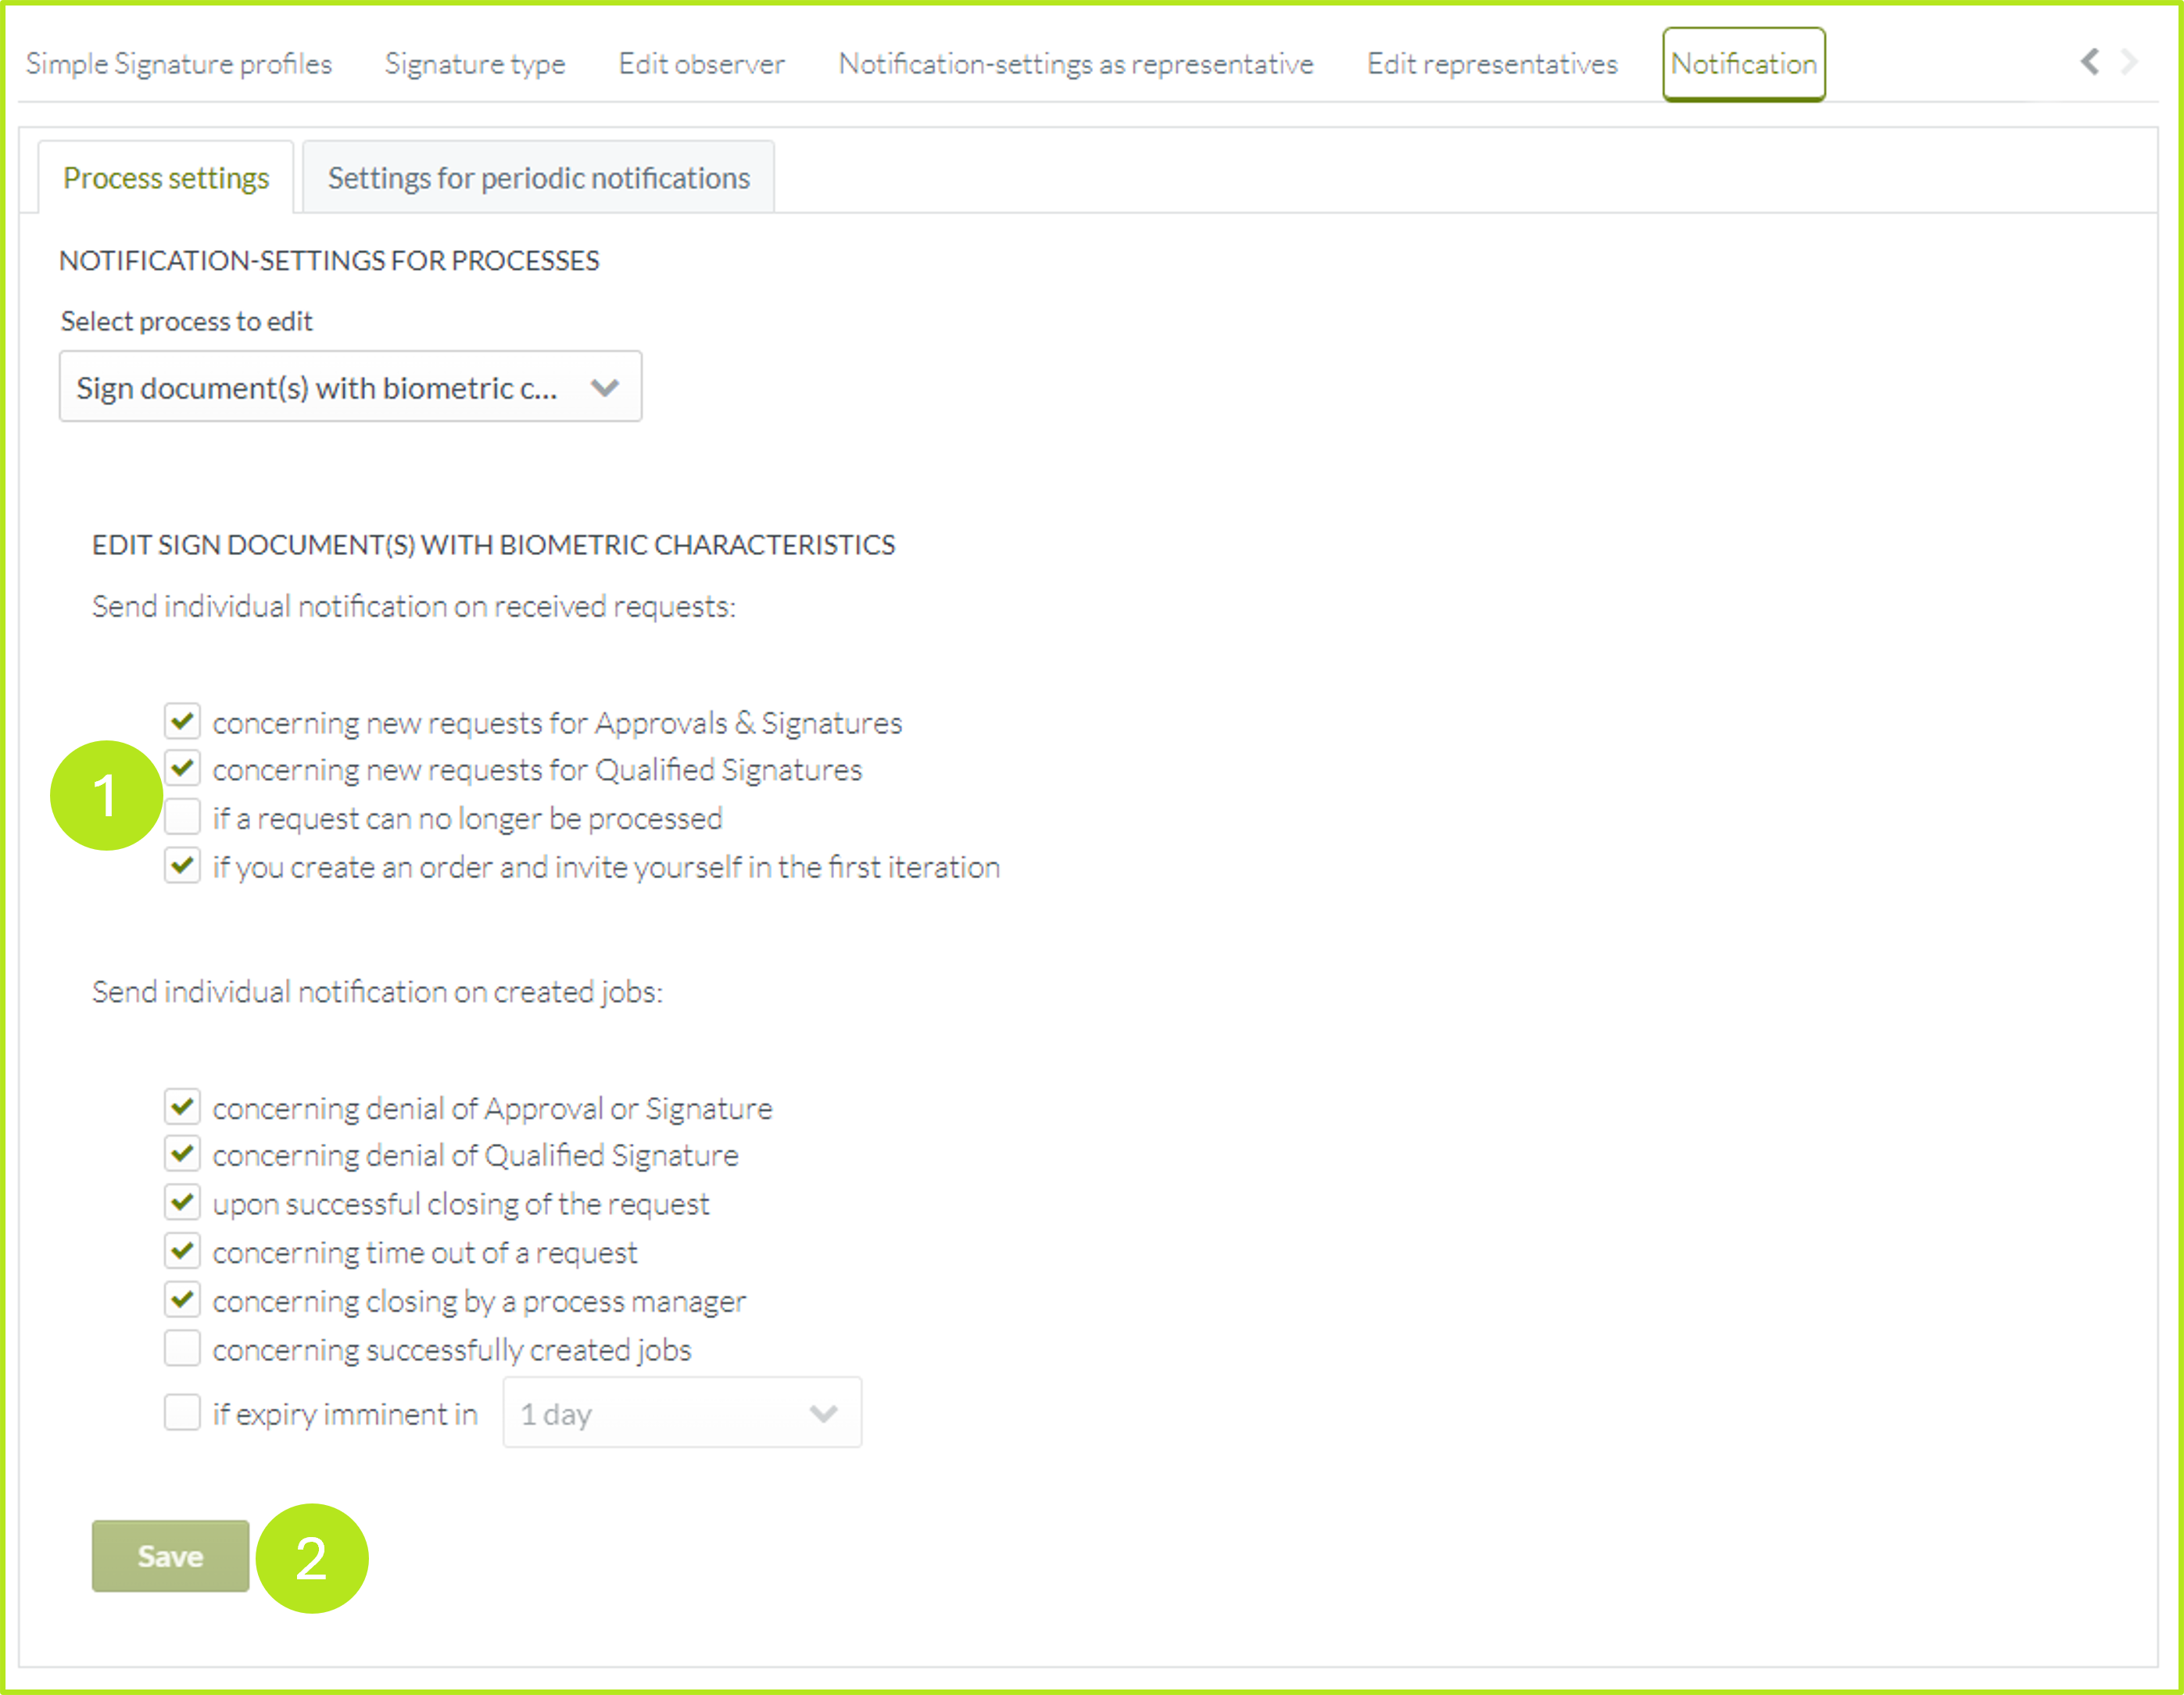
Figure 12: Select the process for editing in the process settings
For process-dependent notifications, e-mail notifications can be activated or deactivated for each process and process step by setting or removing the check mark (see figure 13 [1]). Click on the [Save]-button (see figure 13 [2]) to save the settings.
To edit a process, please open the drop-down menu (see figure 13 [1]) and select the process you want to edit. Then tick the boxes next to the permissions you want to apply to the process and click the [Save]-button as described above.
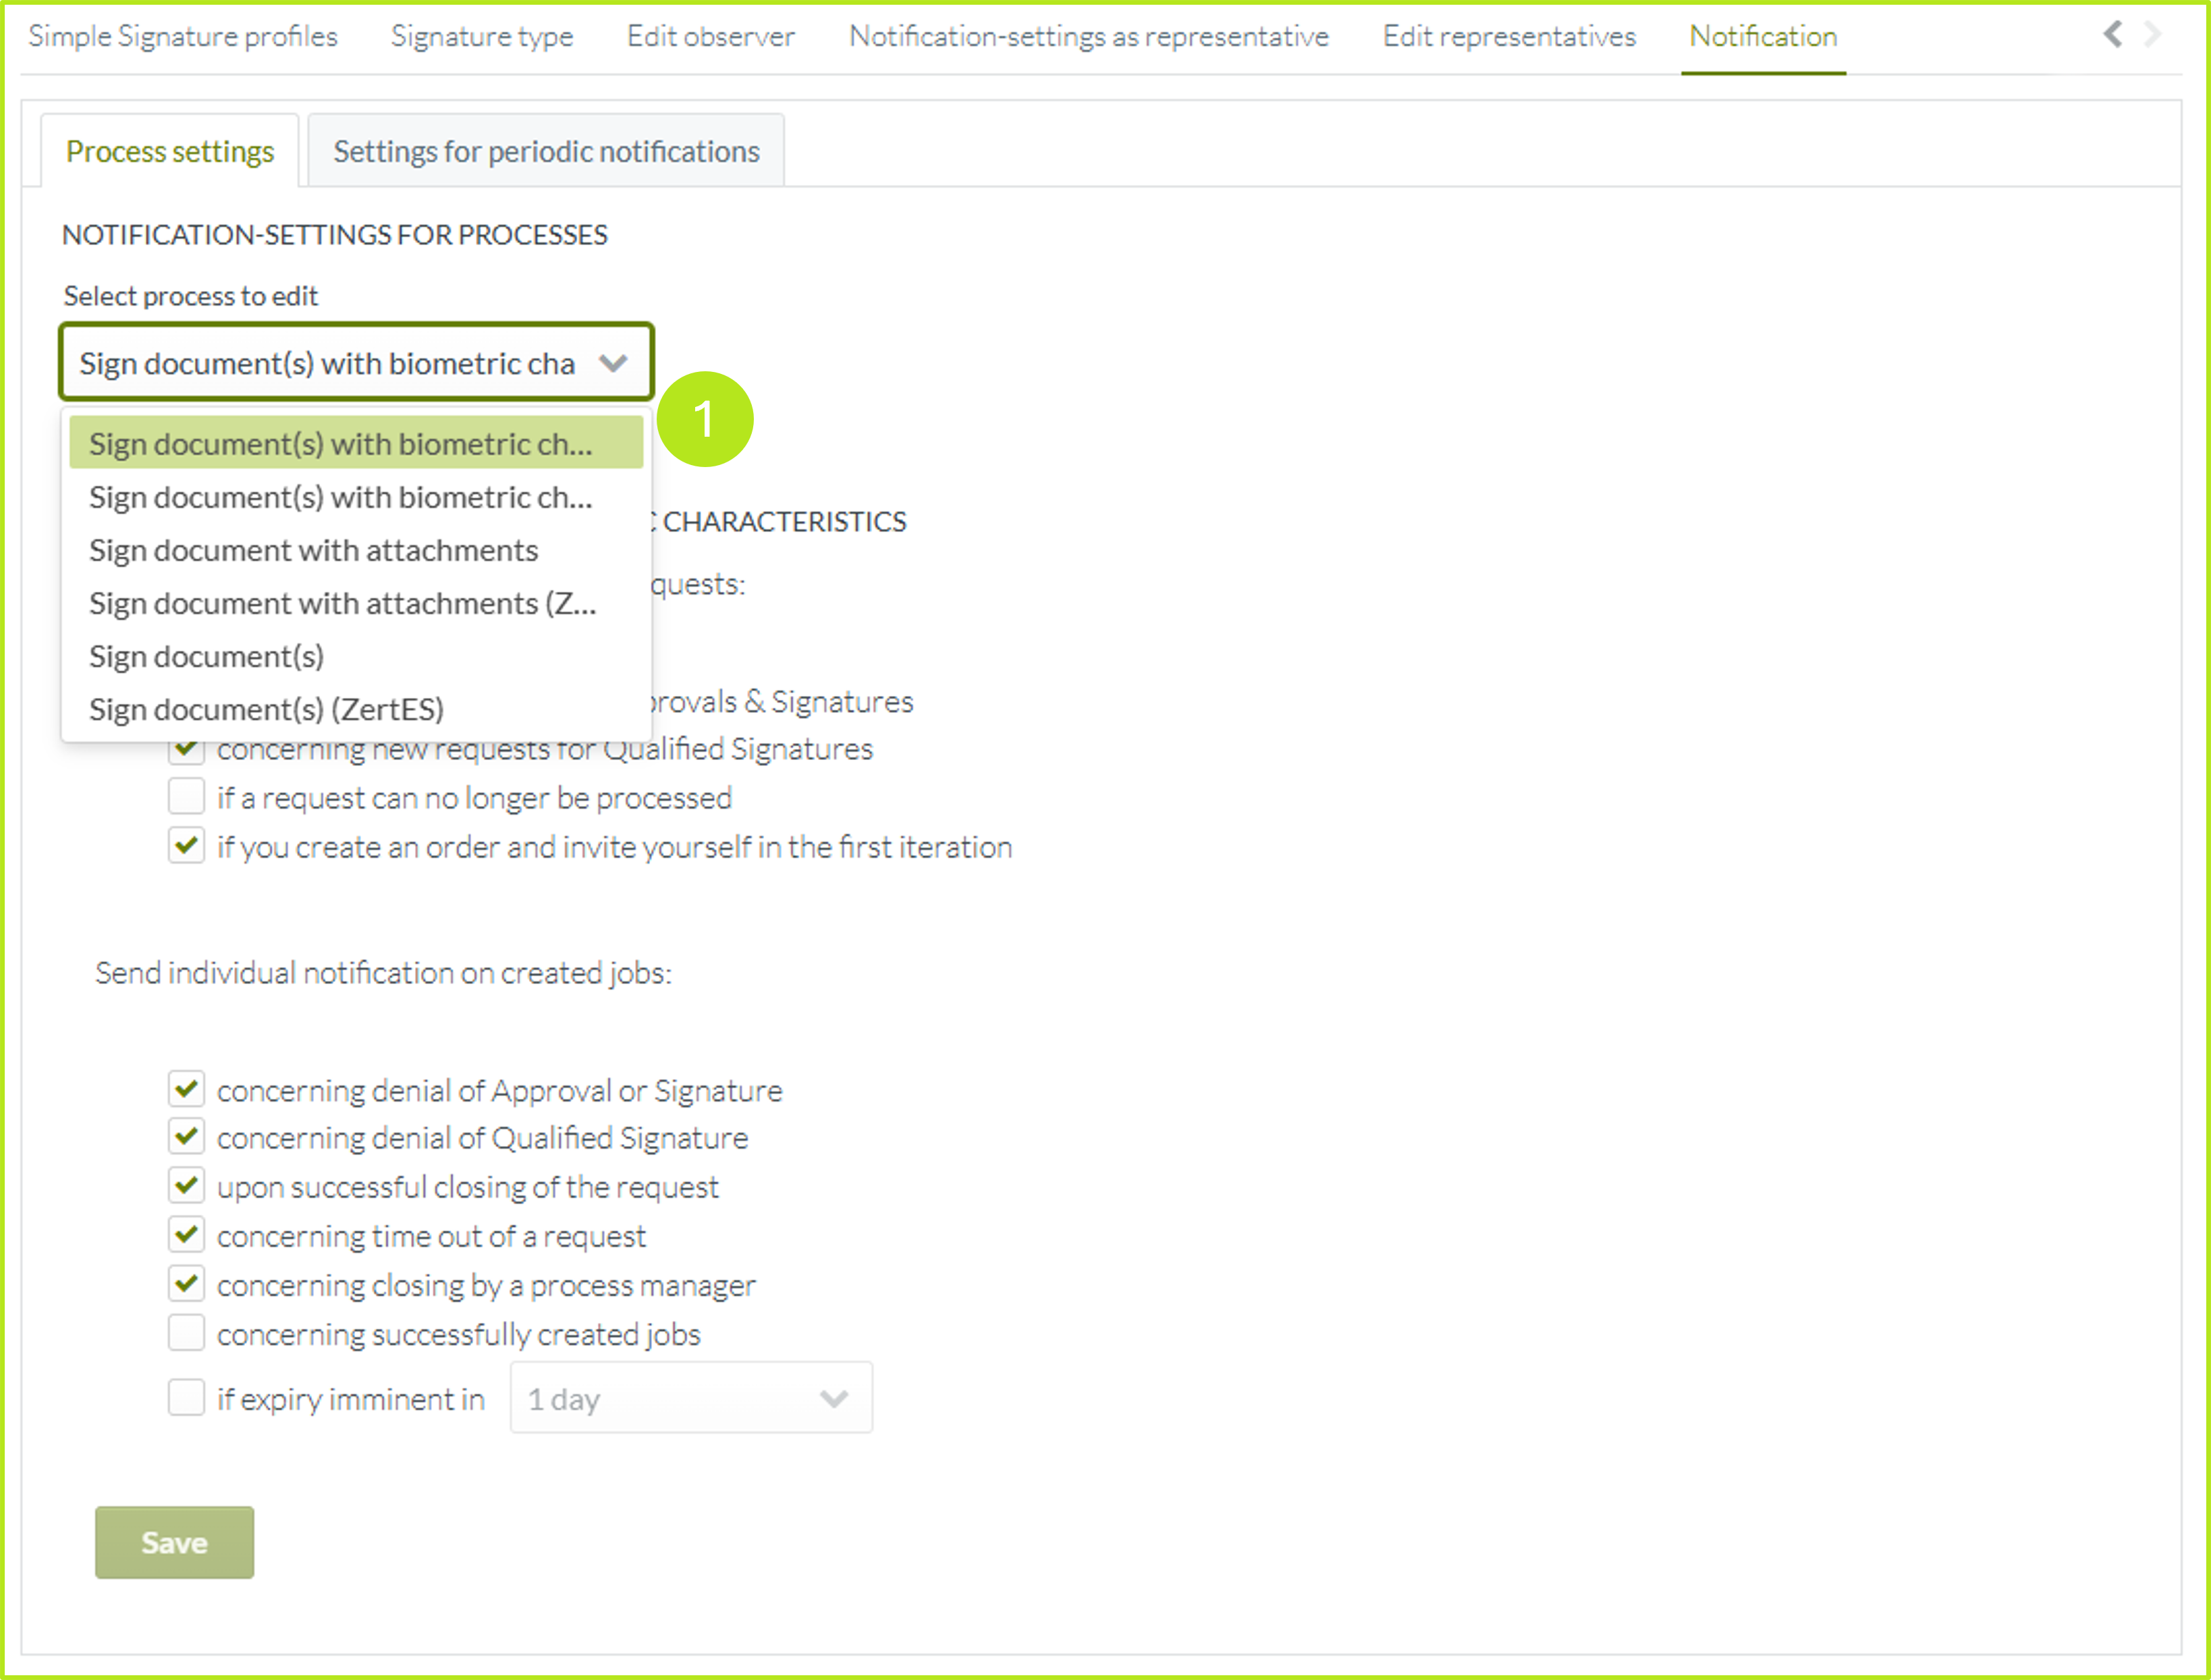
Figure 13: Activate or deactivate email notifications for each process and process step
1.1.8.2 Configuring regular notifications
Any number of notification periods can be stored for regular notifications. This results in a notification of all received orders (so-called collective notifications; see figure 14). To receive notifications, please tick the checkbox (see figure 14 [1]) To edit an existing point in time, click on the pencil icon (see figure 14 [2]) in the row of the corresponding entry or click on the x icon to delete the entry (see figure 14 [3]).
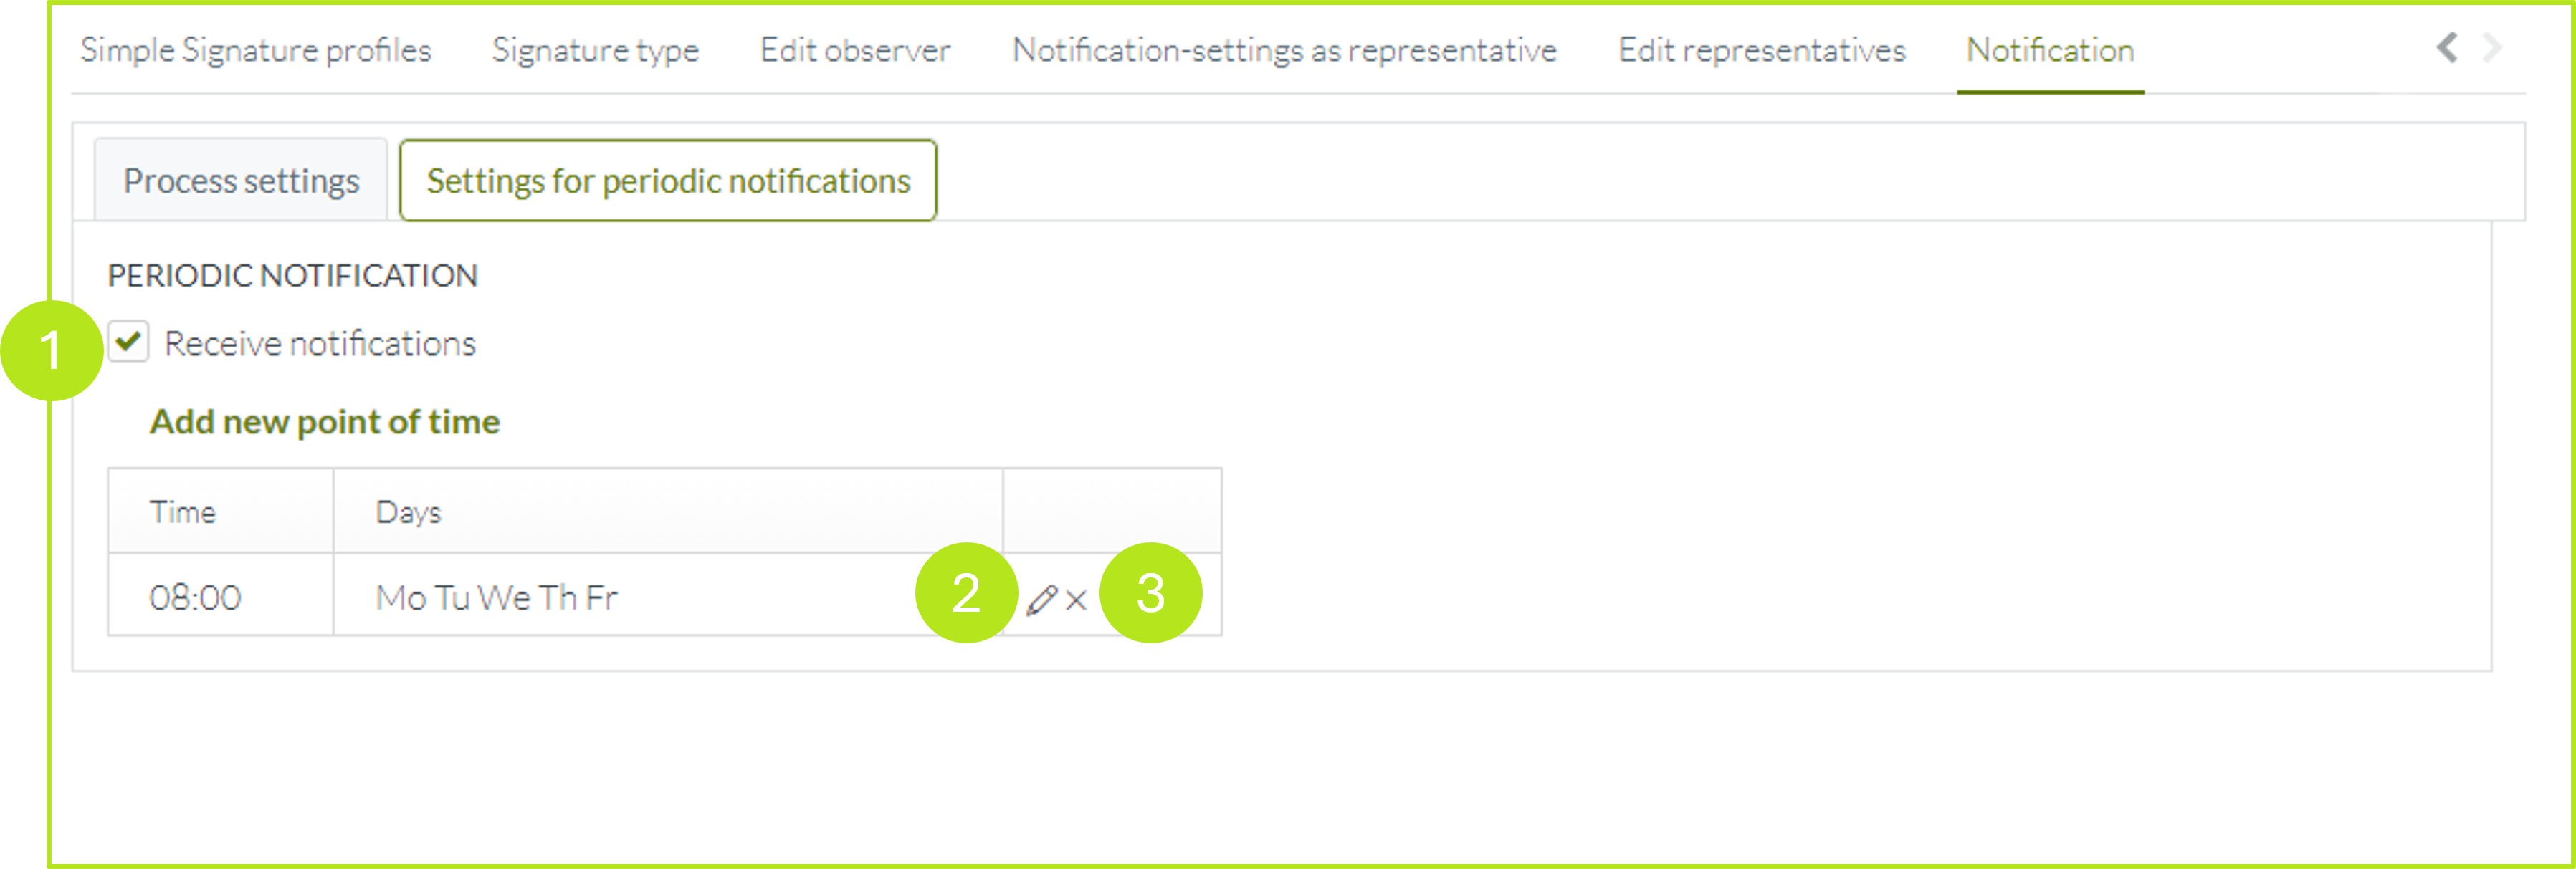
Figure 14: Manage regular notifications
In the window that now opens, you can select the days of the week on which you wish to receive notifications by placing a tick. It is also possible to select a specific time (see figure 15 [1]). Remember to click on the [Save]-button (see figure 15 [2]) to apply the changes.
Figure 15: Configuration of reguar notifications