
Prozess management: Hooks-tab
Content
Hooks are automatic post-processing steps in MOXIS. You can configure them in this tab of the process management.
1. Definition of terms
Hook: An automatic post-processing step in MOXIS that can be triggered at regular intervals (e.g., automatic storage of files in the file system or creation of a job log).
Sambashare: A Samba file server enables the sharing of files between different operating systems over a network.
Cron Job: The cron program is used to execute scripts and commands at regular intervals and at specific times and dates. It is integrated into most Linux applications and offers the ability to schedule tasks on your server.
1.1. The Hook tab in Process Management
To open the Hook tab in Process Management, go to the Administration area and open Process Management. Then click on the base process you want to edit or create a new one. Under the Hook tab (see figure 1 [1]), you can configure the settings for hooks.
XiTip
Please note: The options shown in this tab depend on the basic configuration of MOXIS, which was created in collaboration with XiTrust. Therefore, you may see fewer options in your overview. If one of the options would be a useful addition to your current MOXIS instance, please contact your XiTrust contact person.
1.1.1. Basics of hooks
The following hooks are available as options and can be used according to the desired configuration:
CSRD data collection (standard)
Publish to MOXIS Guest (standard)
Send job status (standard)
Save file locally (only for on-premises applications)
Save file to Sambashare (only for on-premises applications)
Send file to output service
Update log (expiring – if you have any questions, please contact XiTrust Support)
Hooks allow you to add user-defined actions for certain final and non-final events in the MOXIS default workflow. As soon as one of the selected events is triggered, the corresponding hook processing is started. Configuration is done via the Hook Event Block (see figure 1 [2]).
Any number of hooks can be added to a process. To do this, simply click on the [Add New Block]-button (see figure 1 [3]) and select the desired hooks. Click the [Save]-button (see figure 1 [4]) to save your changes, or click the [Reject]- (see figure 1 [5]) or [Delete]-button (see figure 1 [6]) to discard or delete them.
The mechanism takes care of preparing data and, if necessary, asynchronously executing actions with retry handling, while setting the correct ProcessState. You can trigger tasks manually via the Admin UI after the retry limit has been reached.
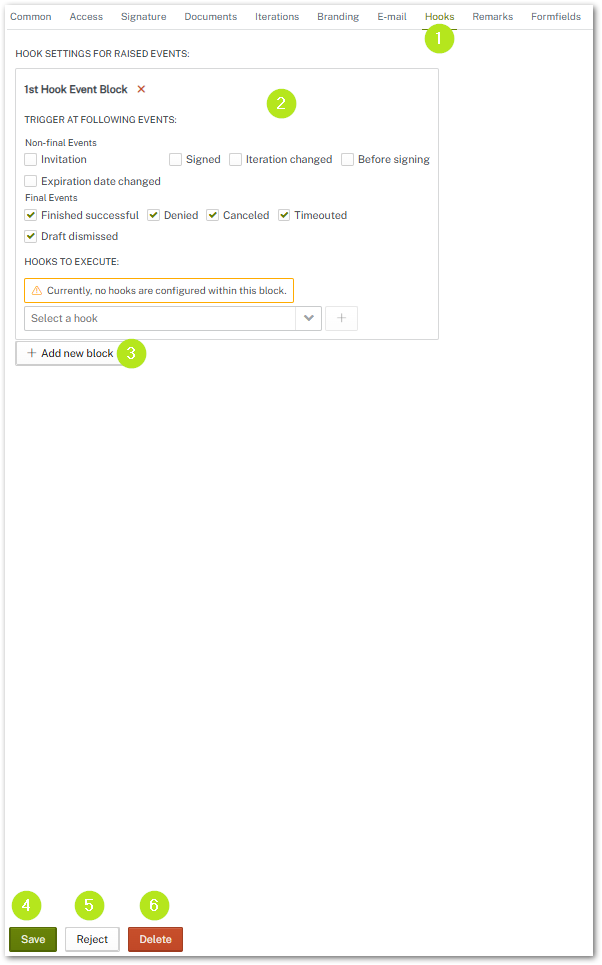
Figure 1: Add new hook in the process management
Each hook responds to specific, defined events when processing a job. You can either select all events available for the respective hook or make a specific selection. You can see which events are supported by a hook by hovering your mouse over the call sign icon (see figure 2 [1]).
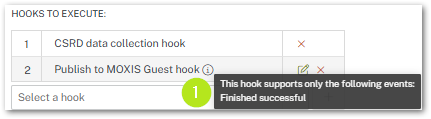
Figure 2: Supported events from a hook - tool tip with corresponding description
If hooks are triggered by the same event, they can be combined in a block. In our example, these are CSRD data collection hook and the Publish to MOXIS Guest hook (see figure 3 [1]). MOXIS processes hooks added to a block in the order in which they were configured. All configured hooks are run through. In addition, a check is made to determine whether the corresponding event needs to be triggered or not.
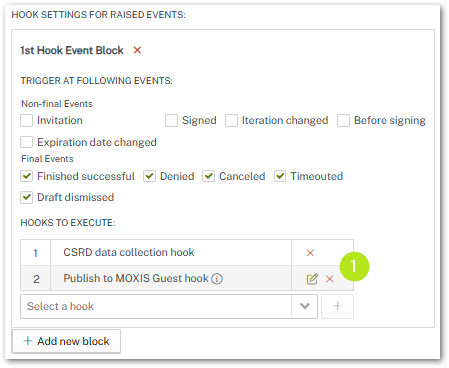
Figure 3: Combined hooks in the process management
In the following chapters, we will introduce you to the individual hooks and their configuration options in more detail.
1.1.2. CSRD Data Collection Hook
This hook is used to collect data for the CSRD report in MOXIS. It is the exception among the hooks because it cannot be configured (see figure 4). When activated in a process, it ensures that MOXIS collects all the data required for the report in the background.
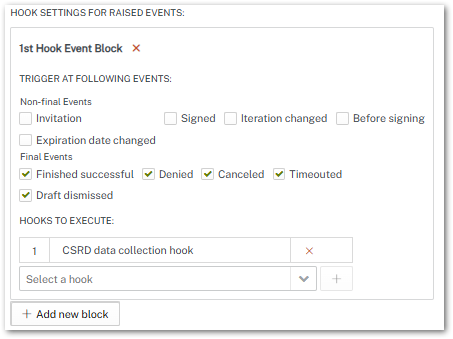
Figure 4: CSRD Hook in MOXIS
1.1.3. Publish to MOXIS Guest Hook
Use this hook (see figure 5) to make documents with the status “successfully completed” available for download to external persons (after the signature has been issued successfully). They will then receive an email with a corresponding link.

Figure 5: Publish to MOXIS Guest Hook
You have two options to edit the hook via the edit icon (see figure 6)
Publish for external signers
Publish for additional recipients
If this option is enabled, additional recipients can be specified when creating jobs.
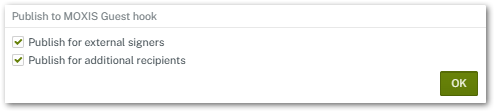
Figure 6: Edit MOXIS Guest Hook
1.1.4. Send job status hook
Use this hook to transmit the job status to another system via HTTP POST web service call (see figure 7). Please note: This hook is the only one that can be triggered by all events. However, an optional selection can also be made here.
To edit the hook, click on the edit icon (see figure 7 [2]). To delete it, click on the red x icon (see figure 7 [3]).
Please note: As long as a red exclamation mark (see figure 7 [1]) is displayed during configuration, the hook is configured incorrectly.
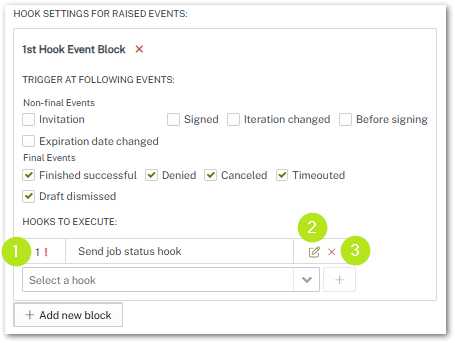
Figure 7: Send job status hook
The configuration of the job status transmission hooks is carried out in five steps (see figure 8, which is configured with sample data):
Define an access point (see figure 8 [1]). Please note: When entering the URL, do not forget to include https:// before the URL.
Test the connection by clicking on the [Test connection]-button (see figure 8 [2]) and confirm your trust in the server certificate. Optionally, you can skip the validation (see chapter 1.1.4.1)
Repeat step 2 until the connection is displayed as successful.
Configure the user classification (see figure 8 [3]), the header parameters (see figure 8 [4]), and the repeat intervals (see figure 8 [5]).
Set the authentication mode (right side). If you have any questions about the authentication mode, please contact XiTrust Support.
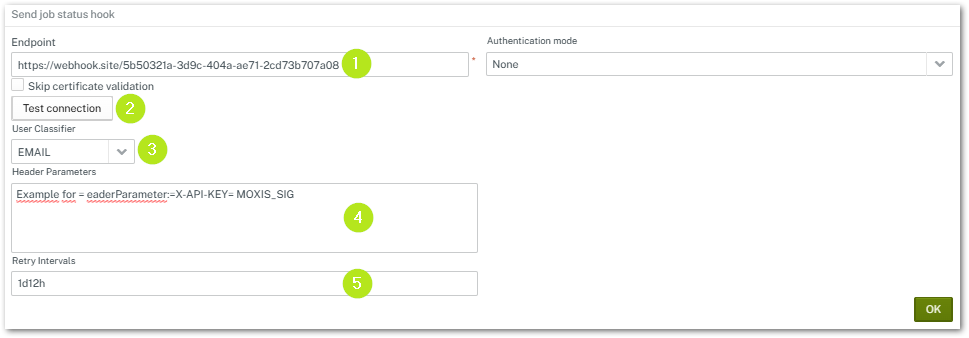
Figure 8: Edit Send job status hook
1.1.4.1. OPTIONAL: Skip certificate validation
Since MOXIS 4.52, it has been possible to skip the connection test step. The Skip certificate validation checkbox was introduced for this purpose. If this box is checked, clicking the [Test connection]-button will only test the connection. It does not matter whether the URL has SSL or not. This means that both https and http will display the message “Connection successful.” However, the security of the link will no longer be questioned.
XiTip
If the checkbox is not activated, the connection remains valid only as long as the certificate is valid. The function as it was known up to version 4.52 of MOXIS therefore remains unchanged.
1.1.4.2. Configuring user classification
User classification is used to output the user in a specific format (see Figure 9). You can choose between:
UPN: User Principle Name for transfer to Active Directory; e.g.: John Doe > jdoe
Email: Email is also transferred, e.g.: andreas.mustermann@xitrust.com
ID: Transfer of the ID
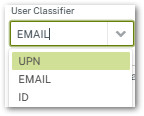
Figure 9: User Classifier
1.1.4.3. Configuring header parameters
The header parameters are sent with the job. These are parameters that can be read by the external system to which they are sent. Additional parameters can be specified, for example, to signal to the firewall of another system that the transmission is secure.
If you configure additional header parameters, use “=” as a separator between <key>=<value> to configure them in separate lines in the text input field.
An “=” is automatically added if it has not been entered previously.
One use case is setting a special header “X-API-KEY” for a customer who uses this header to forward the request to the correct application on their side → e.g.: X-API-KEY = MOXIS_SIG (see figure 8 [4])
XiTip
If you have any questions about configuring the header parameters, please contact the XiTrust Support.
1.1.4.4. Configuring repeat intervals
Set the interval at which you want to initiate a repeat if the hook fails (see figure 8 [5]). Please enter the number of days/hours, etc. that may elapse before the job is restarted. The syntax is as follows (explained using an example): For one day, 10 hours, and 30 minutes, please enter 1d10h30m.
1.1.5 Save file locally hook
This hook allows you to save files directly to the server on which MOXIS is installed.
XiTip
Please note: The Store files locally hook can only be used on on-prem instances of MOXIS.
You can make the following configurations (see figure 10):
Documents:
Specify the folder and file names under which the signed documents are to be stored.Document regex:
A regex can be used to restrict the hook to documents that follow the specified name pattern.Attachments:
Specify the folder and file name under which the attachments/enclosures are to be stored.Attachment regex:
A regex can be used to restrict the hook to attachments/enclosures that follow the specified name pattern.Protocol path:
Specify the path under which the created job log is to be stored. Also define the language via the drop down menu in which it should be created and stored (in this example: English).Job status path:
Specify the path under which a JSON file with the job status should be stored.Job status user classifier:
The user identification type specifies how the user data should be stored in the generated JSON:UPN = login name or user principal name when connected to AD
ID = consecutive unique identification number or
email address in MOXIS.
Please note: The JSON file corresponds to the specification of the Layer 2 Get job state call.
Interval for retry (s, m, h, d):
Here you can define the intervals at which a retry for storage should be started. For example, 1m, 1h, 1d would mean that MOXIS would first try the storage again after one minute, then after one hour, and then after one day before the job appears under Repeat post-processing. There, the post-processing can be started manually.
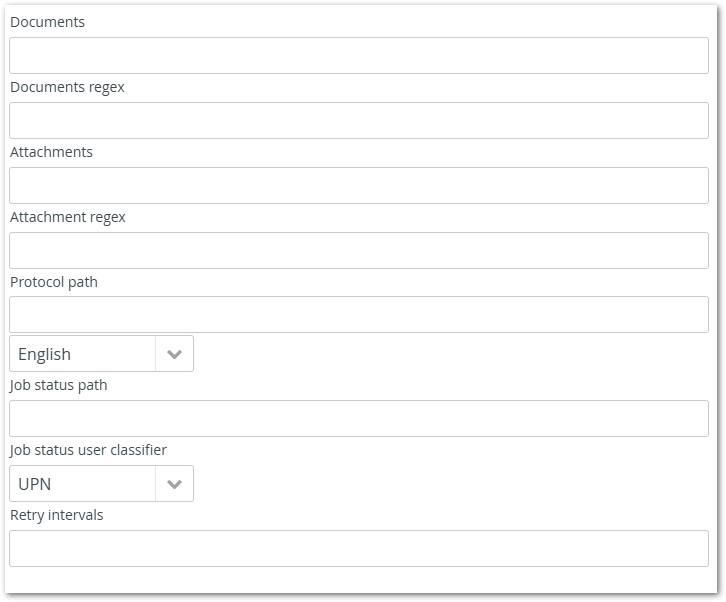
Figure 10: Configuration of the save file locally hook
1.1.5.1. Replacements for filename templates
The following replacements can be used with filename templates for the Save File Locally hook and the Update Log hook.
...${processInstanceId} # Replaced with processInstanceID ...${refNo} # Replaced with job reference number ...${fileName} # Filename of document WITHOUT extension eg "test" ...${fileNameWithExtension} # Filename of document WITH extension eg "test.pdf" ...${fileExtension} # Extension of document eg "pdf" ...${processParameterId} # Process entry ID/Process parameter ID ...${processLaunchParameterId} # Process launch ID ...${creationDateTime} # creation Date as Java Date (to be used when providing custom dateformat in template eg: ${creationDateTime?datetime?string("dd-MM-yyyy")}) ...${creationDate} # creation Date as String (format according to: moxis.commons.fileName.fileNameDateFormat | default format "yyyy-MM-dd") ...${exportDateTime} # date of export as Java Date (see creationDateTime) ...${exportDate} # date of export as String (see creationDate) ...${jobOwner} # Full name of job owner ...${currentIteration} # current iteration ...${category} # job Category ...${duplication} # Placeholder for file duplication marker: If filename does not yet exist in destination it will be empty, otherwise it will be a counter to prevent duplicate files (e.g.: "myfile${duplication}.out" might result in the files "myfile.out" "myfile1.out" "myfile2.out" ...) ...${getProcessNameForParameterId(<id>,<locale>)} # get the process name in given locale and for the given process parameter id # - i.e.: <#assign id = processParameterId>${getProcessNameForParameterId(id,'de')} ...${getProcessNameForLaunchParameterId(<id>,<locale>)} # get the process name in given locale and for the given process launch parameter id # - i.e.: <#assign id = processLaunchParameterId>${getProcessNameForLaunchParameterId(id,'en')}
Date and time values should only be used if a user-defined DateTime format is required.
XiTip
Please note: The escaping behavior for “ has changed with the configuration via the MOXIS Admin UI. Escaping with \ ” is no longer necessary.
The latter is only relevant if a user-defined *DateTime format is specified.
1.1.6. Save file to Sambashare hook
The export hook for a file share (SAMBA) has essentially the same functions as for local storage, except that the server on which the file is to be stored can also be configured. Clicking on the [Edit]-button opens a pop-up window where further configurations can be made (see figure 14).
XiTip
Please note: Sambashare can only be installed on on-premises instances of MOXIS.
Documents:
Define the folder and file name here under which the signed documents are to be stored.Document regex:
A regex can be used to restrict the hook to documents that follow the specified name pattern.Attachments:
Define the folder and file name here under which the attachments/enclosures are to be stored.Attachment regex:
A regex can be used to restrict the hook to attachments/supplements that follow the specified name pattern.Log path:
Specify the path here where the created order log should be stored. Also define the language in which it should be created and stored.Job status path:
Specify the path under which a JSON file with the order status should be stored.Job status:
The user identification type specifies how the user data should be stored in the generated JSON:UPN = login name or user principal name when connected to AD,
ID = consecutive unique identification number or
email address in MOXIS.
Please note: The JSON file corresponds to the specification of the Layer 2 Get job state call.
Interval for retry (s,m,h,d):
Here you can define the intervals at which a retry for storage should be started. For example, 1m, 1h, 1d would mean that MOXIS would first try the storage again after one minute, then after one hour, and then after one day before the job appears under Repeat post-processing. There, the post-processing can be started manually.
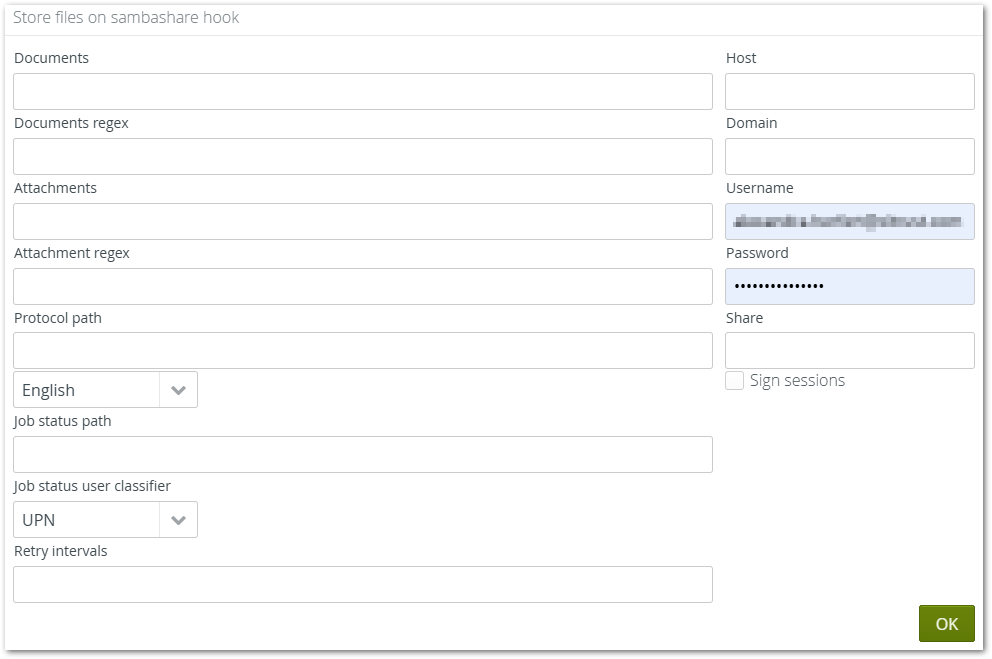
Figure 14: Edit the store files on sambashare hook
1.1.7. Send file to output service hook
This hook is based on the file storage hook. Documents, attachments, and logs can be sent to the output service. The output service sends files to preconfigured routes (e.g., SFTP servers). These routes are configured in a separate service and can be selected by the user in the administration interface.
The Output Service is based on Apache Camel. This is an open source project that supports file exchange, among other things. It is configured individually for each customer, offering the option of connecting customer-specific systems that are supported by Camel.