
(en) XignUp User Documentation
Content
This manual provides you with an overview of how to register a digital identity.
1. The XignUp registration process (xIDENTITY)
With XignUp from XiTrust, you can quickly create an eIDAS-certified digital identity. This allows you to sign documents online with legal validity. To register, please follow the step-by-step instructions below. When registering for xIDENTITY, you must identify yourself online as the person you are.
1.1 Requirements for registering a digital identity
To register for a digital identity, the following requirements must be met:
You have received an e-mail with the link to the registration portal and the access data for registration .
You have downloaded the following apps: The NECT wallet (for all those who do not yet have the app, see chapter 1.1.1 and the A-Trust signature app (for all those who have not yet downloaded the app, see chapter 1.1.2.
Your personal or business smartphone (ideally with a fingerprint or face recognition function) is ready and waiting.
You have a passport, identity card or residence permit valid for the identification process and have one of these documents to hand.
In addition to a smartphone, you can also use a PC or laptop. Please note: The registration process only works smoothly if you carry it out with two end devices. It will NOT work if you are only using a smartphone.
XiTip
In addition to the expiry date, other parameters are decisive for the validity of a document for issuing a digital identity.
XiTip
Please note: The time window for registration is limited to 60 minutes. However, the link itself is valid for 30 days. If a timeout occurs during registration due to a timeout, please get in touch with your responsible XignUp contact person.
1.1.1 Step-by-step instructions for downloading the NECT Wallet app (via Google Play Store or Apple Store)
To download the NECT Wallet app , please follow the step-by-step instructions below.
Step 1: If you use Android, please download the NECT Wallet app here Nect Wallet - Apps on Google Play.
If you use Apple, please follow the link below: Nect Wallet in the App Store (apple.com)
As soon as you have downloaded the app, please click on the [Install] button (see Figure 1).
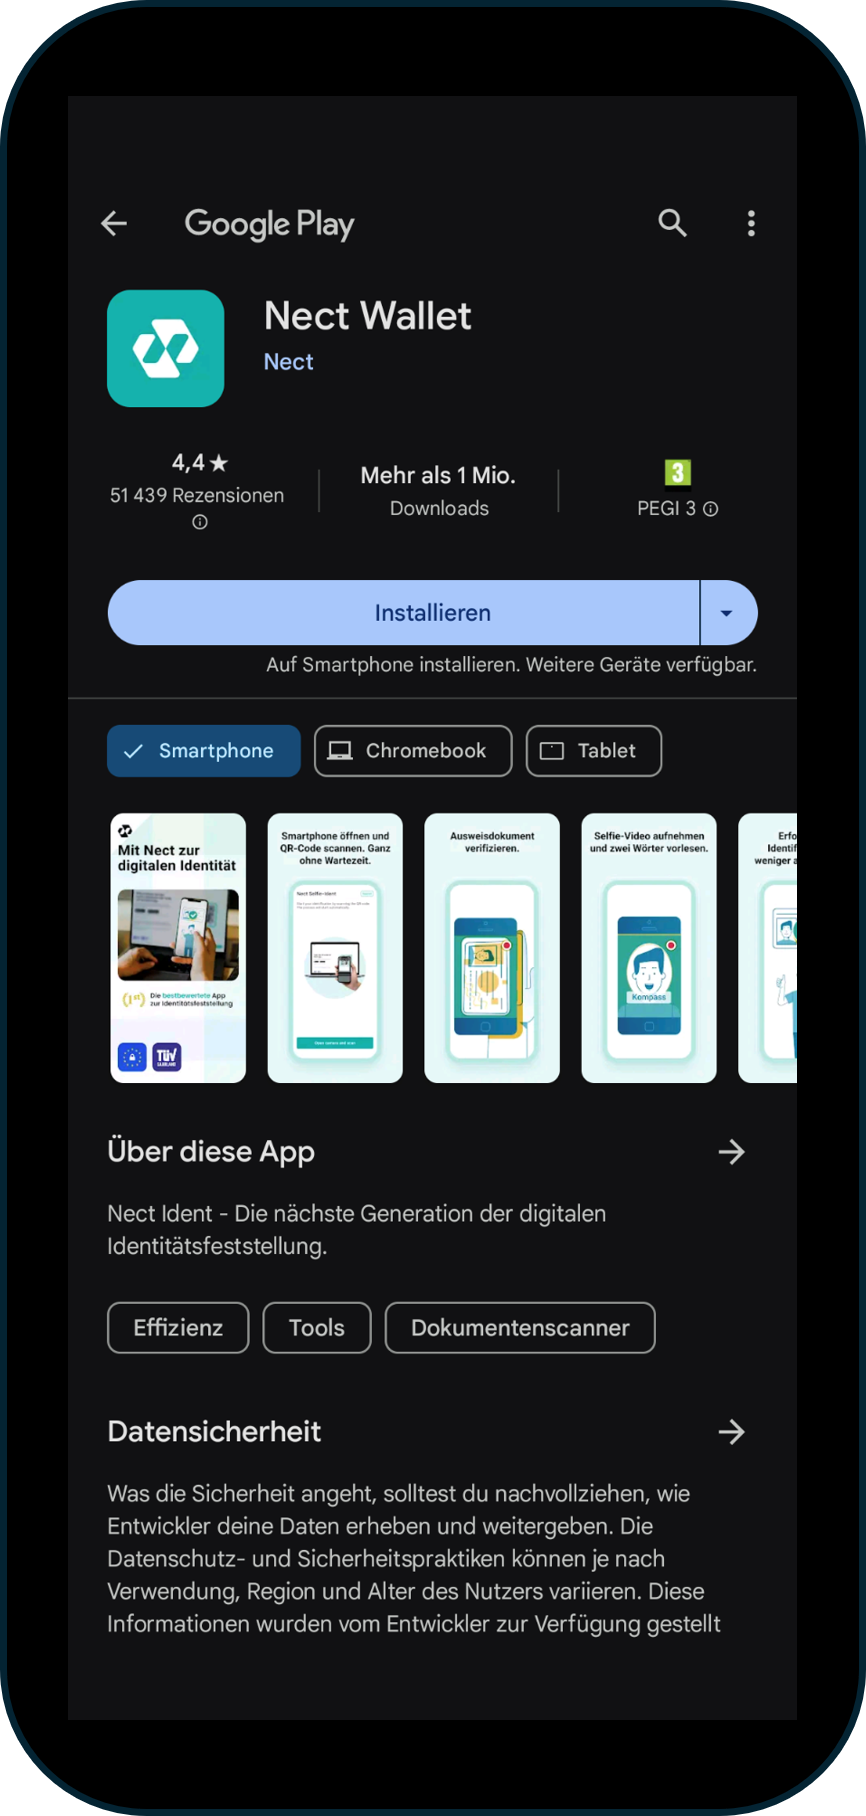
Figure 1: Click on the [Install] button to download the NECT wallet.
Step 3: After successful installation, open the NECT Wallet app by clicking on the [Open] button (see Figure 2). Before you do this step, however, please download the A-Trust app if you have not already installed it.
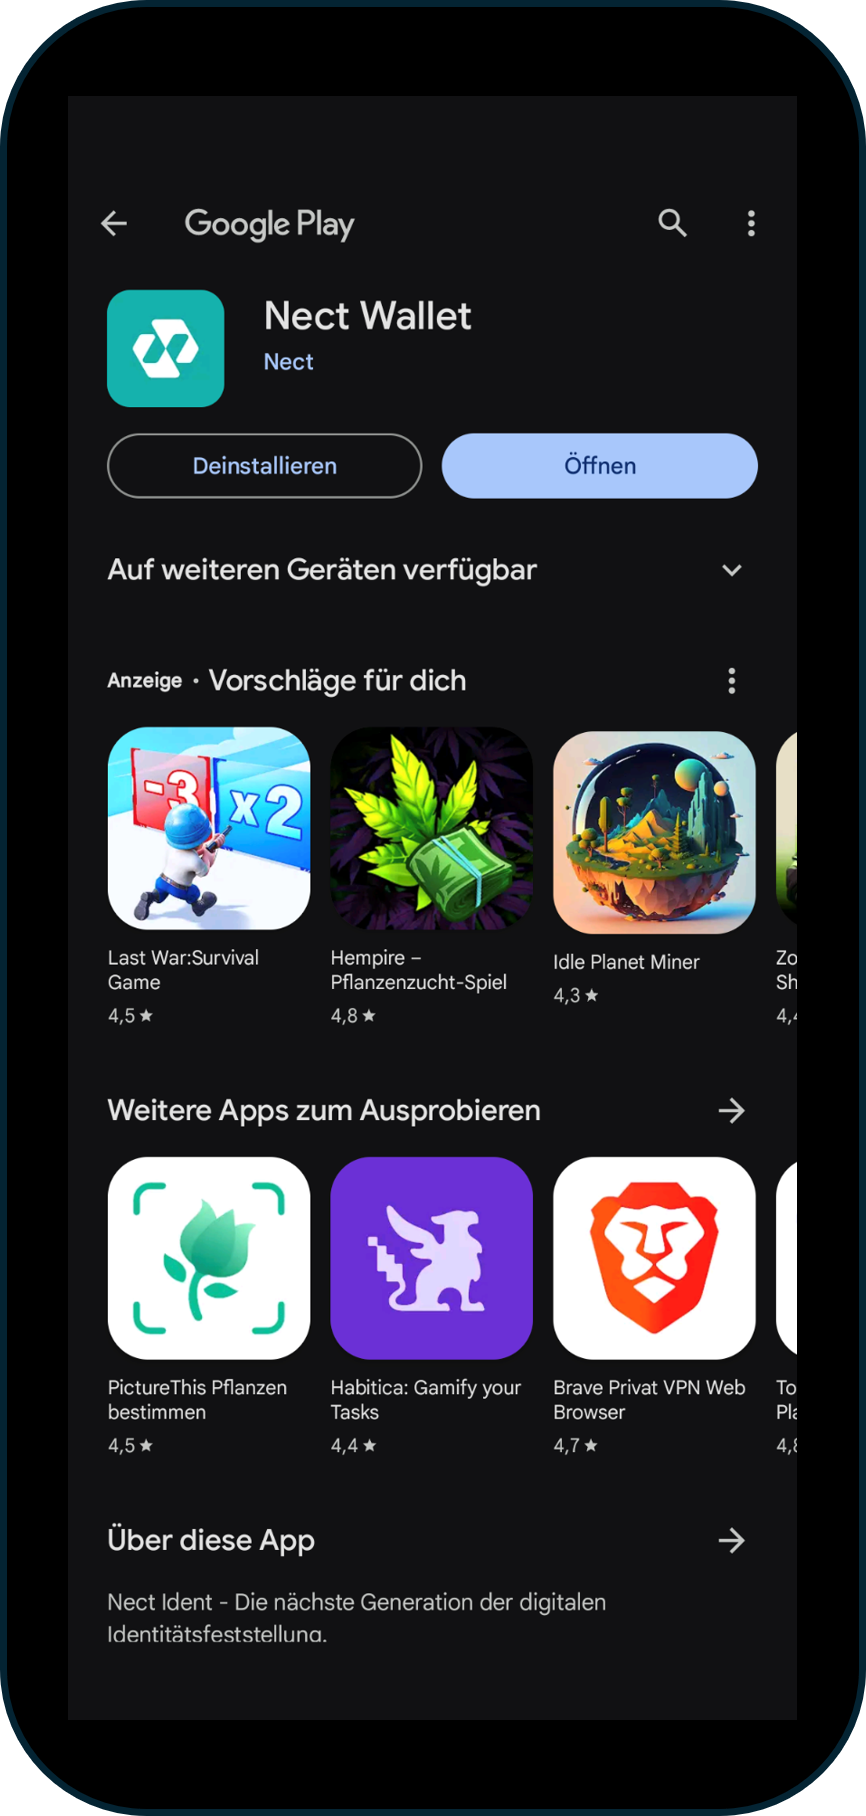
Figure 2: Do not open the NECT Wallet until you start the registration process (after downloading the A-Trust app).
1.1.2 Step-by-step instructions for downloading the A-Trust app
To download the A-Trust app , please follow the step-by-step instructions below.
Step 1: If you use Android, please download the A-Trust app here A-Trust Signature - Apps on Google Play.
If you use Apple, please follow the link below: A-Trust Signature on the App Store (apple.com).
Step 2: As soon as you have downloaded the app, please click on the [Install] button.
Step 3: Congratulations! You have just downloaded the second app you need for the installation.
1.2 How to identify and qualify for a digital identity online
Step 1: If all requirements are met, please start the registration process.
To do this, click on the link in the e-mail you received specifically for the registration process. A window will open. Please enter the following data here:
Your full first name and surname
a valid e-mail address to which only you have access
XiTip
Please only use a personal smartphone that only you have access to for the registration process . Remember: A digital signature authorises any signatory to sign something on your behalf. We at XiTrust can only minimise the risk of technical failure. We bear no responsibility for the handling of your personal items.
In addition, please tick the checkbox next to I have read and accept XignUp's terms and conditions and privacy policy if you have read both.
Please note: The login process cannot be completed if you do not tick the box. The interface should now look like Figure 3. Instead of the sample data, your page will of course contain your individual data.
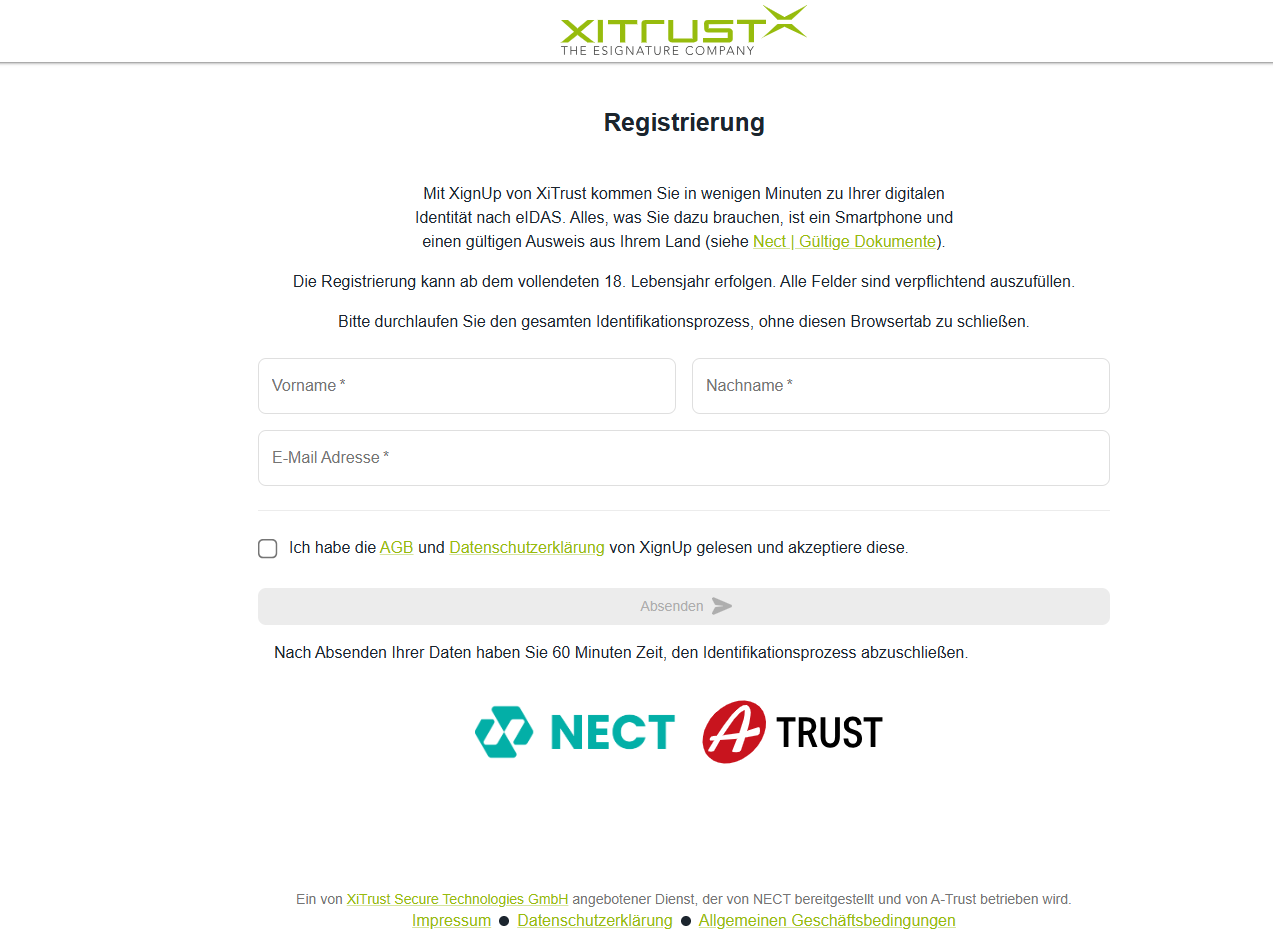
Figure 3: Example of a registration interface
XiTip
Please note that the browser window from which you start your registration process must remain open throughout the entire identification process.
Step 2: If all precautions have been taken and you have entered the login data correctly, please click on the [Submit] button. Please note: You are now leaving the XiTrust interface.
Step 3: You are now on the NECT website . Here you have two options for identifying yourself for A-Trust GmbH and thus creating a digital identity .
Option 1: Scan the QR code provided and open the NECT Wallet app in this way (see Figure 4, left-hand side). The NECT Wallet enables you to identify yourself via A-Trust.
OR
Option 2: Enter your mobile phone number and you will receive a link via SMS. This link will also redirect you to the identification process (see Figure 4, right-hand side).
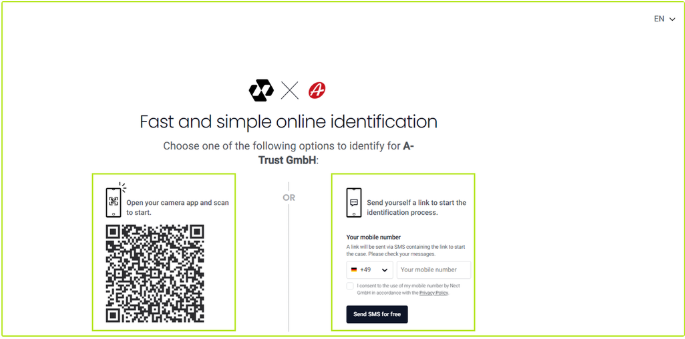
Figure 4: This is the start page of the identification process with two options for identifying yourself for A-Trust GmbH. At the bottom left you can see the case ID, at the bottom right you can access the NECT FAQ if you have any questions about NECT.
XiTip
As long as the identification process is in progress , the start page of the identification process must remain open (see Figure 4). At this stage, you already have a so-called case ID (see Figure 4, bottom left-hand corner). This is assigned to you, is unique and is used throughout your entire identification process. In the bottom right-hand corner (see Figure 4), you will find a link to the NECT portal or the NECT wallet and their FAQs (frequently asked questions) if you have any questions .

Figure 5: Identification in progress. Please follow the instructions in the NECT Wallet. Keep the browser window open under all circumstances!
Step 4: After opening the app, start the identification process by clicking on the [Get started] button (see Figure 6). Another click on the [Next] button (see Figure 7) confirms your registration.
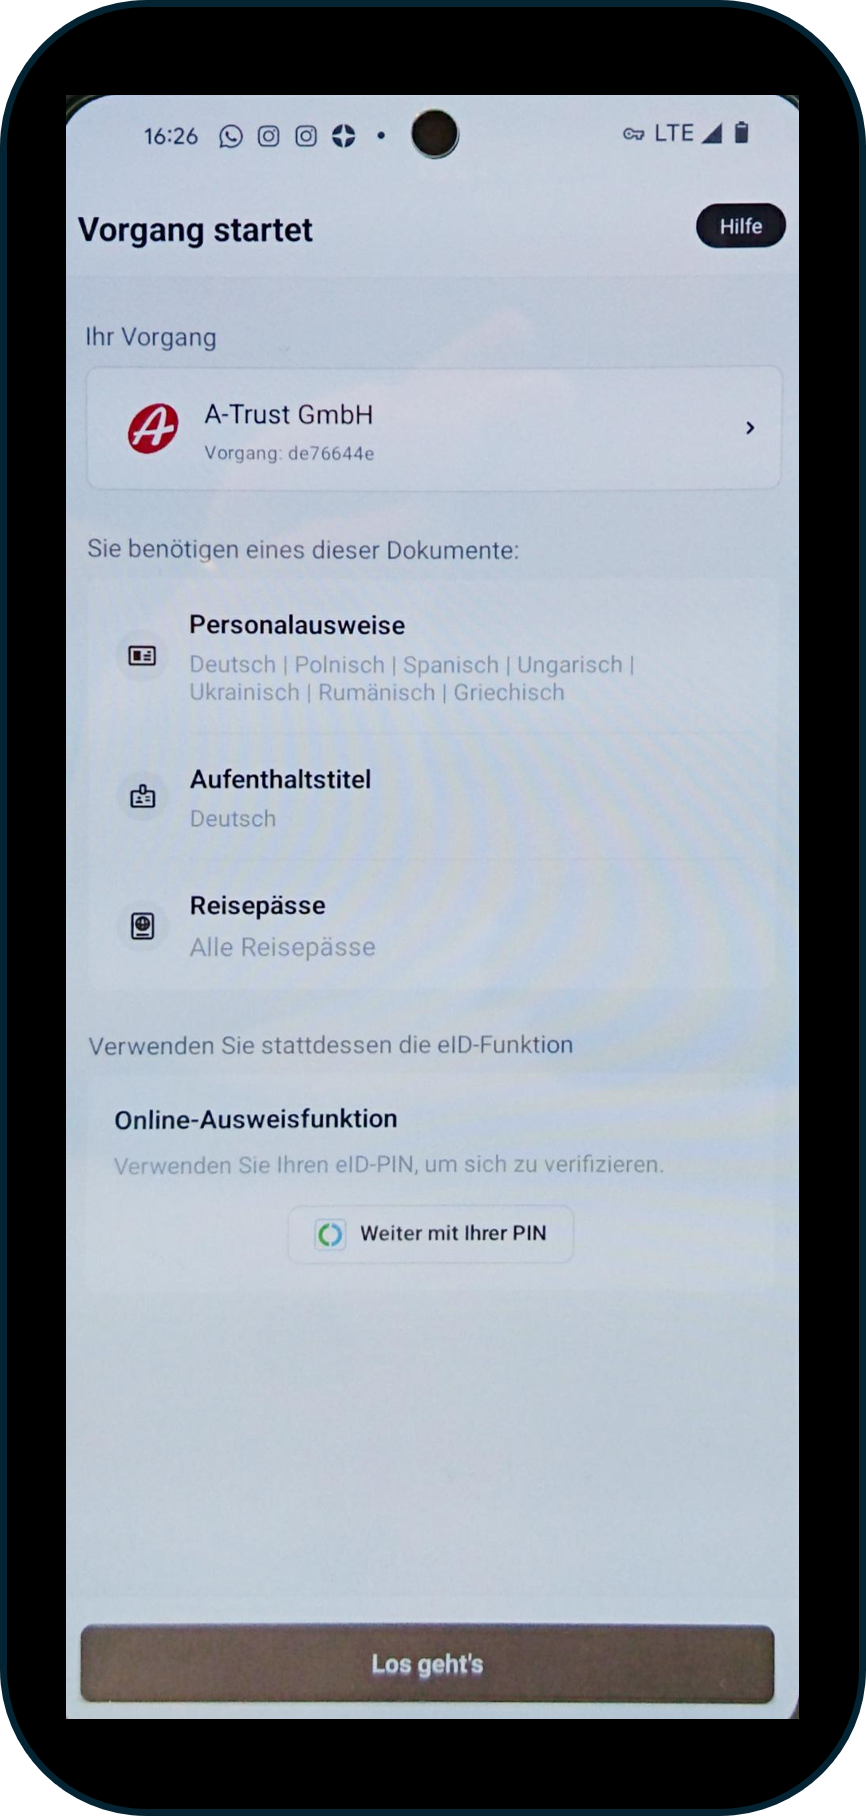
Figure 6: Click on the [Get started] button to start the identification process
XiTip
Please remember to keep your browser window open!
Step 5: Please confirm the processing of your personal data, data protection information and the general terms and conditions by clicking on the [I agree] button (see Figure 8).
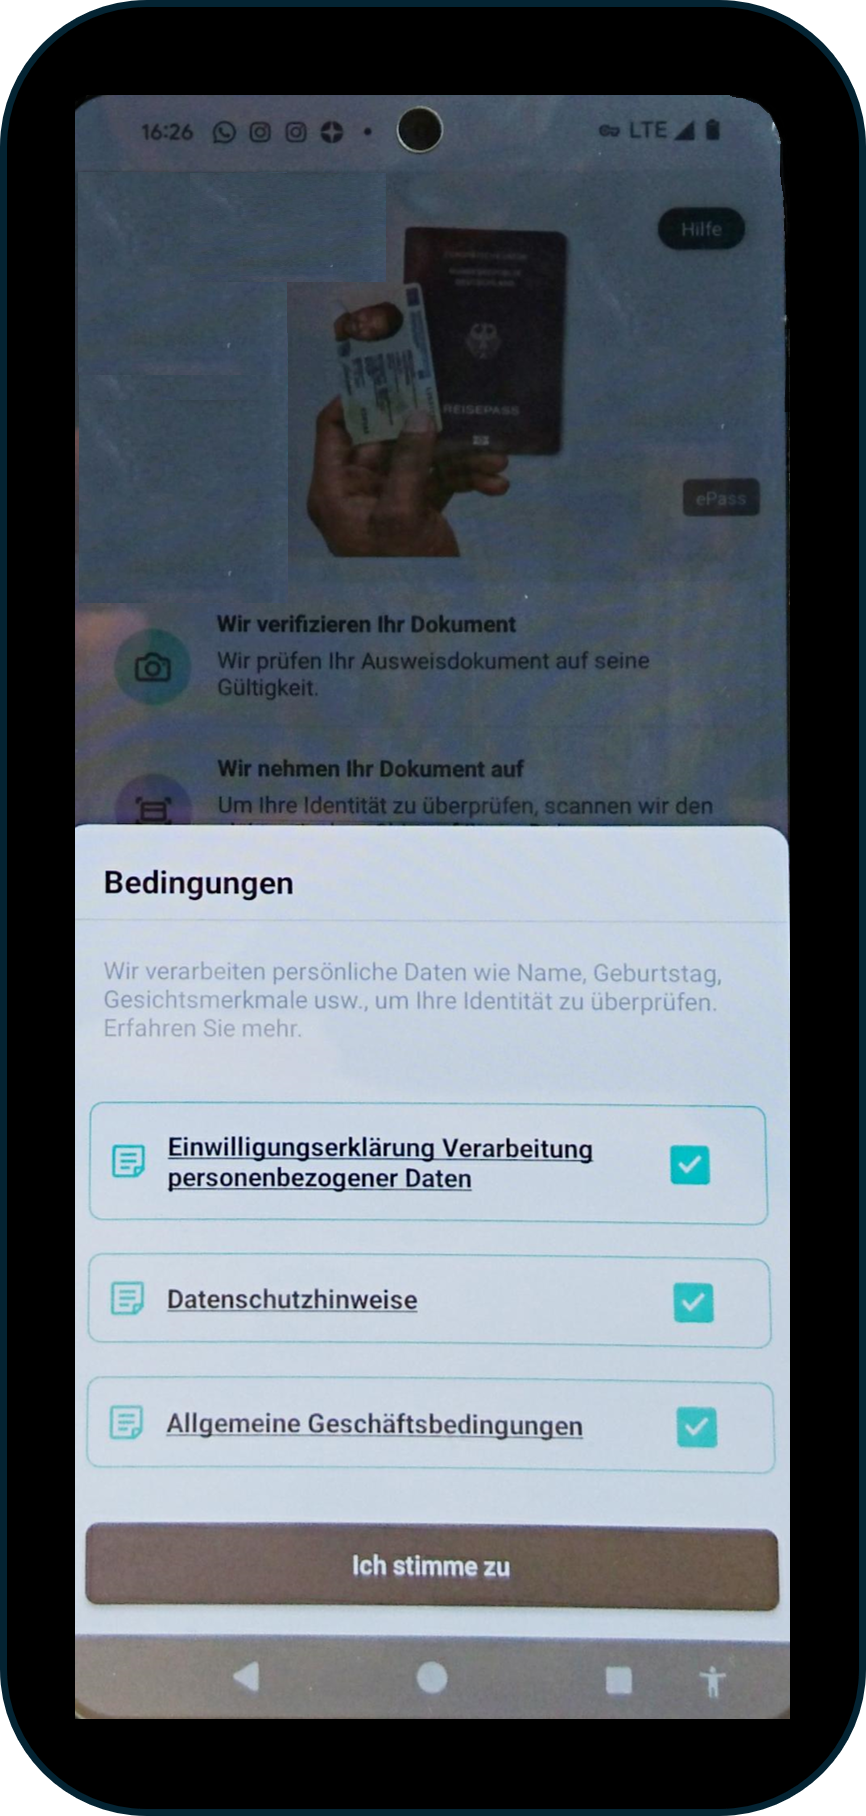
Figure 8: Please confirm the app's terms of use by clicking on the [I agree] button.
Step 6: The NECT Wallet app offers an explanatory video that introduces you to the process. You can watch the video or skip it by clicking on the [Skip video] button (see Figure 9). We recommend that you watch the video.
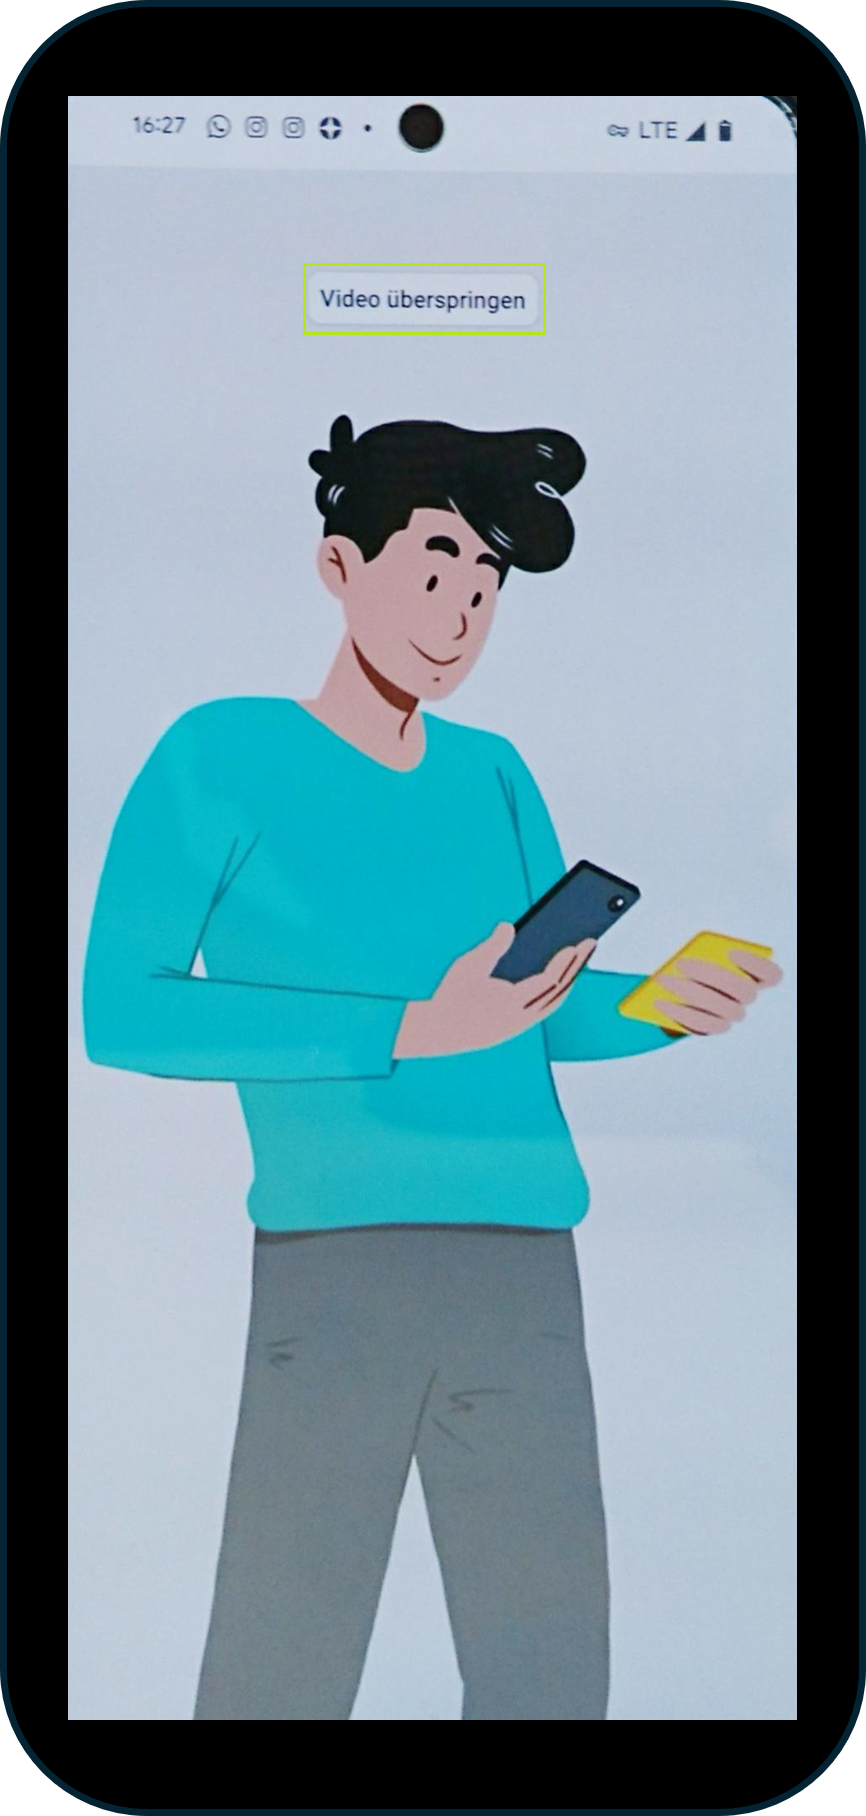
Figure 9: The explanatory video supports you in the identification process (skip by clicking on [Skip video])
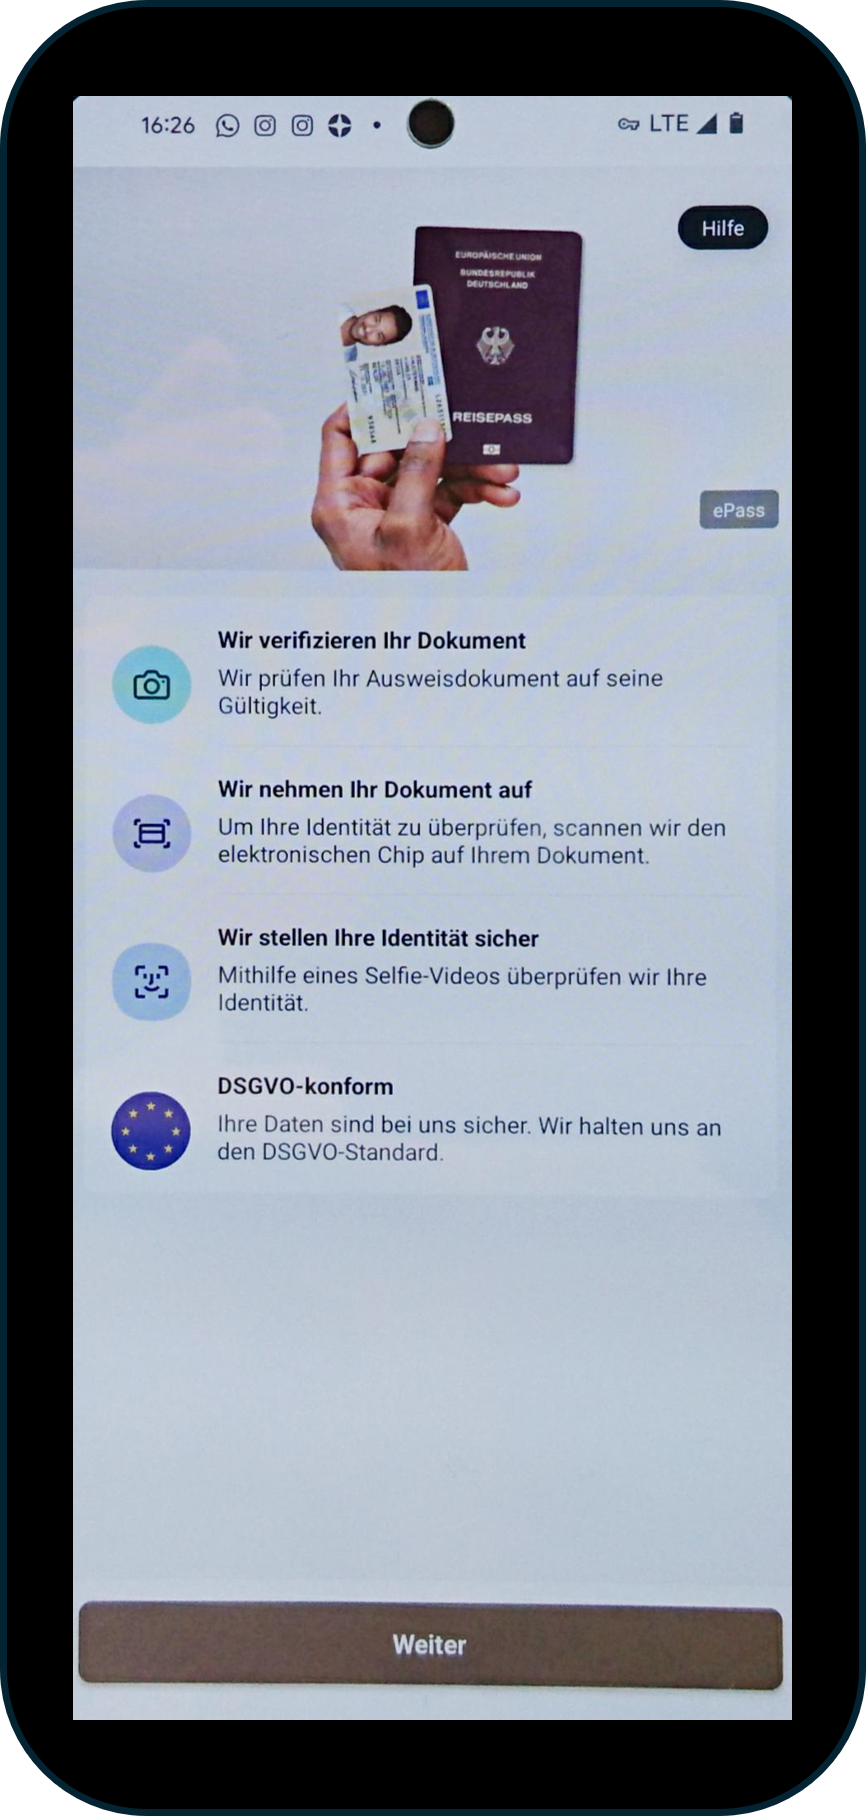
Step 7: You will now be asked to identify yourself. This is first done using your ID document. Please follow the app 's instructions exactly and click on the [Next] button (see Figure 10).

Figure 10: The first part of the identification process consists of checking your ID document
Step 8: Please authorise the app to take pictures and videos (see Figure 11). Please note: The online identification process will not work without this authorisation.
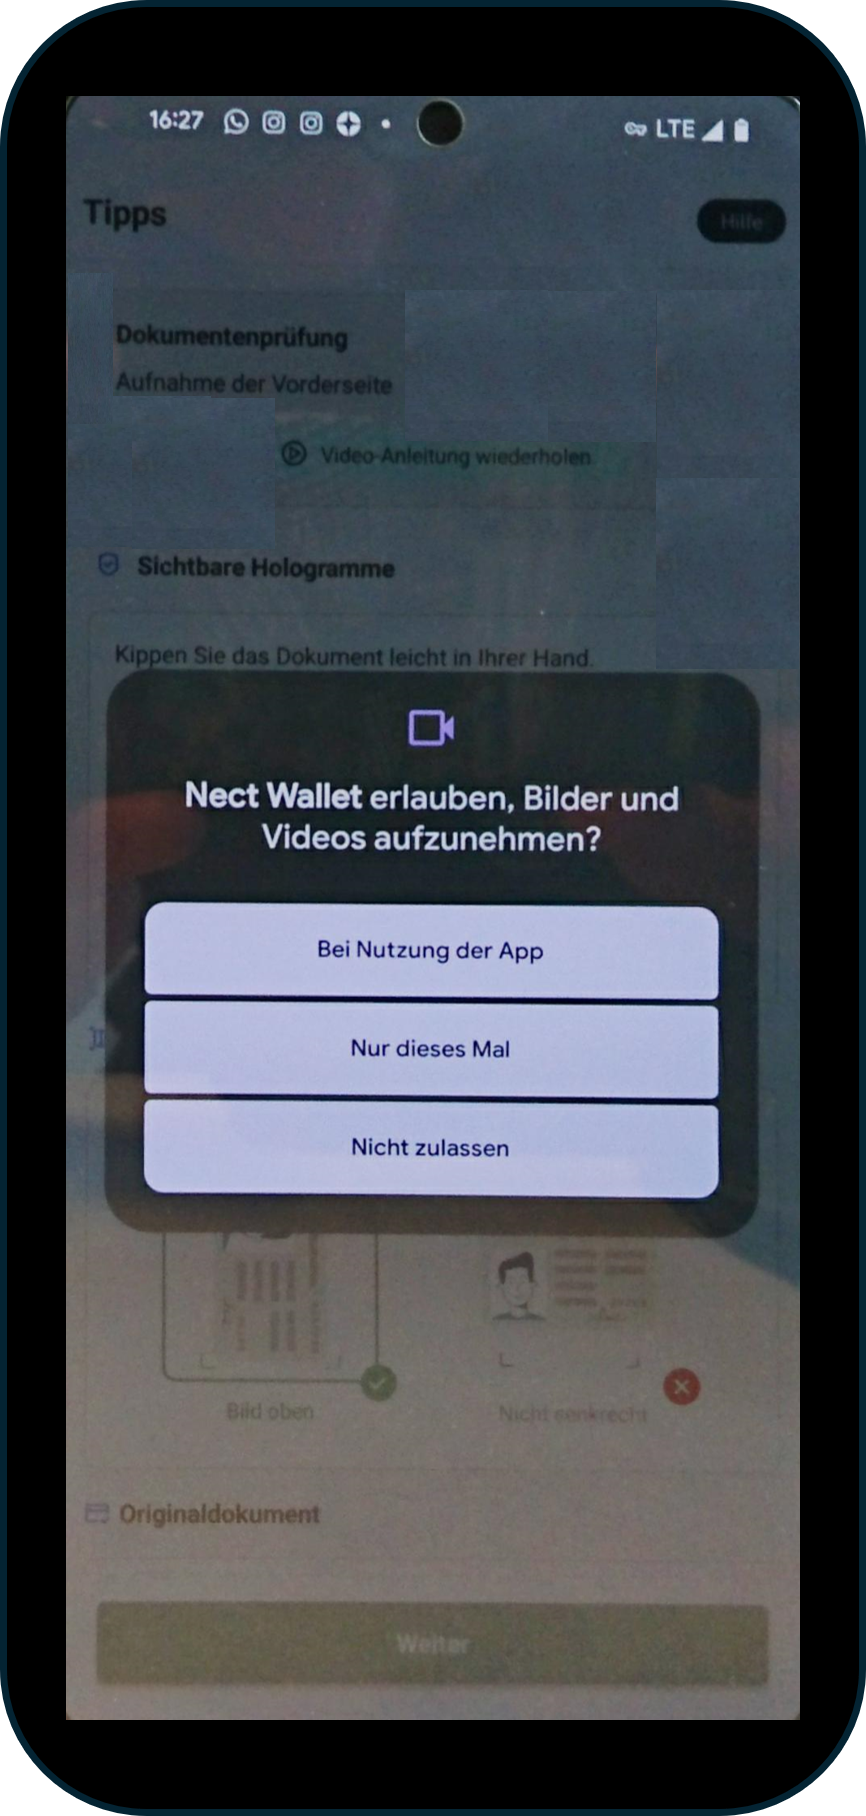
Figure 11: Please allow the NECT Wallet to take pictures and videos.
Step 9: Place your selected ID document with the photo as prescribed by the app (see Figure 12). Then click on the red [button] to take a picture.
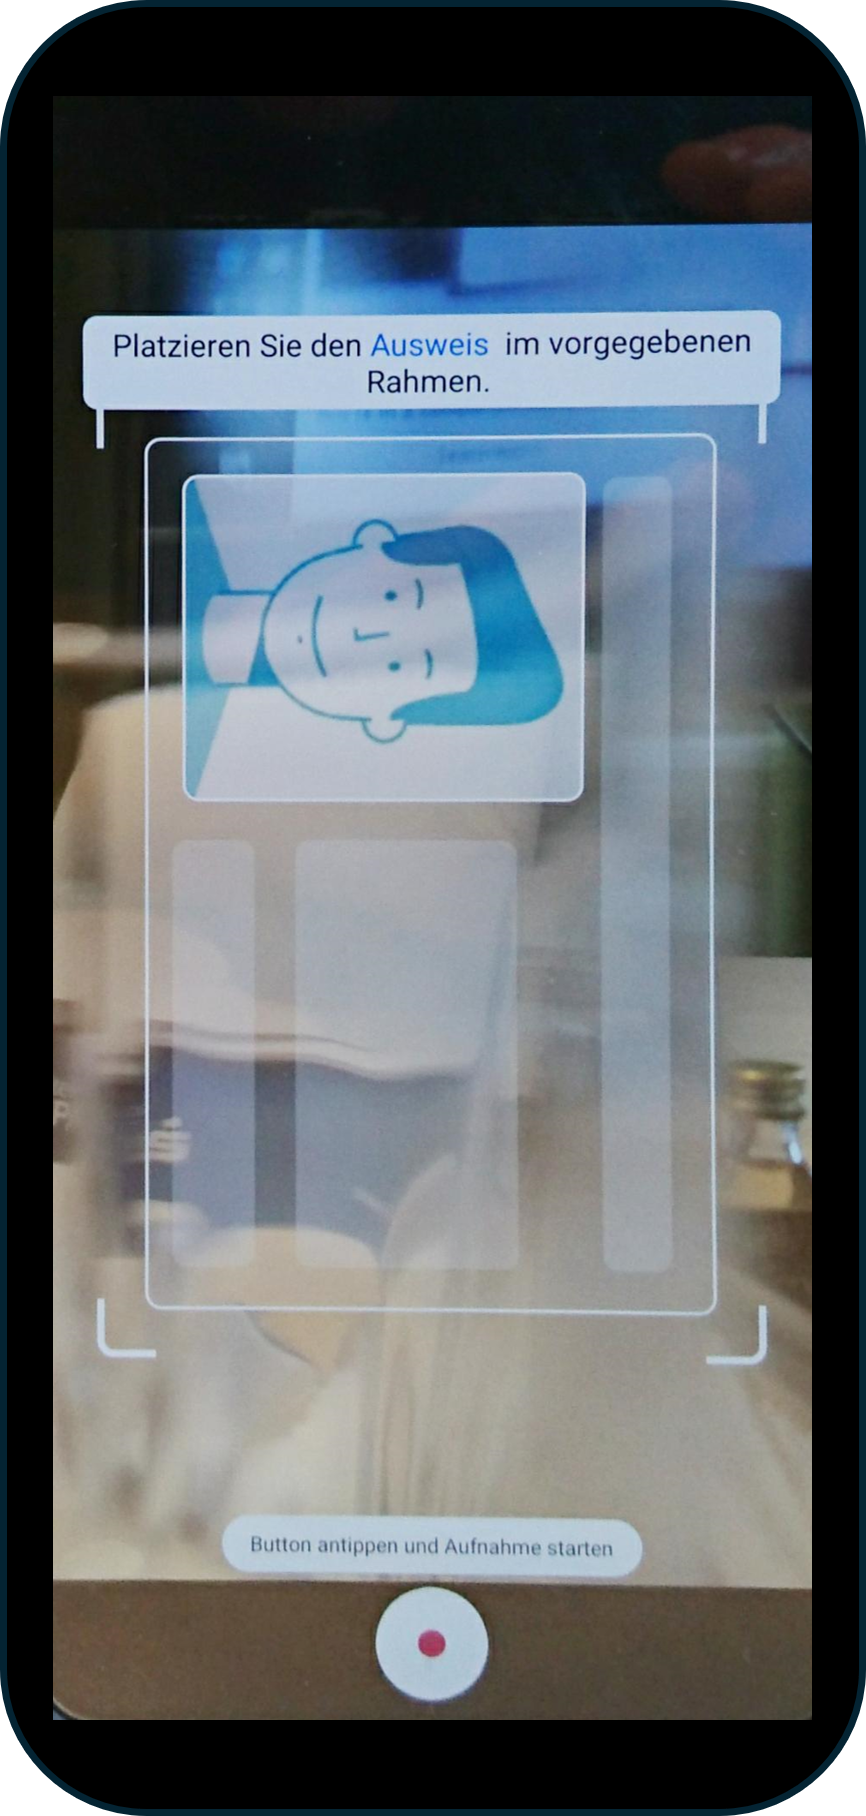
Figure 12: Place the ID document in the specified frame.
Step 10: Once you have successfully photographed the image, please scan your ID document (in our example, a passport) to confirm its authenticity. To do this, please follow the app's instructions and click on the [Start scan]-button (see Figure 13).
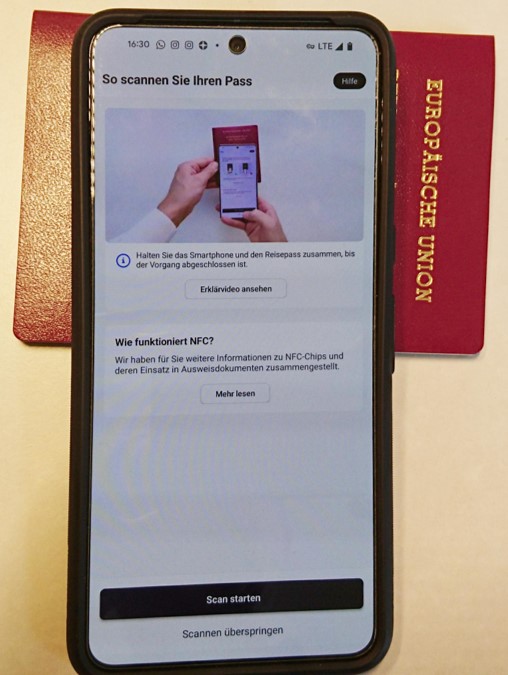
Figure 13: Scan your ID document by placing it under the camera and clicking on the [Start scan] button.
Step 11: After the scan, you will be asked to take a selfie video. Here, too, the NECT Wallet app offers video instructions, which we are happy to recommend. However, you can also skip the instructions by clicking on the [Skip video] button (see Figure 14). After the video, you will receive further instructions from the app (see Figure 15). Please pay attention to the following points when creating the video:
Ensure that the lighting is sufficiently bright.
Hold the smartphone at eye level as shown.

Figure 14: Video on how to make a selfie video. Skip possible by clicking on [Skip video].
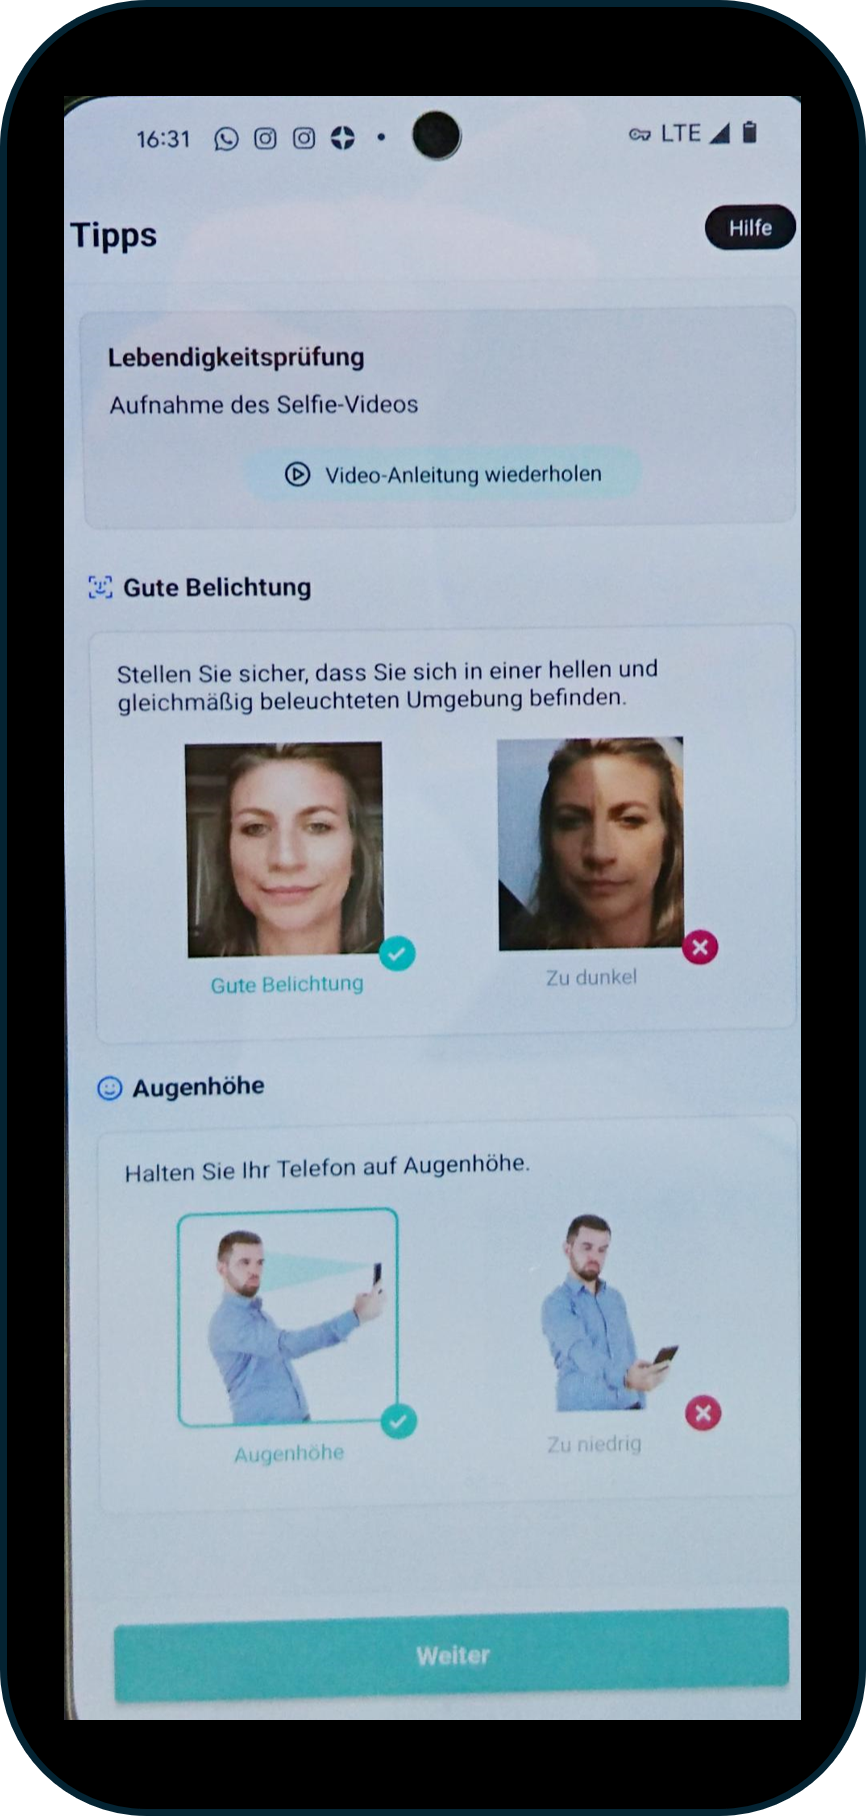
Figure 15: Further instructions for creating your selfie video
XiTip
Please remember to keep your browser window open!
Step 12: You've almost done it! The data is now being uploaded (see Figures 16 and 17). The browser window now also shows a different status (see Figure 18)
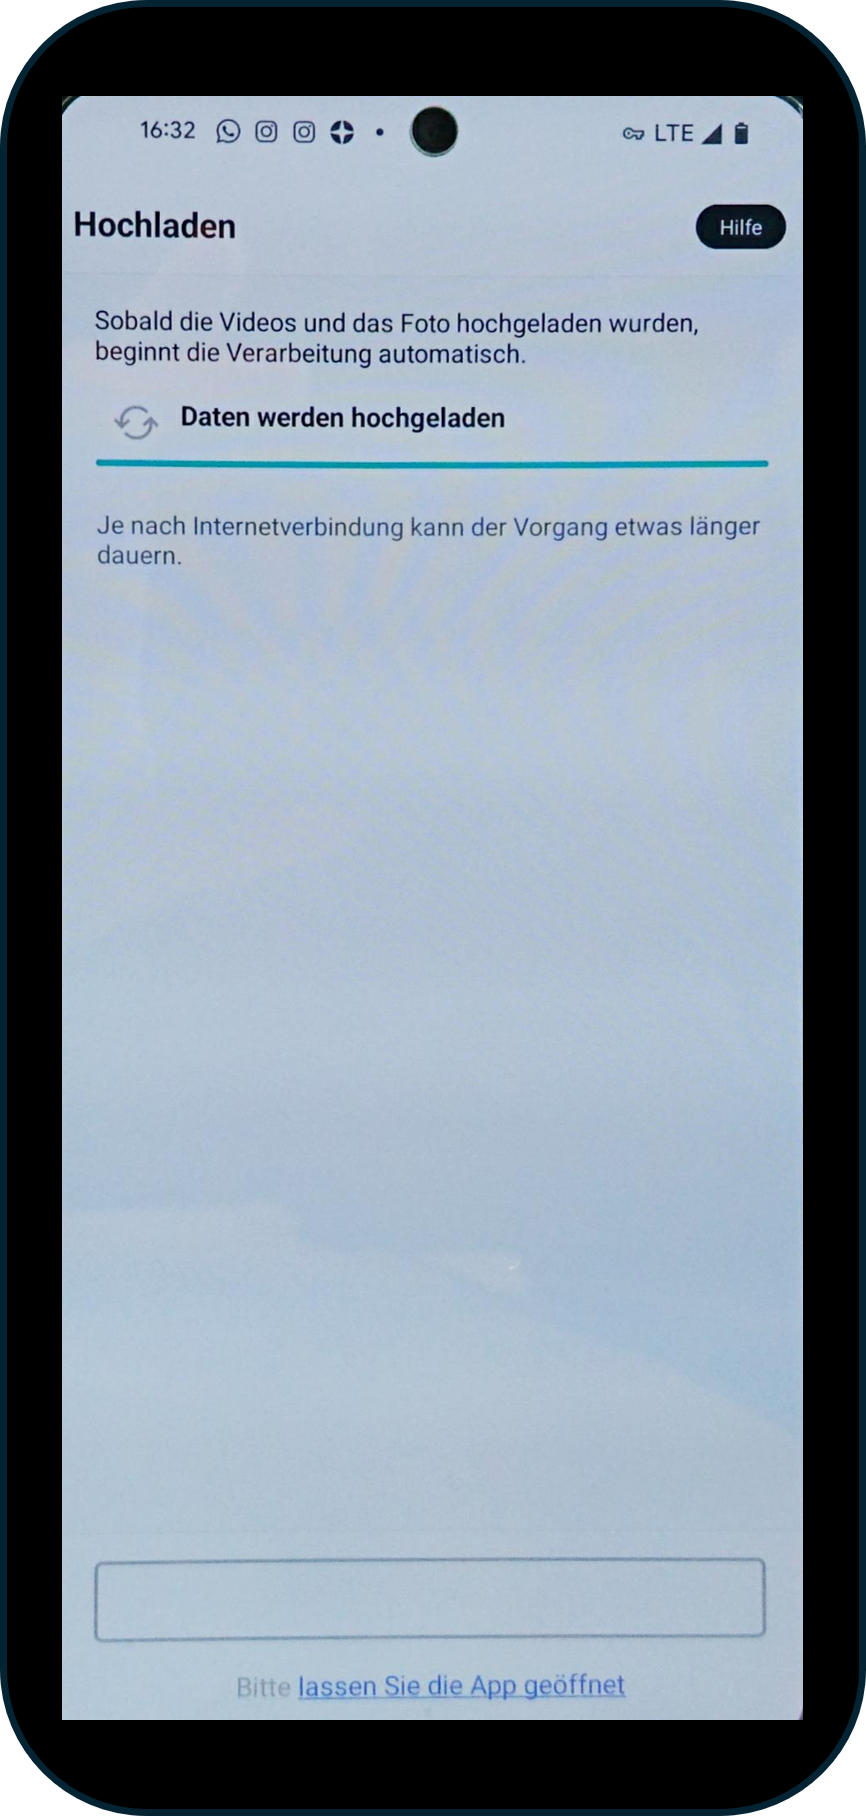
Figure 16: Upload your data. The duration of the process varies depending on the internet speed.
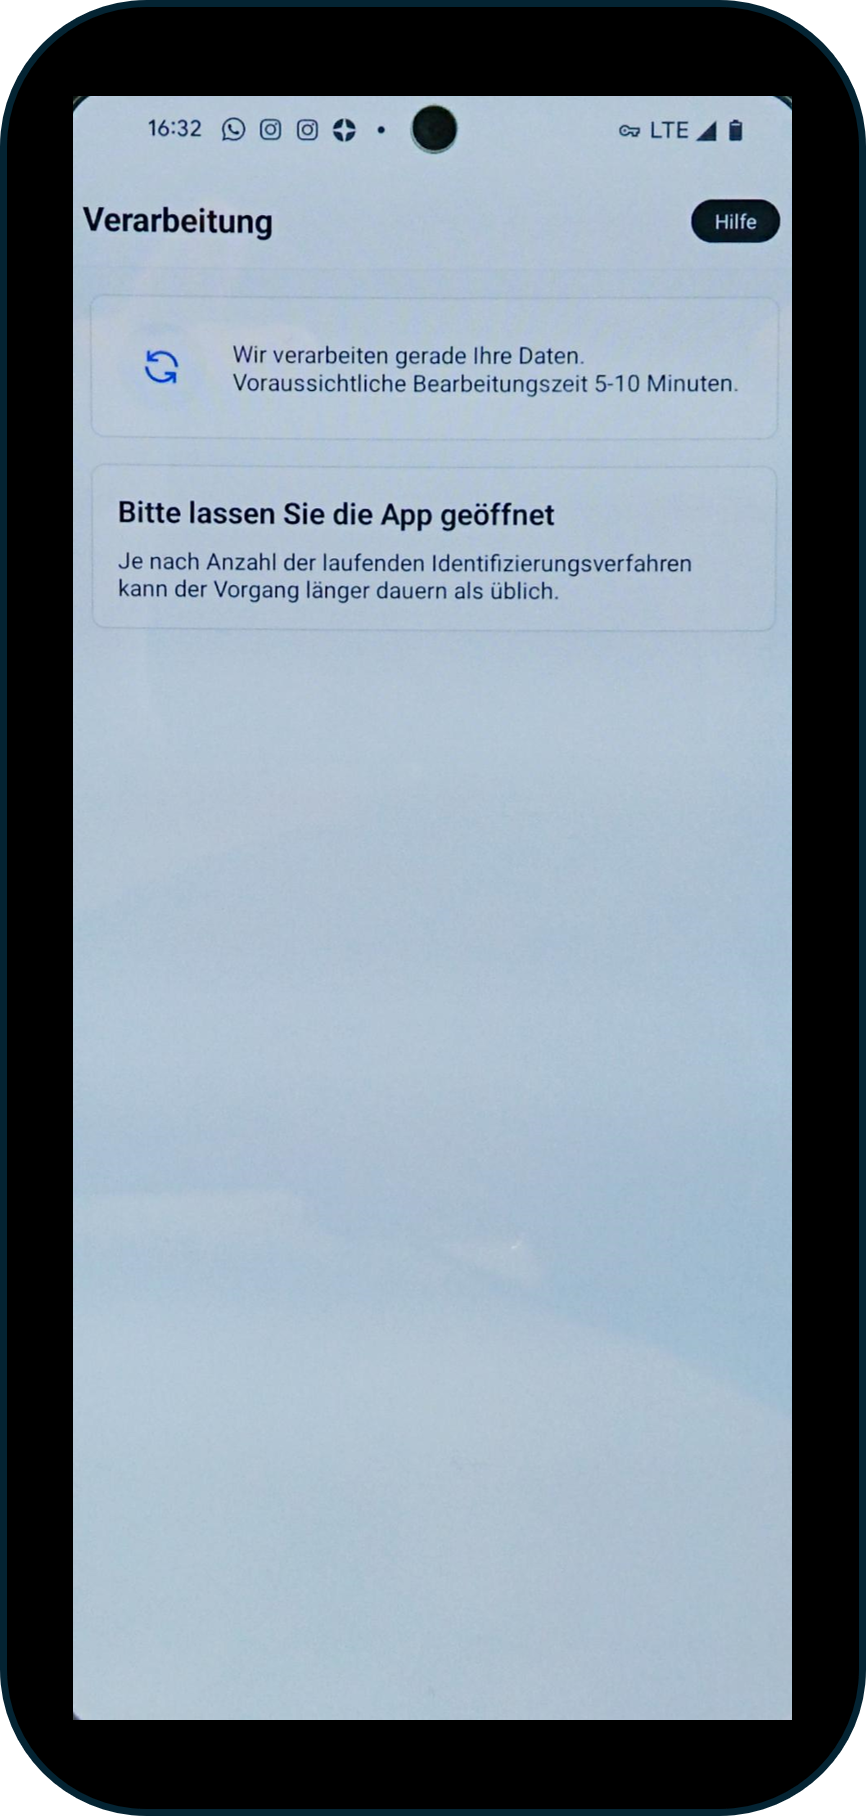
Figure 17: Upload your data. Another reminder to keep the app open, including the expected processing time.
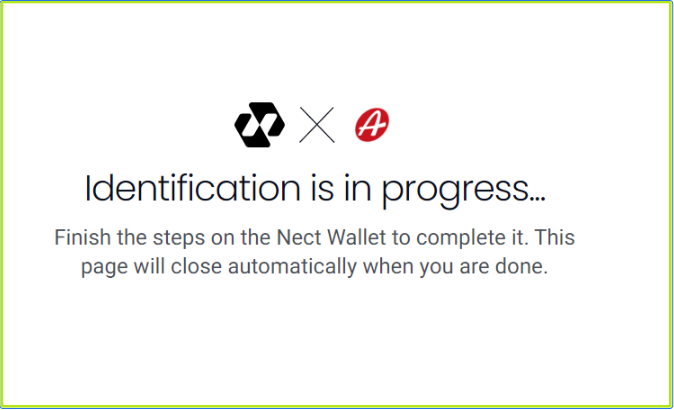
Figure 18: Browser window during the registration process.
XiTip
If the window no longer responds, this could be due to your firewall settings. You can find out how to fix the problem at here.
Step 13: Congratulations! You have successfully completed the identification process on your smartphone (see Figure 19). Now continue in the browser window (see Figure 20).
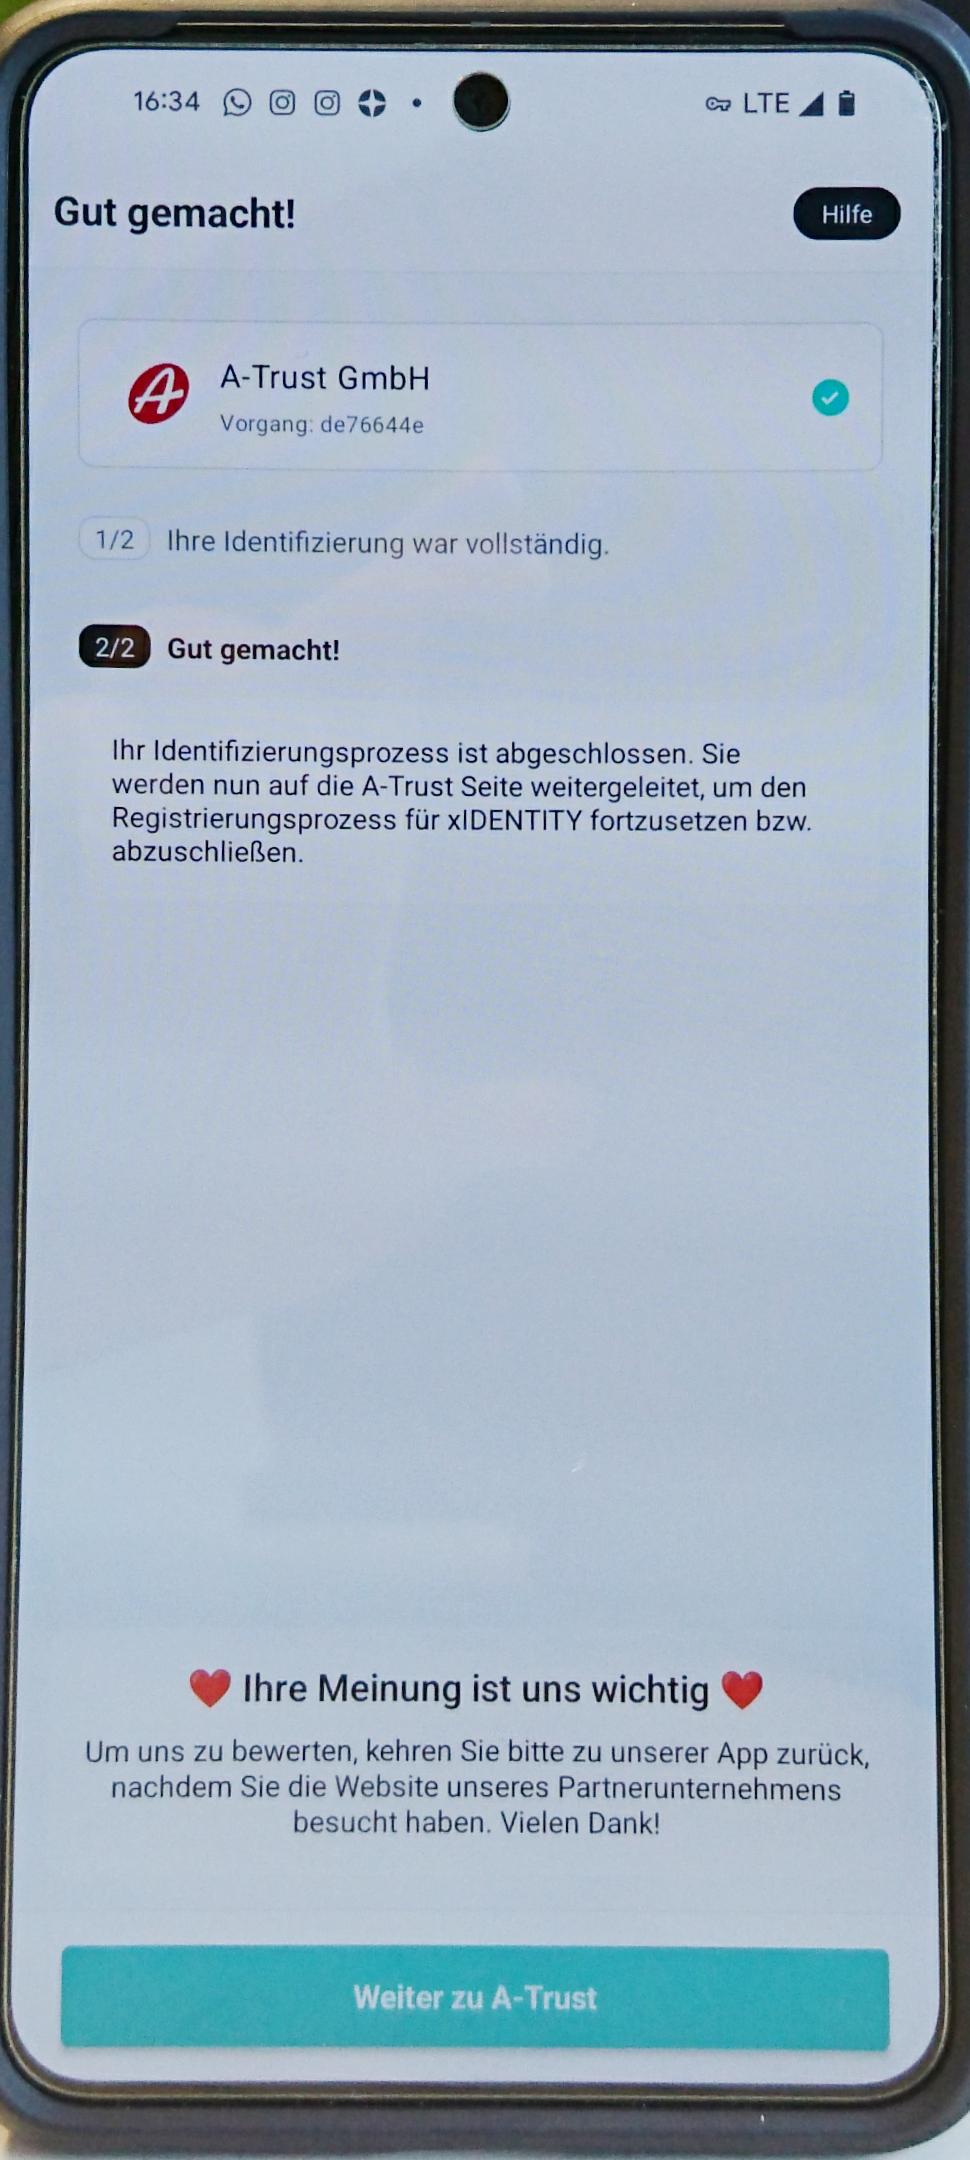
Figure 19: Completed identification process
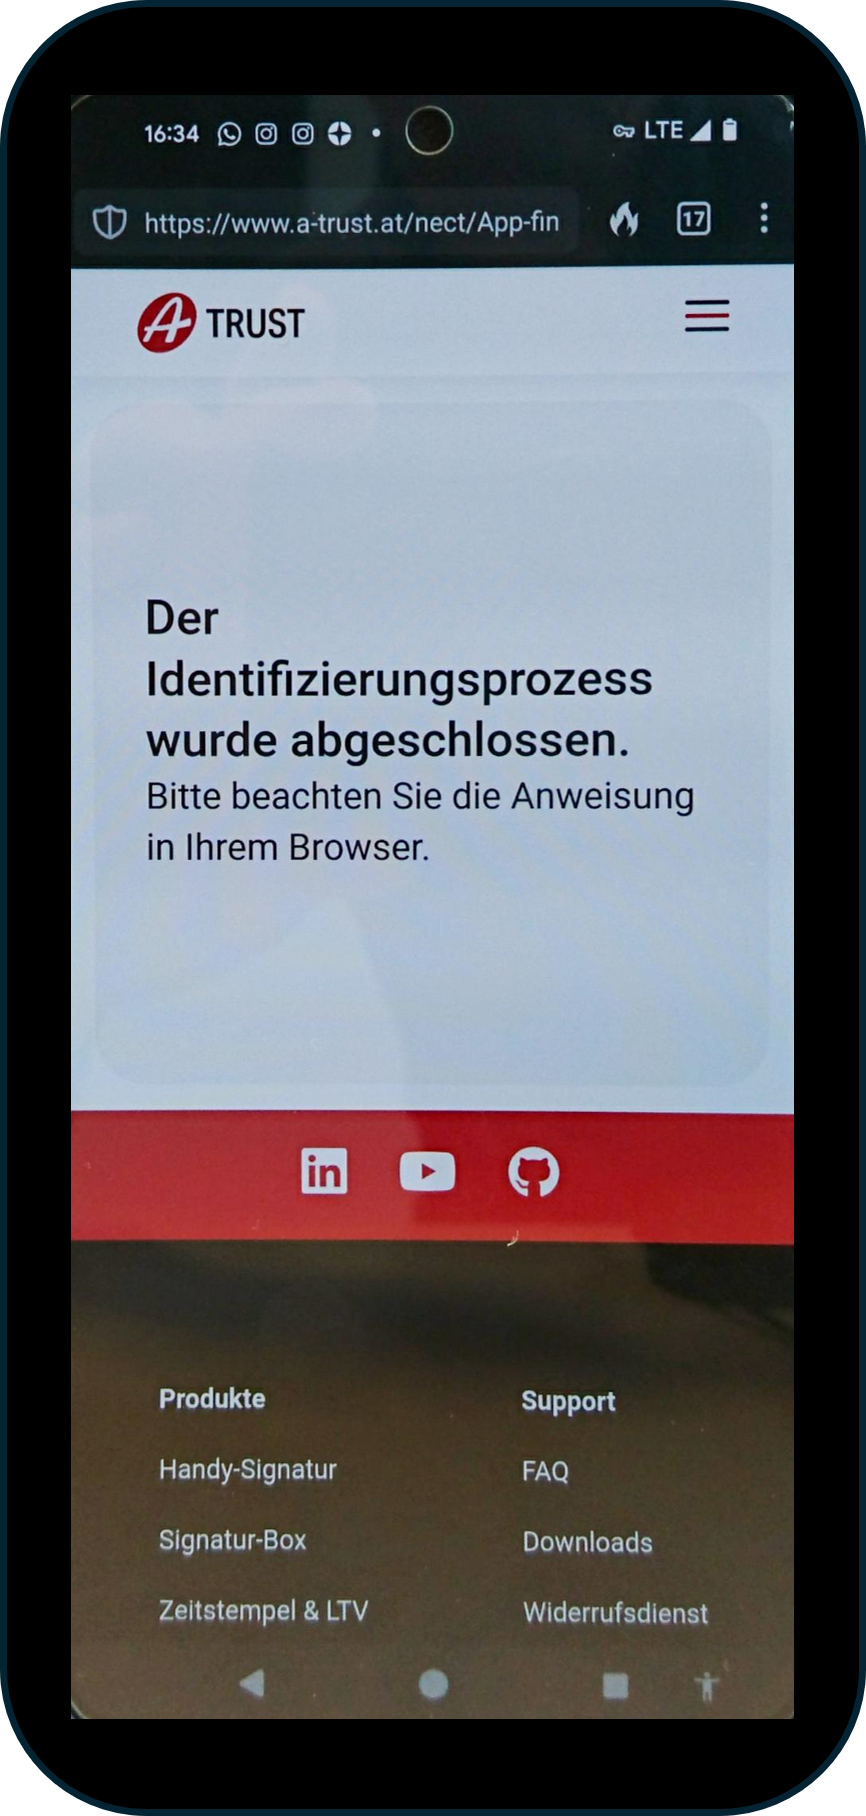
Figure 20: Please return to the browser window.
Step 14: After completing the NECT registration, please continue with the activation of your xIDENTITY. To do this, click on the [Activate EU-Identity] button (see Figure 21) and continue the process in the next chapter.
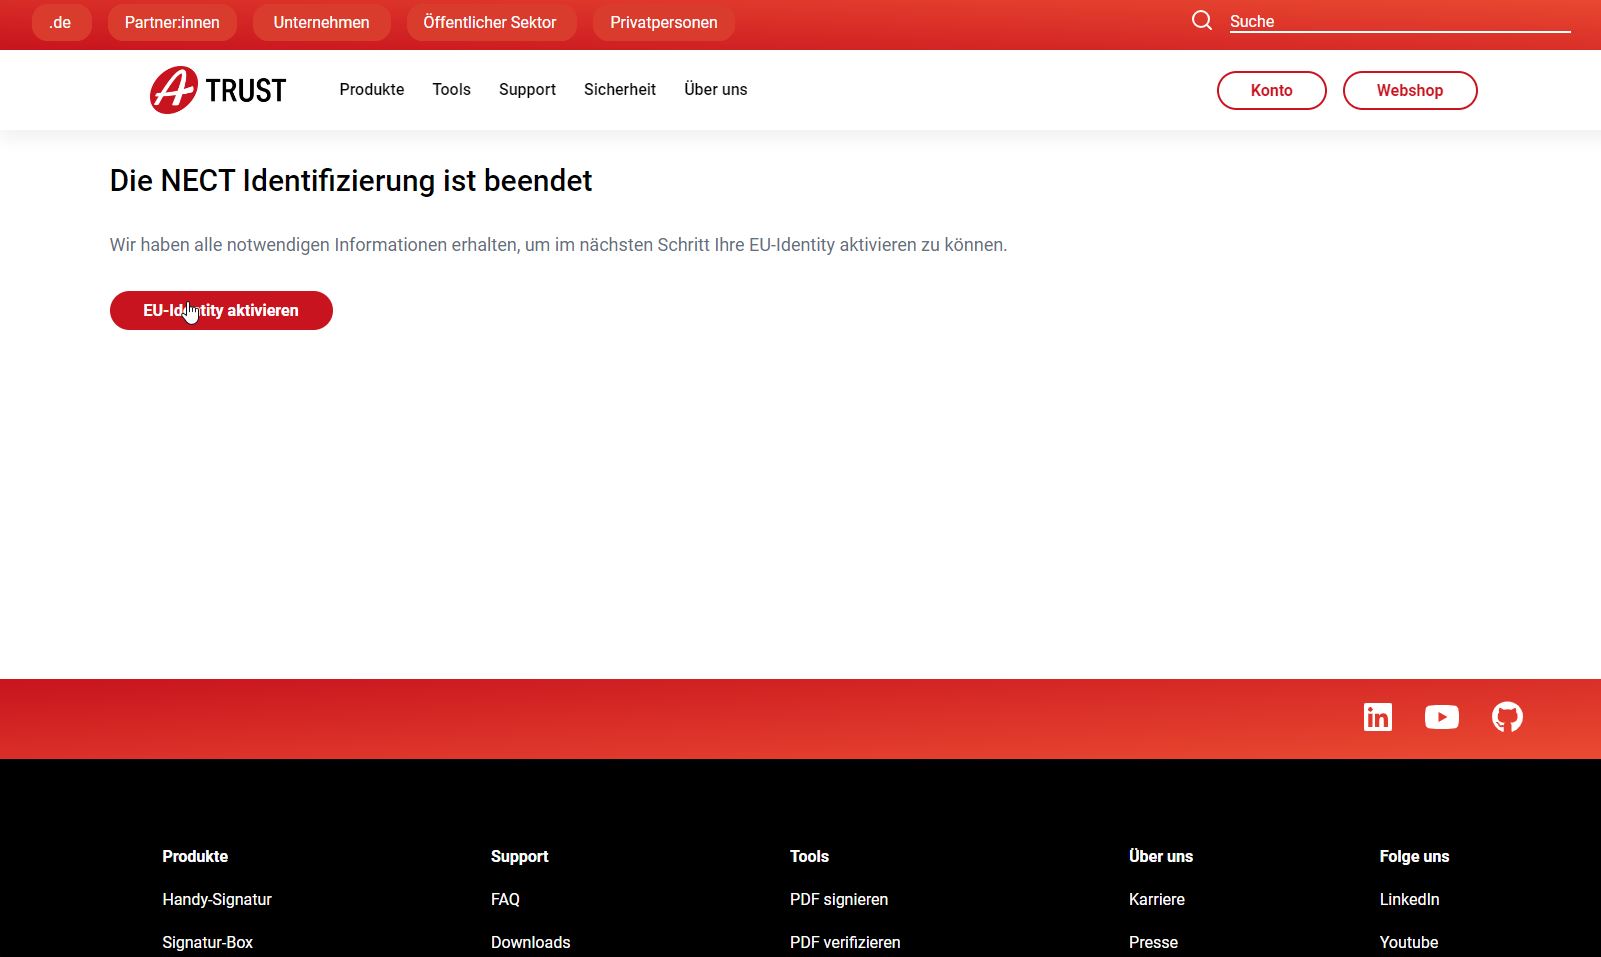
Figure 21: Browser window: NECT identification is complete.
1.3 Instructions for activating your xIDENTITY
As soon as you have clicked on the [Activate EU Identity] button (see Figure 21), a new window opens. Enter a freely selectable user name here (see Figure 22 [1]). Then set a signature password and repeat the password (see Figure 22 [2]).
The revocation password (“Widerrufspasswort”) is used to block and revoke your qualified certificate (see Figure 22 [3]).
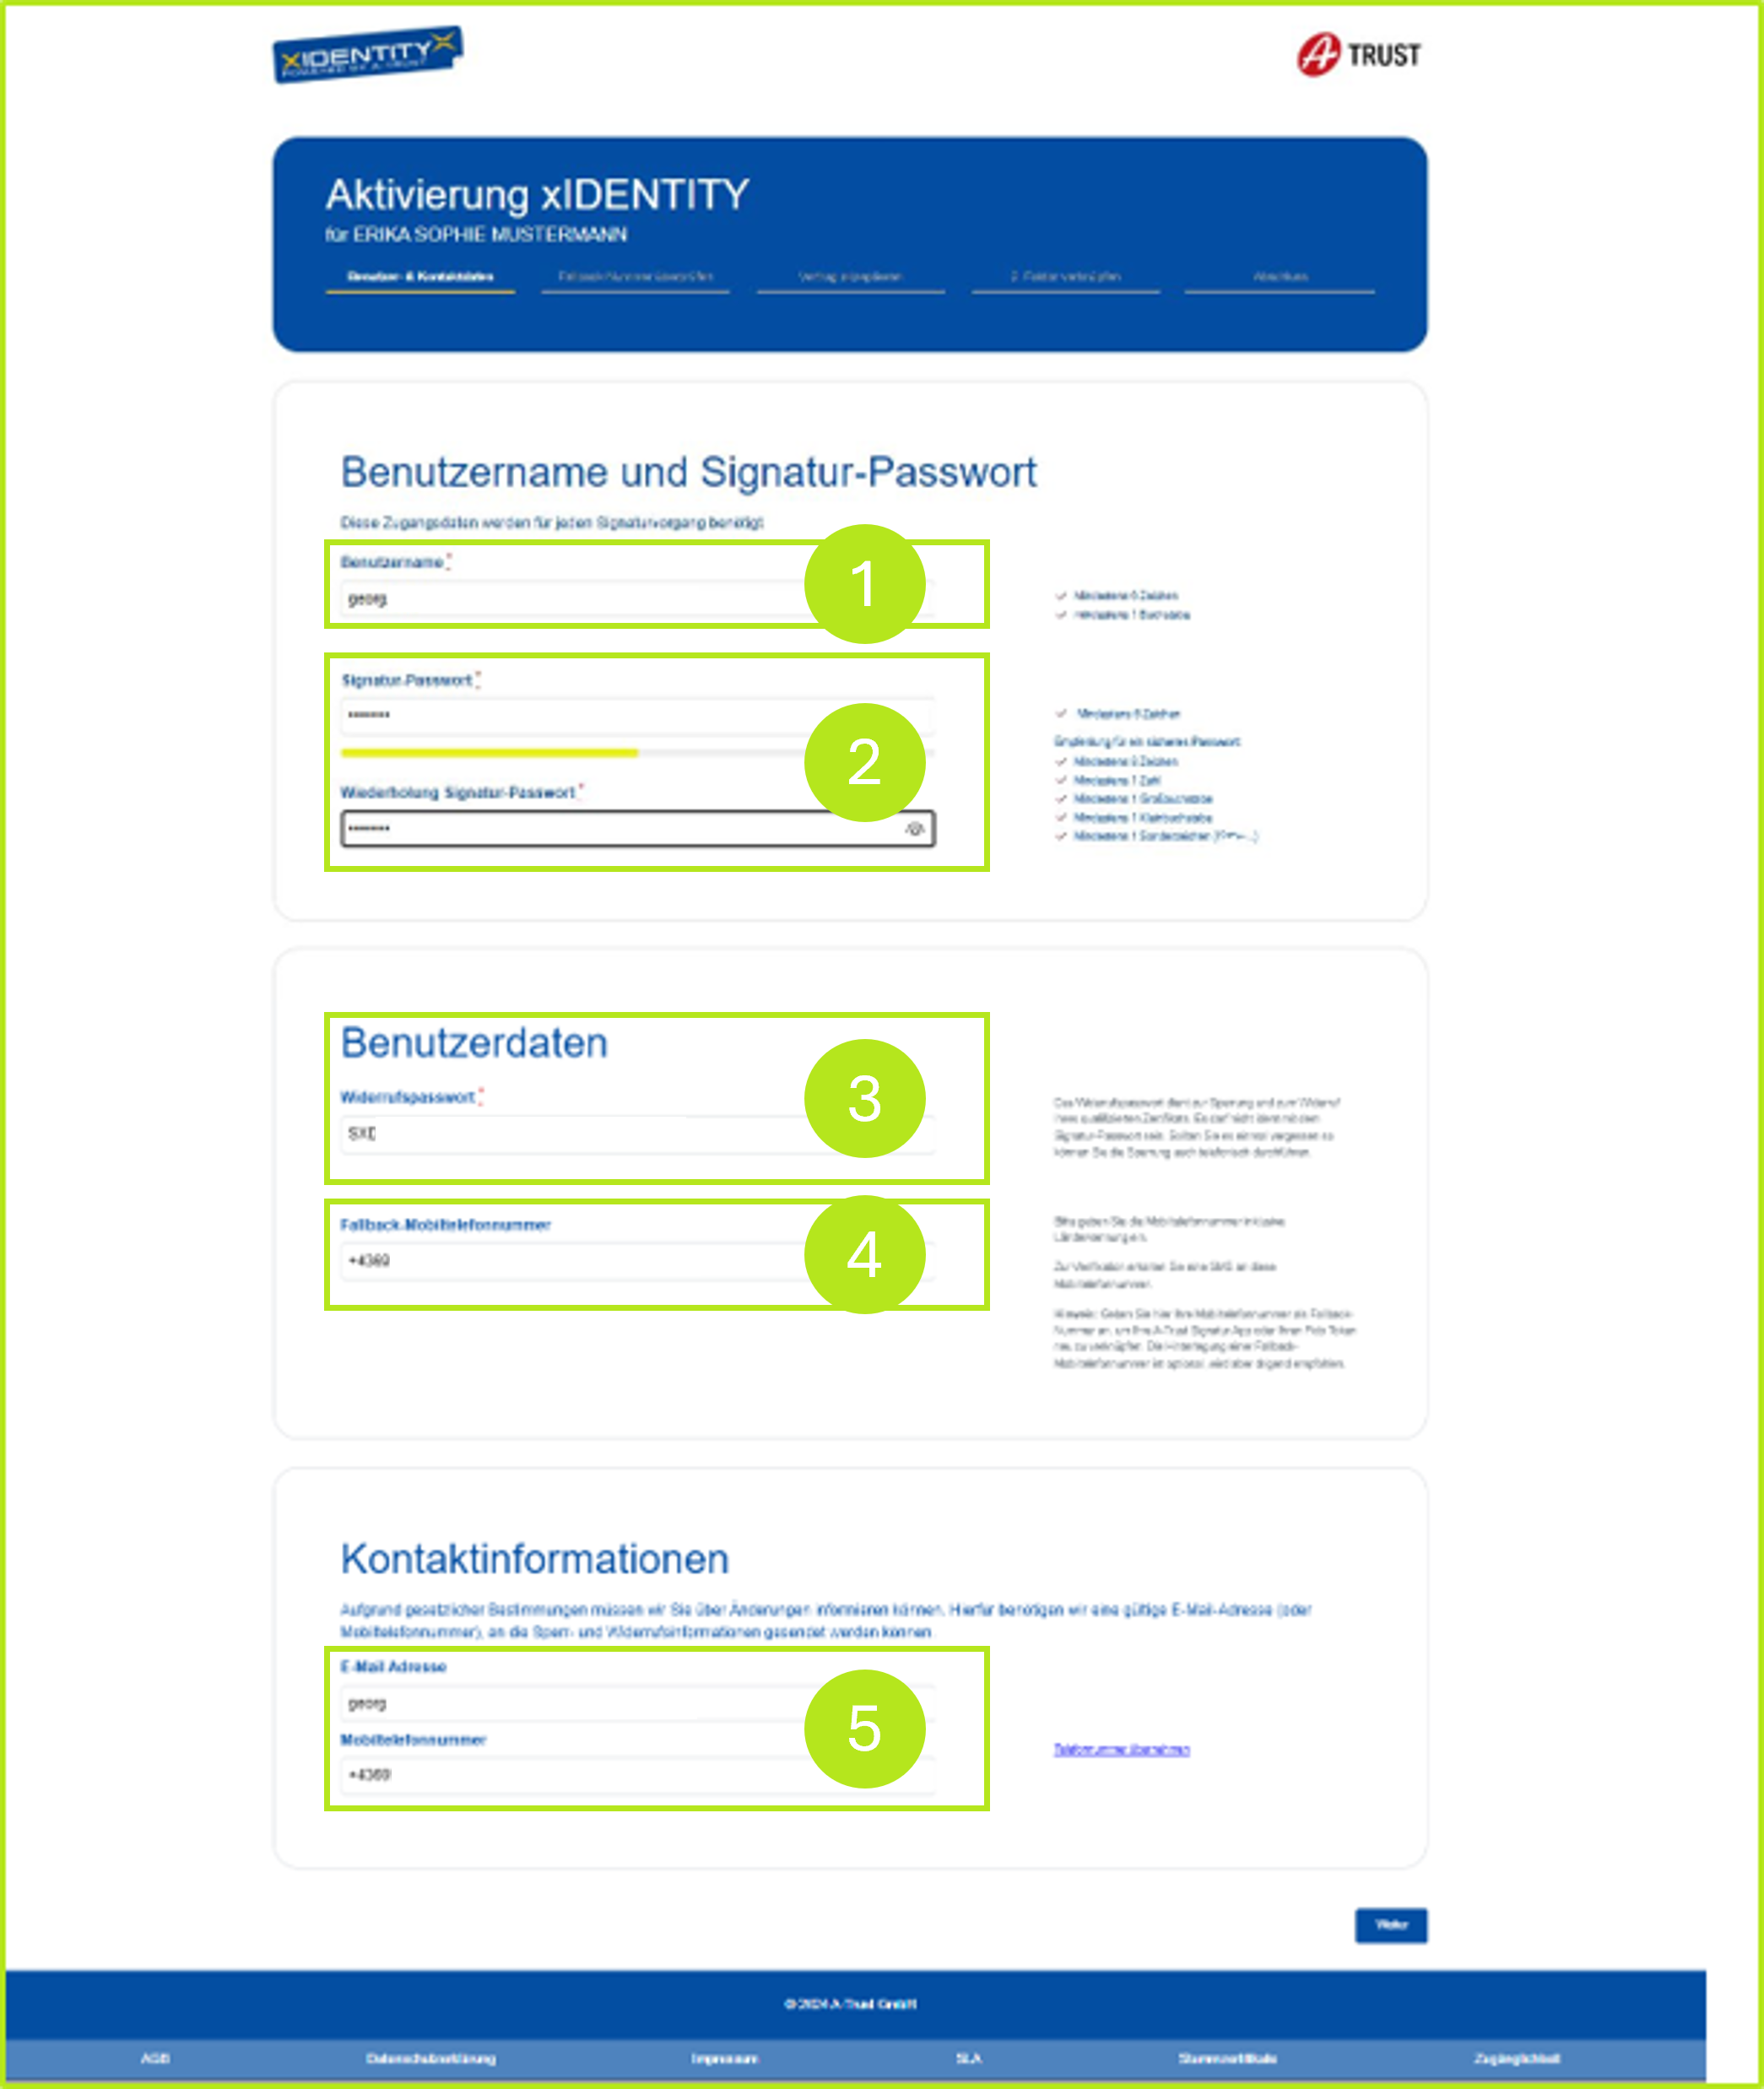
Figure 22: Activation of xIDENTITY from XiTrust at A-Trust
XiTip
Please keep the cancellation password secret and store it in a safe place. If you wish to delete your digital identity, you can only do so by entering the cancellation password. Please bear in mind that all signatures made up to that point are still valid.
The mobile number that can be entered in the "Fallback mobile number" field (see Figure 22 [4]) is optional, but is recommended by A-Trust.
The "fallback mobile number" can serve two purposes:
It serves as the basis for two-factor authentication via the A-Trust signature app or the Fido token.
Due to legal requirements, A-Trust must be able to inform you of any changes.
A-Trust requires a valid e-mail address or mobile phone number in order to be able to send you such blocking and cancellation information.
XiTip
There are now two ways to complete the process:
with SMS-TAN (fallback mobile number) (-> option 1, see section 1.3.1) or
without SMS-TAN (-> option 2, see chapter 1.3.2)
Option 2 is suitable, for example, if you have difficulties receiving text messages due to poor mobile reception. In this case, it is recommended that you do not enter a fallback number. This means that you no longer need to enter a TAN. You will also no longer need a telephone number for all further steps. Please note: This applies in particular to users who are outside the DACH region or in places with less stable mobile phone reception.
1.3.1 Step-by-step instructions for activating your xIDENTITY with SMS-TAN
Please note: If you decide to enter the fallback mobile number (-> option 1), please continue reading here. This is because if you enter a fallback number, you must confirm your telephone number in the next step using an SMS TAN (see Figure 23 [1]).
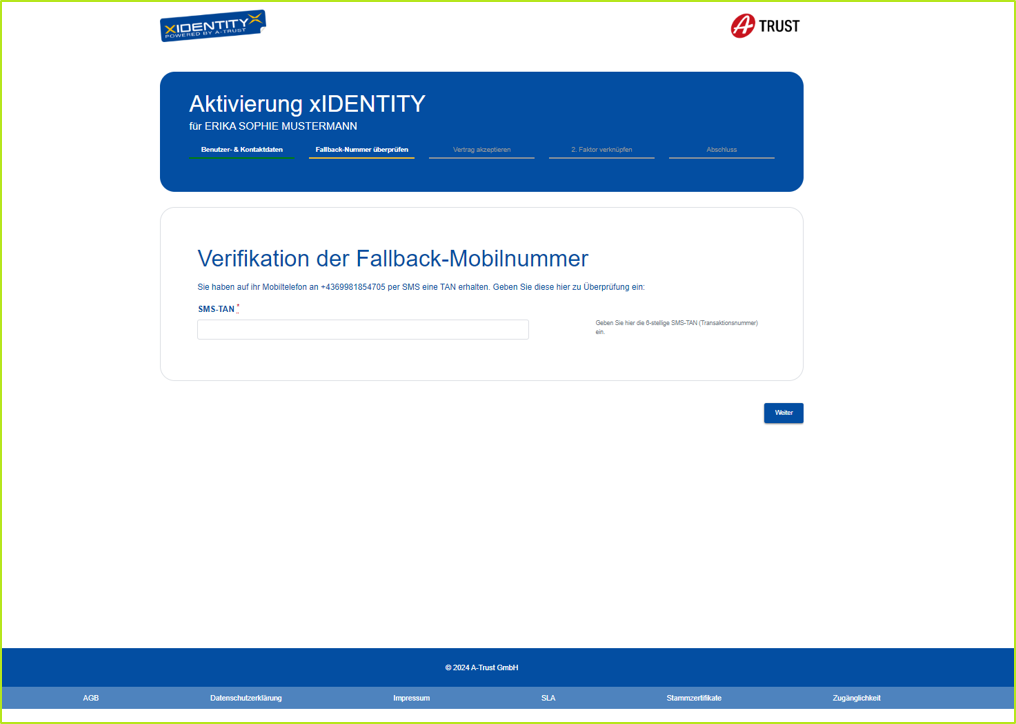
Figure 23: Verification of the fallback mobile number
Step 1: You will receive an SMS-TAN. Please enter this in the corresponding field (see Figure 23 [1]).
XiTip
Please note: The TAN is only valid for 5 minutes .
Step 2: Now select a second factor for triggering your A-Trust QES, a so-called two-factor authentication (2FA). You can choose between two options:
(1) 2FA via A-Trust signature app (see Figure 24 [1])
(2) 2FA via FIDO security key (see Figure 24 [2])
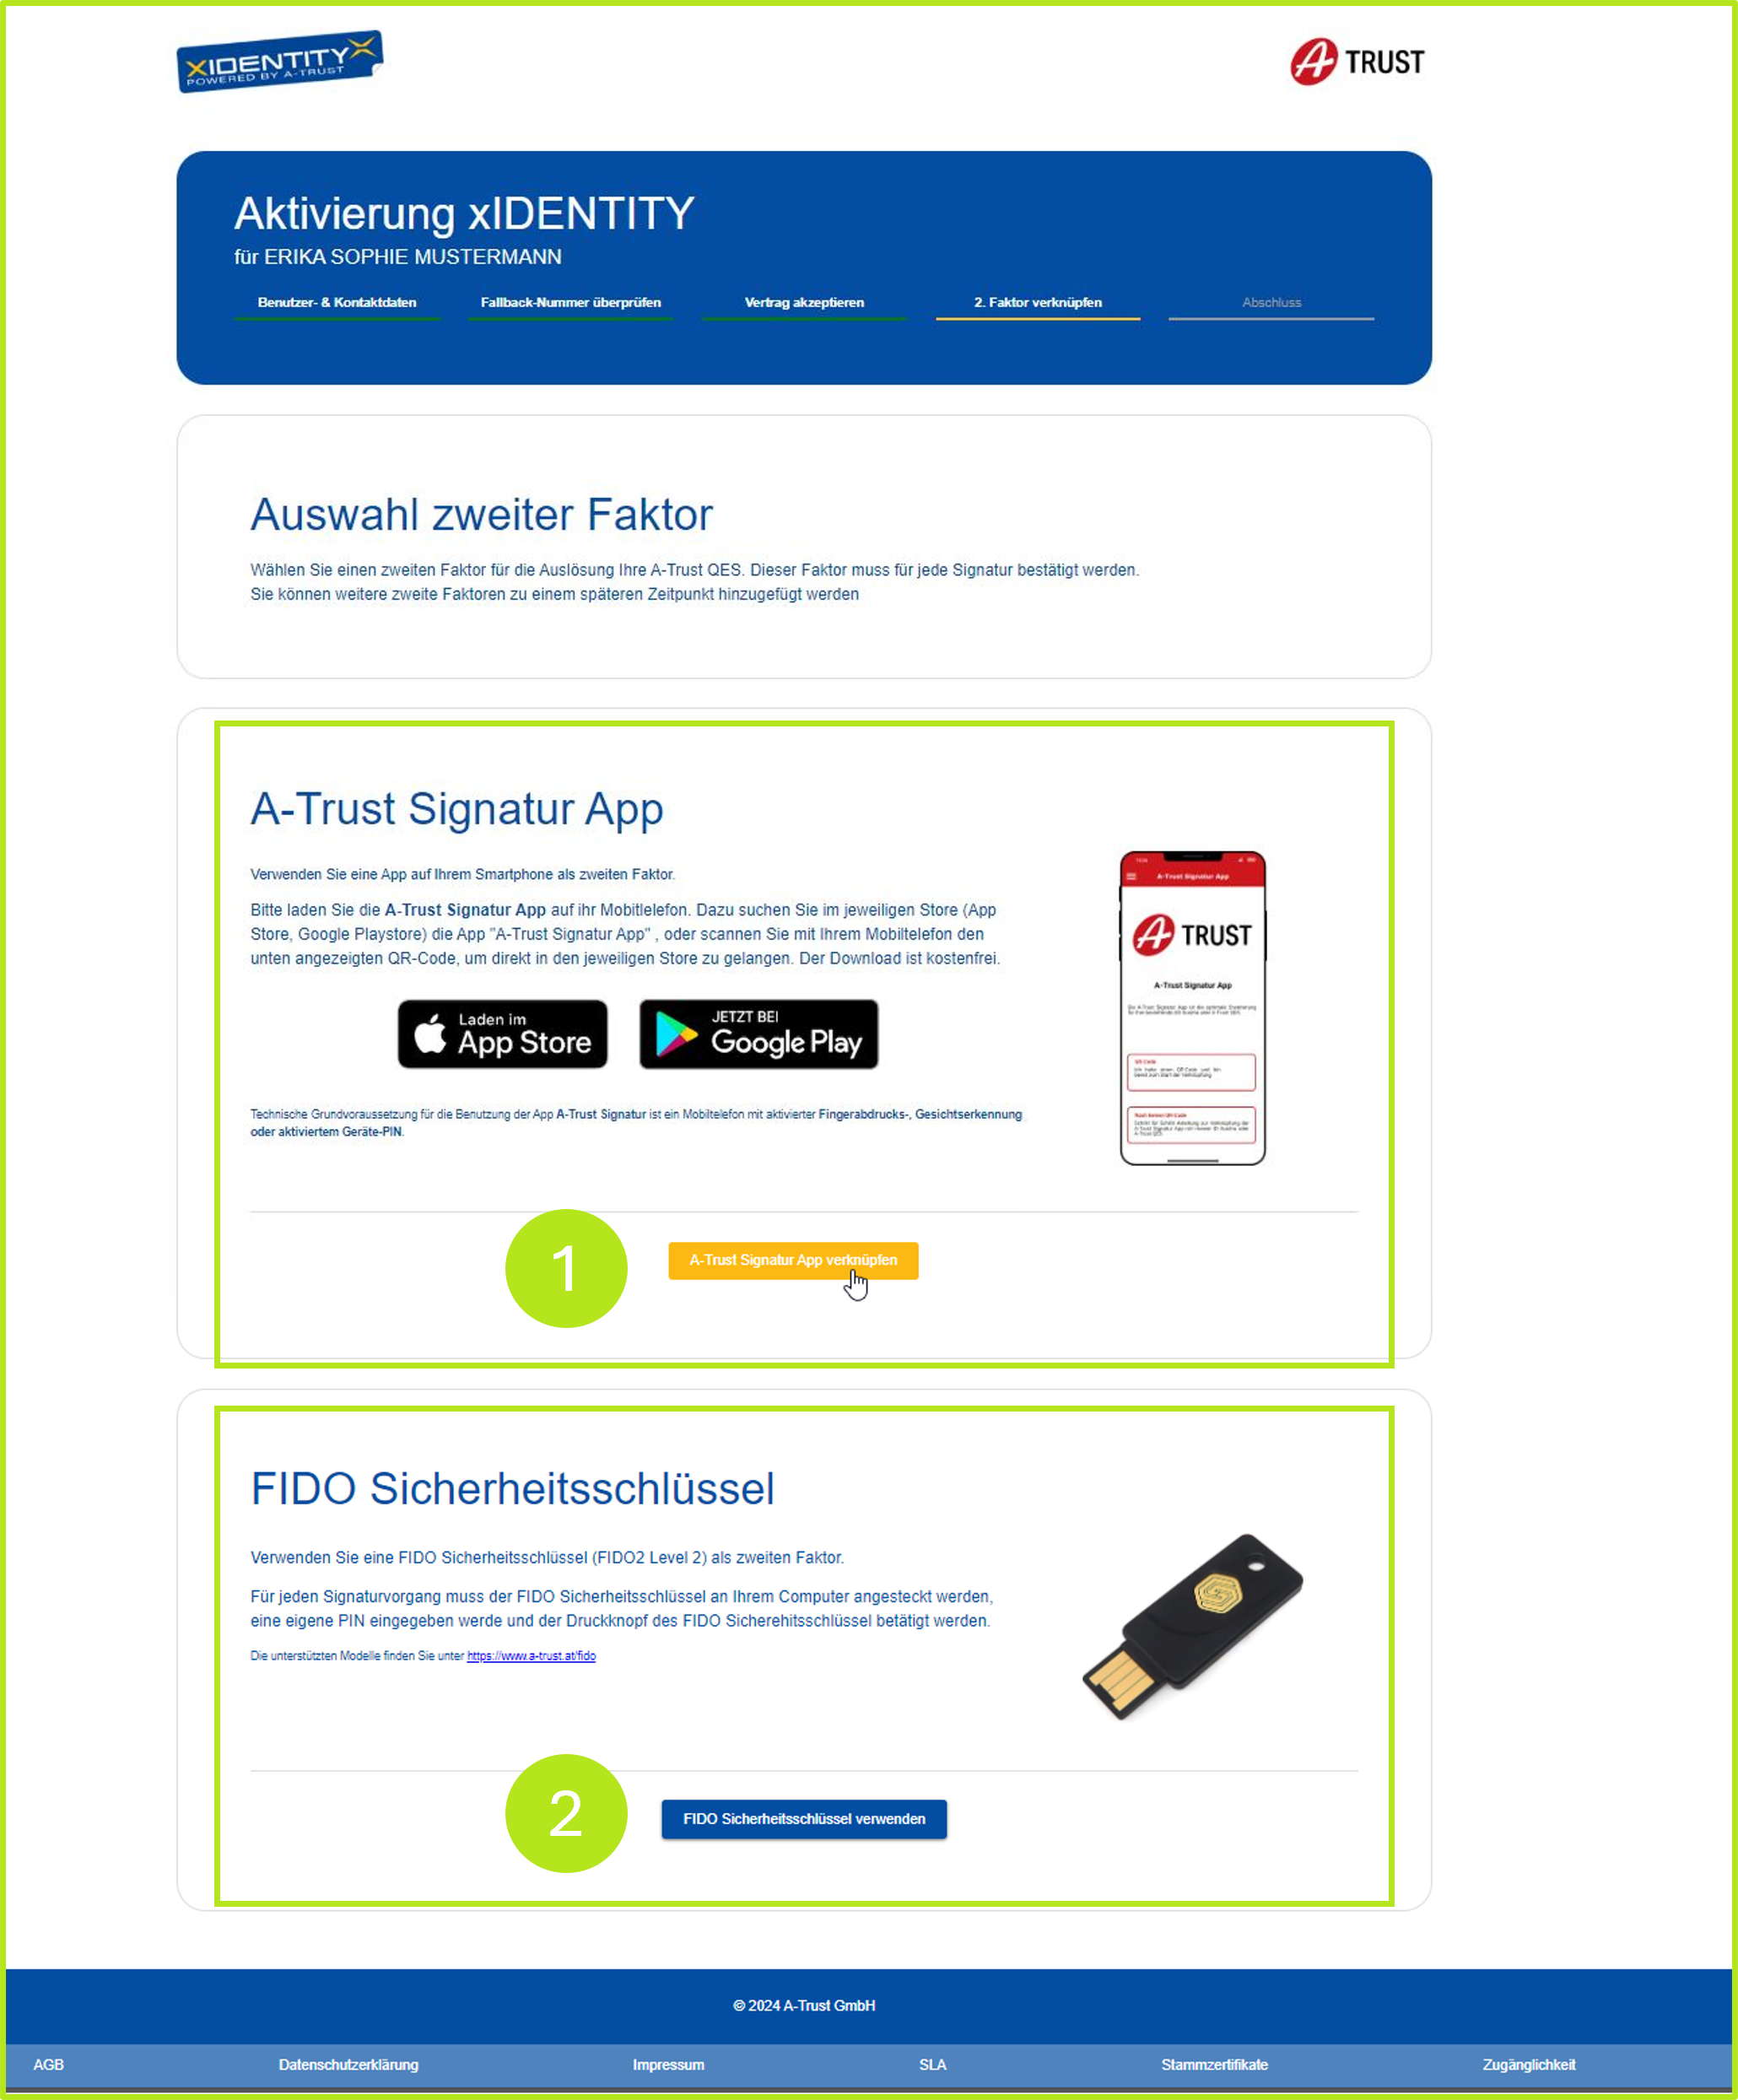
Figure 24: Two-factor authentication in the A-Trust portal
Step 3: If you decide in favour of the signature app ,please open it. In the next step, you will be asked to scan the QR code provided (see Figure 25) with your smartphone via the app in order to link the A-Trust signature app. The individual steps for scanning the QR code are explained below in steps 3a - 3c. If you do not need the explanation, you can also skip directly to step 4.
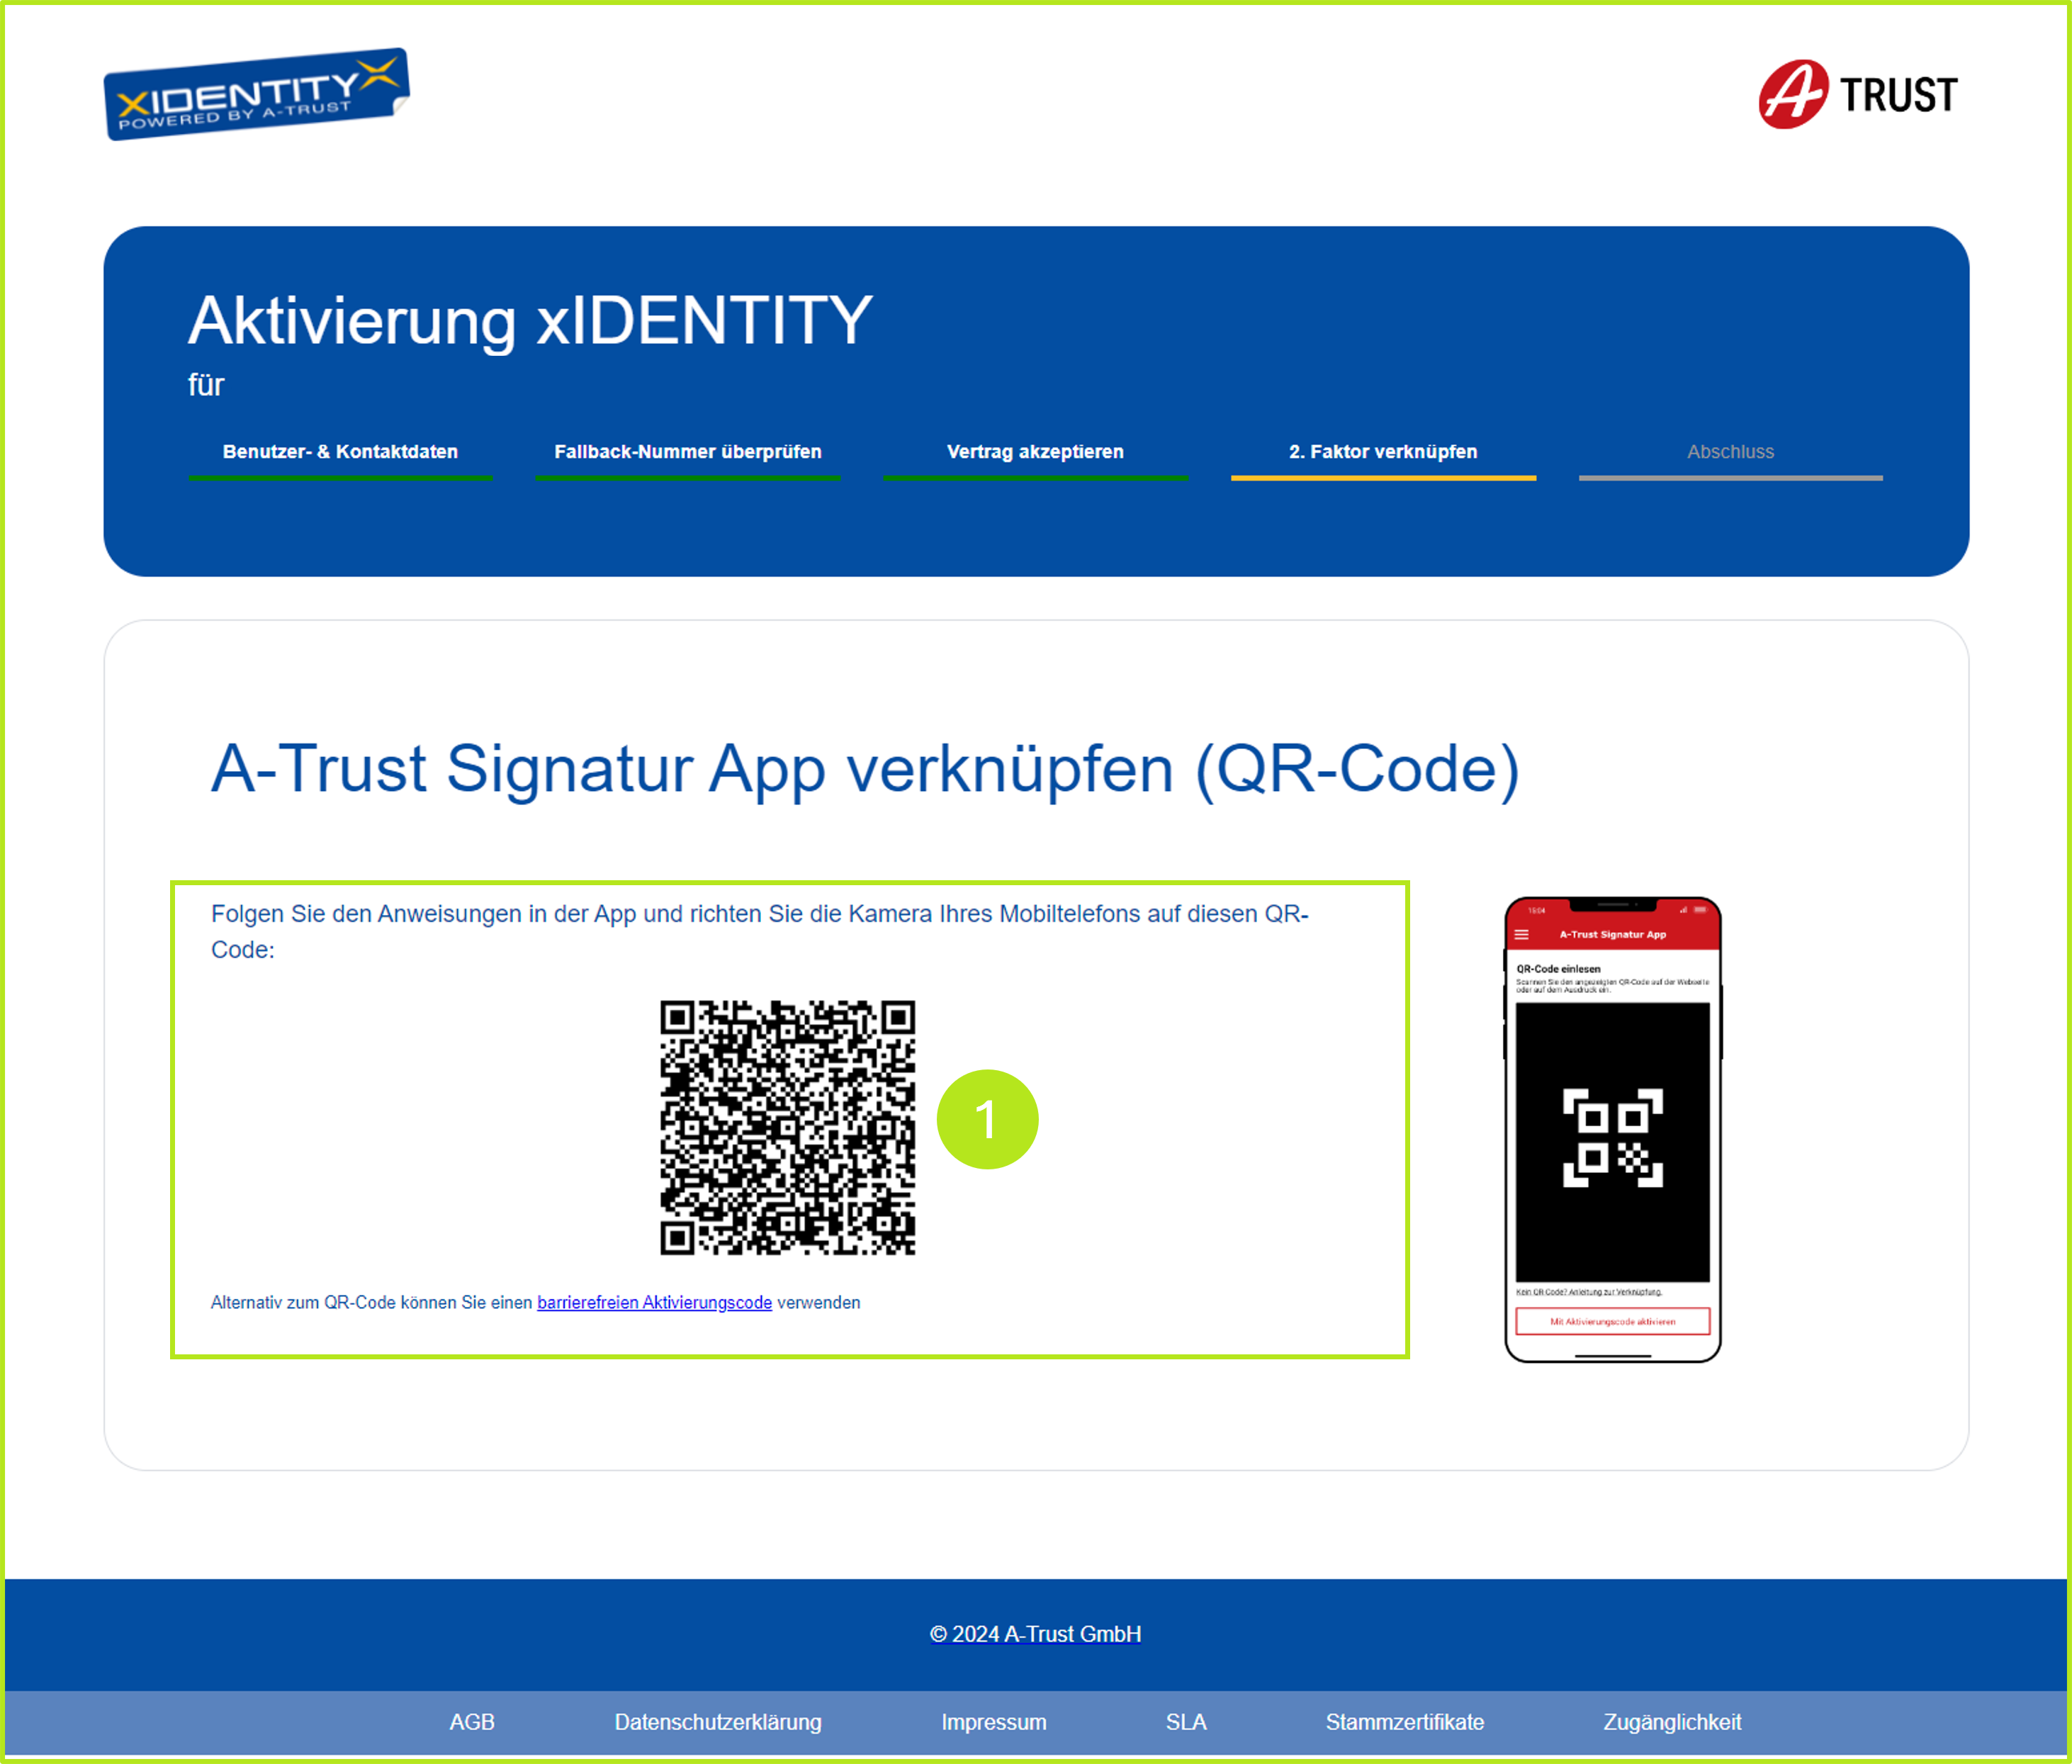
Figure 25: Linking the A-Trust signature app via QR code
Step 3a: To scan the QR code, open the A-Trust app on your smartphone and click on the I have a QR code and I am ready to start the link (see Figure 26).
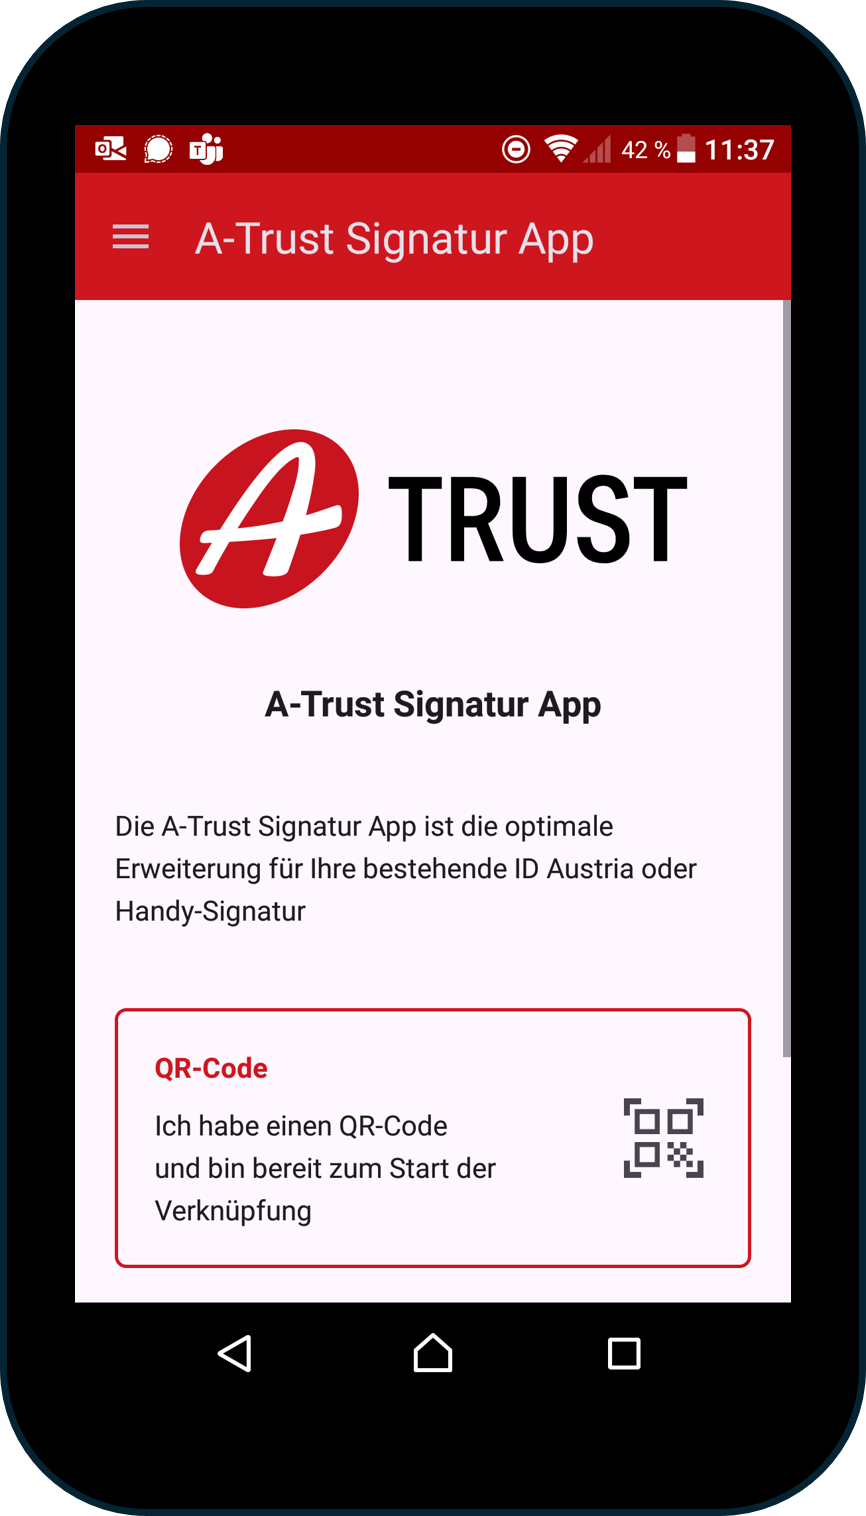
Figure 26: Open the pre-installed A-Trust signature app and select the option to scan the QR code.
Step 3b: Now scan the QR code on the desktop with your mobile phone and click on the [Activate with activation code] button (see Figure 27).
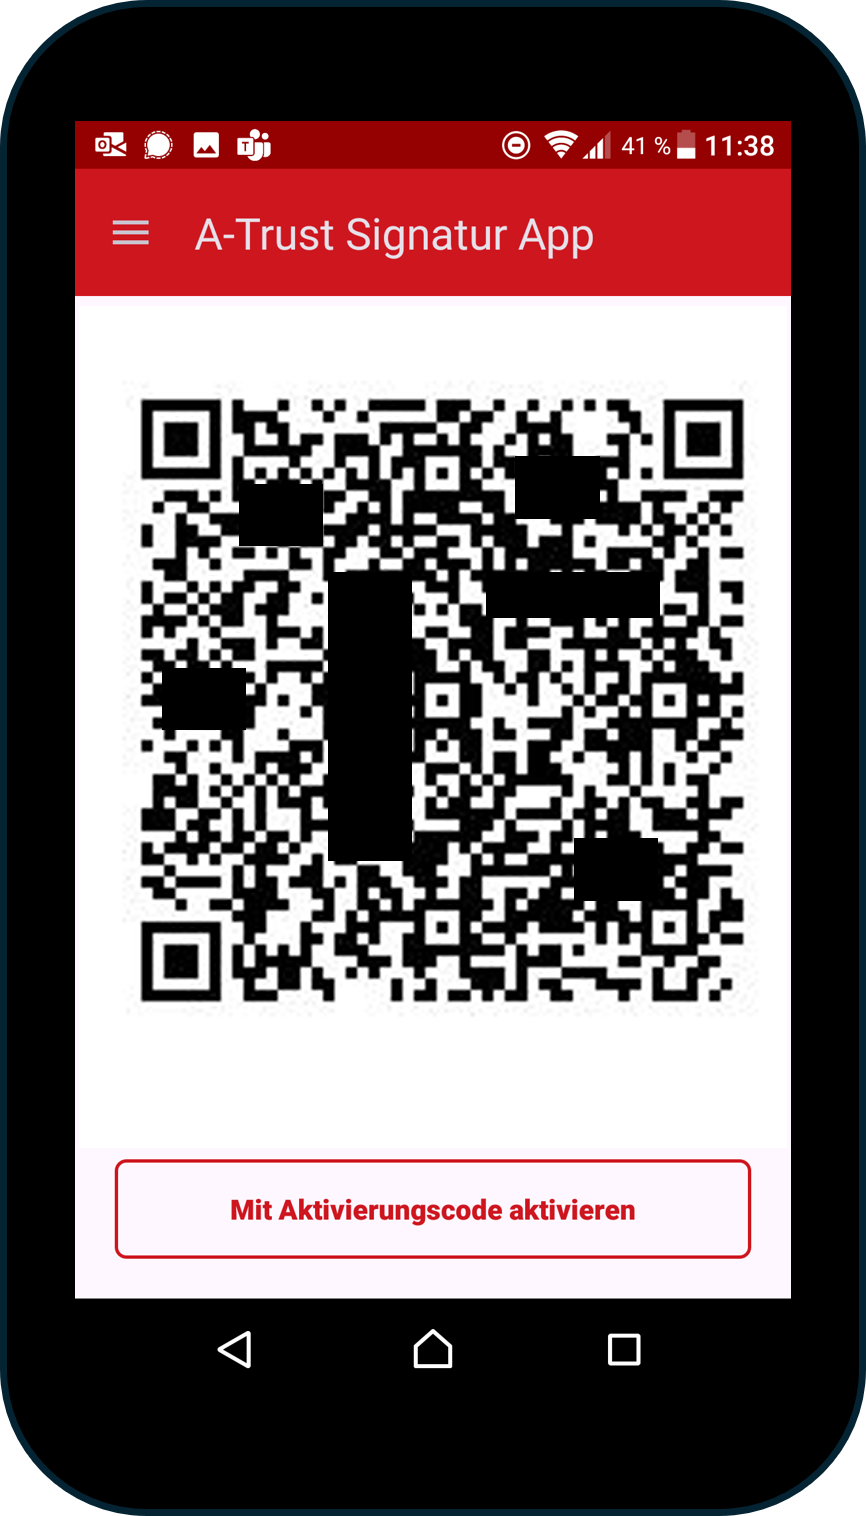
Figure 27: Scanning the QR code with the A-Trust signature app
Step 3c: As soon as your mobile phone is linked to the A-Trust app, you will receive an overview of your data in the app and can edit your signature requests under the [Request signatures] button (see Figure 28).
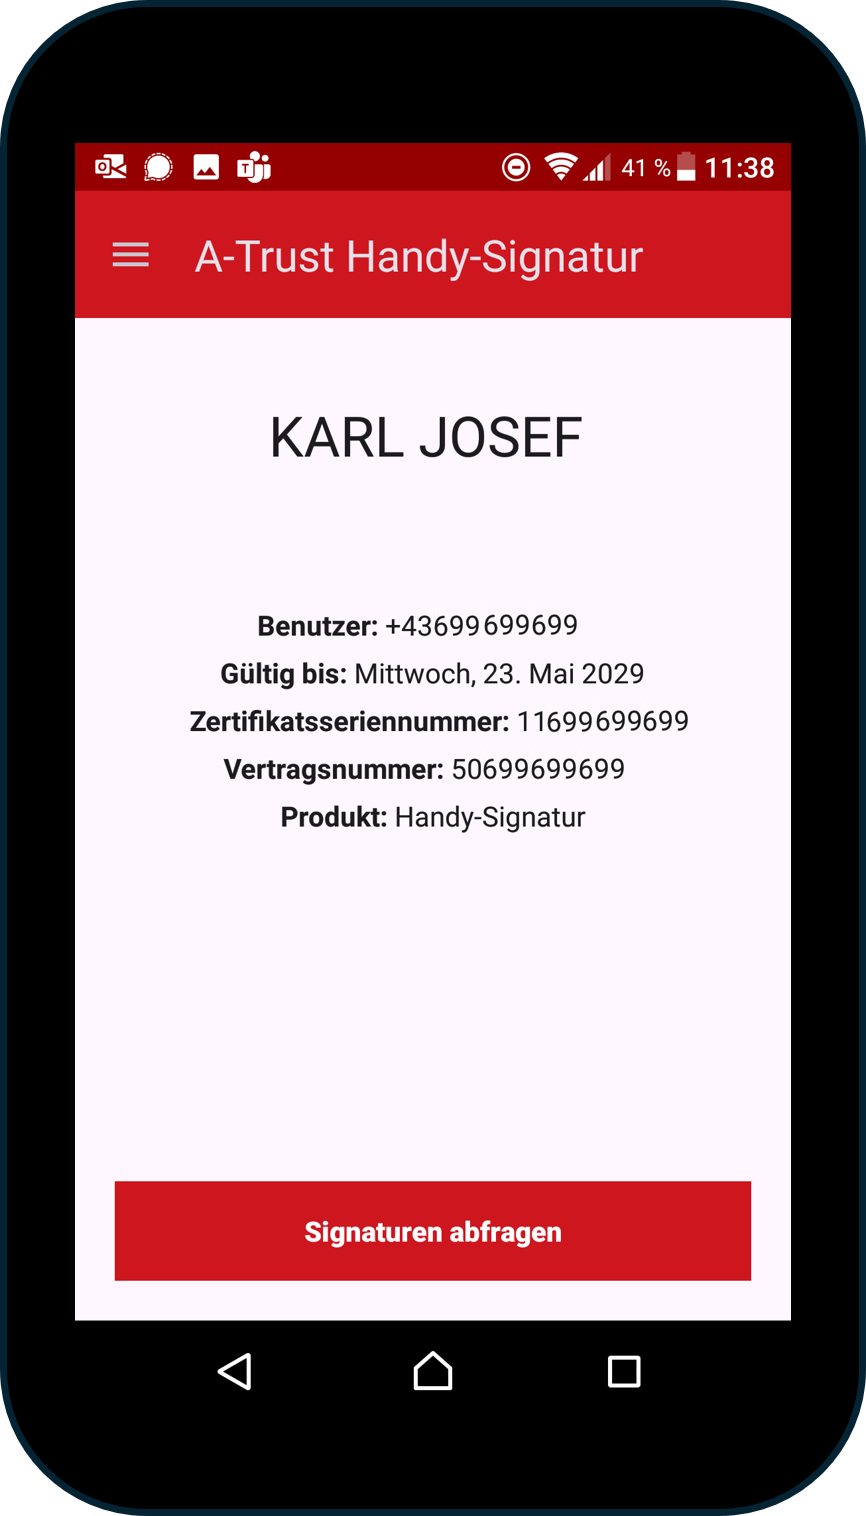
Figure 28: Overview of the data after successfully linking the app and mobile phone.
Step 4: Once the link has been successfully created, the message shown in Figure 29 will appear on your desktop.
XiTip
Please note: A certificate has only been issued to you when this step has been completed and the window below (see Figure 29) is visible.
Figure 29: xIDENTITY activation process completed - you now have a digital identity.
We at XiTrust congratulate you on your digital identity!
1.3.2 Step-by-step instructions for activating your xIDENTITY without SMS-TAN
Please note: If you decide in favour of option 2, please continue reading here.
XiTipp
If you choose the version without SMS-TAN, please do NOT enter a fallback number (see Figure 22).
Step 1: Select a second factor for triggering your A-Trust QES, a so-called two-factor authentication (2FA). This factor must be confirmed for each signature. You can choose between two options:
(1) 2FA via A-Trust signature app (see Figure 30 [1])
(2) 2FA via FIDO security key (see Figure 30 [2])
Figure 30: Two-factor authentication in the A-Trust portal
Step 2: You now have the option of viewing the signature contract in detail . To do this, please open the signature contract link. You can also view the following documents via other links (see Figure 31):
Information
GTC
Data protection notice
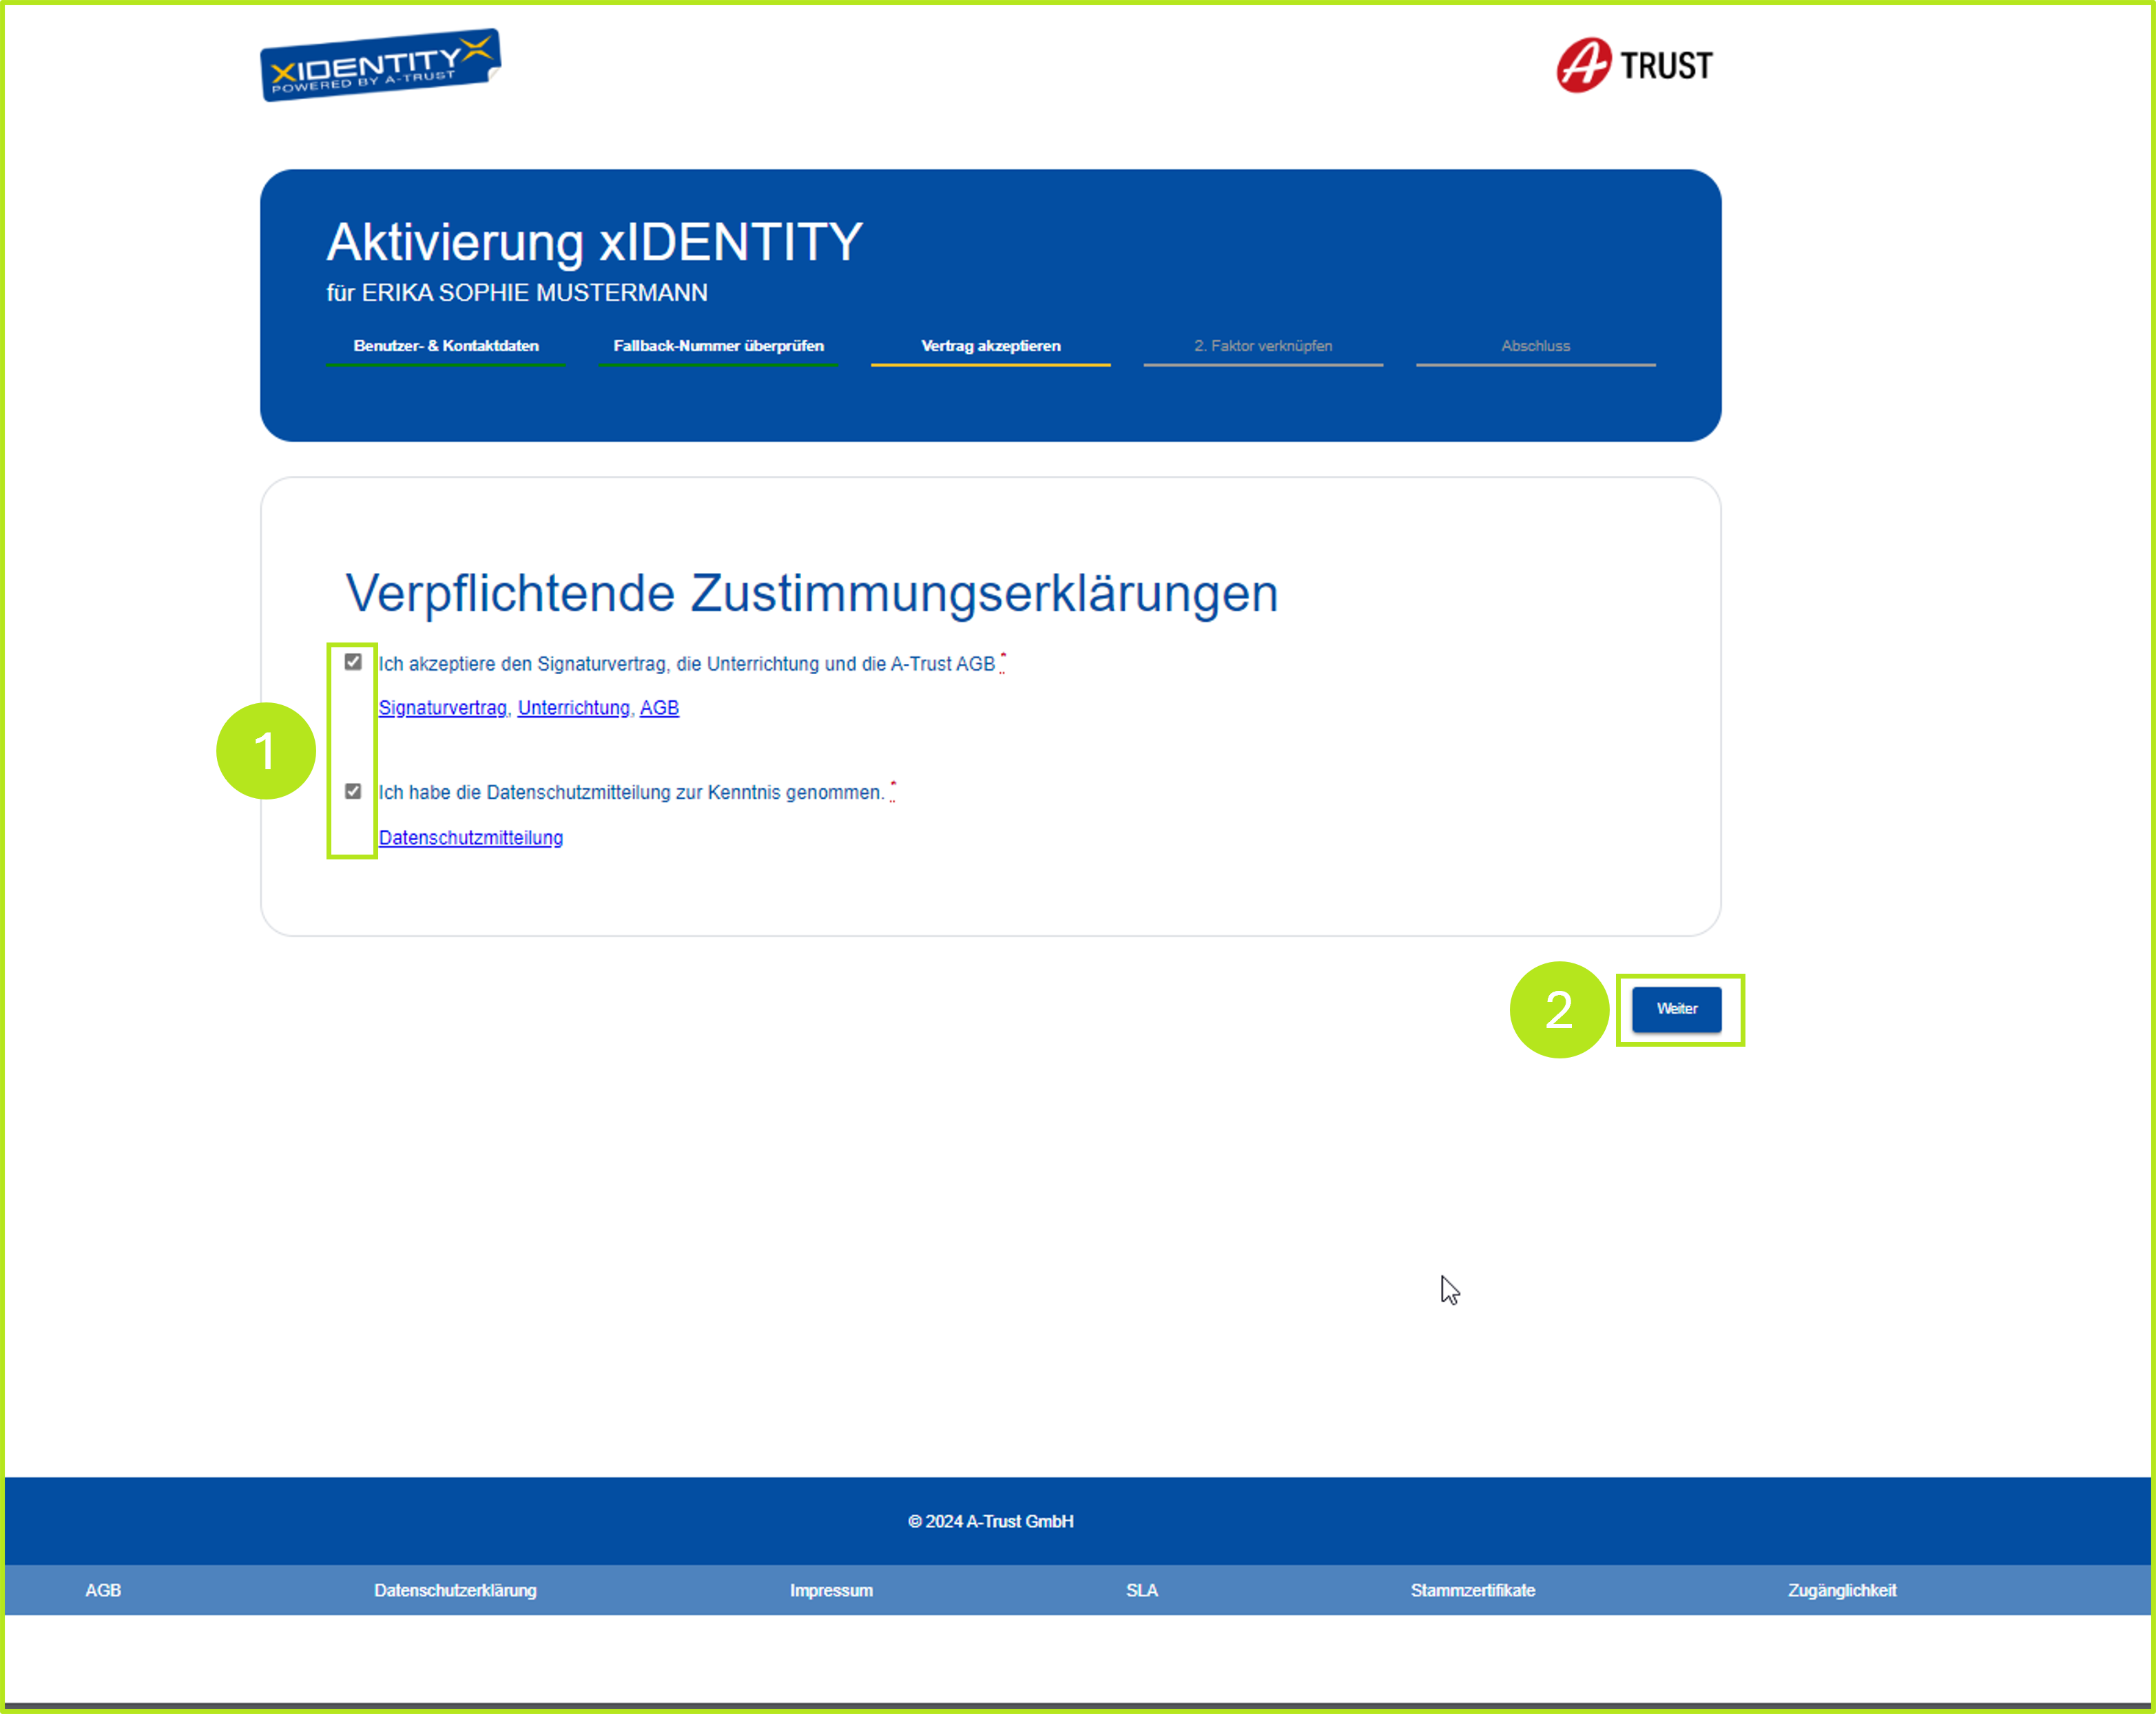
Figure 31: Mandatory declaration of consent and further links
Step 3: Read through the individual documents carefully, confirm that you accept the points by ticking the corresponding checkboxes (see Figure 31 [1]) and click on the [Next] button (see Figure 31 [2]) as soon as you are finished.
Step 4: If you decide in favour of the signature app, please open it. In the next step, you will be asked to scan the QR code provided (see Figure 32) with your smartphone via the app in order to link the A-Trust signature app. The individual steps for scanning the QR code are explained below in steps 5a - 5c. If you do not need the explanation, you can also skip directly to step 6.
Figure 32: Linking the A-Trust signature app via QR code
Step 5a: Please open the A-Trust app on your smartphone and click on the I have a QR code and I am ready to start the link (see Figure 33).
Figure 33: Open the pre-installed A-Trust signature app and select the option to scan the QR code.
Step 5b: Now scan the QR code on the desktop with your mobile phone and click on the [Activate with activation code] button (see Figure 34).
Figure 34: Scanning the QR code with the A-Trust signature app
Step 5c: As soon as your mobile phone is linked to the A-Trust app, you will receive an overview of your data in the app and can edit your signature requests under the [Request signatures] button (see Figure 35).
Figure 35: Overview of the data after successfully linking the app and mobile phone.
Step 6: Regardless of how you link your mobile phone to the app. After successful linking, the message shown in Figure 36 will appear on your desktop.
XiTip
Please note: A certificate has only been issued to you if this step has been completed and the window below (see Figure 36) is visible.
Figure 36: xIDENTITY activation process completed - you now have a digital identity. Congratulations!
We at XiTrust congratulate you on your digital identity!