[Business & Now Cloud] The signature process for external signers
After a job has been created in MOXIS, the external signers receive a link to the document by e-mail (see figure 1).
E-mail notification for external signers
The requirement for sending this e-mail to external signers is that this functionality has been activated by the MOXIS administrator.

Figure 1: Notification e-mail for external signers
The information regarding the process with a smartphone is only displayed in case of a Qualified Signature.
The link in the e-mail takes the external signers to the signature page (see figure 2).

Figure 2: Signature page for external signers
MOXIS Guest user interface

Figure 3: Menu bar in MOXIS Guest
The menu bar in MOXIS Guest (see figure 3) offers the following options:
Highlight text
Pan around the document
Show the next page of the selected document
Select zoom factor for page size
Select language
Check documents and attachments (the red mark will be replaced by a green tick once all required documents have been signed)
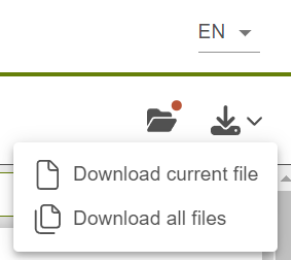
Download (Download current file/Download all files)
Switch between the documents to be signed
A job for external signers can contain the following types of files:
Documents: It is possible that more than one document needs to be signed.
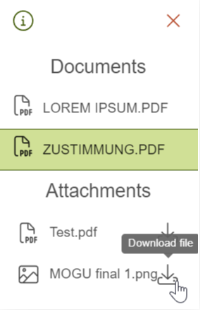
Attachments: Attachments are either documents or images that provide additional information. These files cannot be checked directly in MOXIS Guest. However, the external signers have the possibility to download them (see figure 4).

Figure 4: Download documents
All documents and attachments can be downloaded at once by selecting the option Download all files.
In case external signers click on the SIGN button even though they have not yet checked all attachments and documents to be signed , a pop-up opens. The user can go directly to the signing process by clicking on CONTINUE. If they select the CHECK DOCUMENTS button, the document menu opens automatically on the right-hand side of the screen (see figure 5 - 7).

Figure 5: Check documents pop-up

Figure 6: Document menu

Figure 7: Document menu information
Documents that have not yet been checked are also indicated by a red mark (see figure 7). As soon as a document is clicked, it is opened in the background. The document menu must be closed to check it.
In the document menu, attachments can be downloaded individually (see figure 8).

Figure 8: Download attachment
As soon as all documents have been checked, a green tick is displayed instead of the red mark at the document menu (see figure 9).

Figure 9: All documents checked
Now the job can be signed or rejected if necessary.
Signing an external job
As soon as the SIGN button is clicked, the signature menu opens with step-by-step instructions.
The signature menu includes the following sections (see figure 10):
The number of documents to be signed is shown in brackets in the heading.
The signature can be visualised either by drawing, text or image.
(Optional) In the Biometry and device data section, external signers can decide which data may be captured. However, this security feature must be enabled in the process configuration.
In the next section, the signature provider can be selected.
Optionally, it is possible that additional data is required.
The process is completed with the signature.

Figure 10: Signature menu
There are three options to visualise the signature (see figure 11 and 12):
DRAW: The signature is drawn into the input window. The entry can be deleted by pressing CLEAR.
TEXT: The text is preset but can be customised. The CLEAR button resets the text to the default.
IMAGE: An image of the signature (e.g. jpg, png, gif) can be uploaded here. The maximum file size may differ according to the system configuration.

Figure 11: Visualisation options
.png)
Figure 12: Visualisations
The signature provider can be selected from the provided options (see figure 13).
.png)
Figure 13: Select signature provider
External signatories who use a smartphone to sign with a Qualified Signature must switch from the mobile phone signature app to the browser to complete the process (see figure 14)!

Figure 14: Smartphone notice in the e-mail for qualified signature
As soon as the process has been completed via the signature provider, a confirmation is displayed and the external signers can either close the browser window or switch back to the job (see figure 15).

Figure 15: Confirmation when job is completed
Rejecting an external job
The order can also be rejected by external signers.
If required by the process configuration, external signers must provide a reason for rejection (see figure 16).
Figure 16: Enter reason for rejection

Figure 17: Confirm reason for rejection
As soon as the reason for rejection has been confirmed (see figure 17), a confirmation is displayed and the browser window can be closed (see figure 18).

Figure 18: Close the browser window
Download of the document by external signers
Once the signature process is complete, the external contact receives an e-mail with a download link for the document (see figure 19).
Figure 19: E-mail with download link
