
How do you register with the XiTrust Customer Service Desk for support enquiries?
Content
XiTrust provides a service desk (based on Atlassian Jira) for customers. Support requests can be submitted and tracked here. This article provides step-by-step instructions on how to register for the service desk and what options are available to you for creating a ticket.
1. Step-by-step instructions for initial registration with the XiTrust Service Desk
Step 1: To use the Service Desk, you must first register. To do so, go to our website at xitrust.com and click on Ressources (see figure 1 [1]) and select the Customer Support menu item (see figure 1 [2]). Then click on the [Create ticket]-button (see figure 2). You will be automatically redirected to the login or registration area of the service desk.
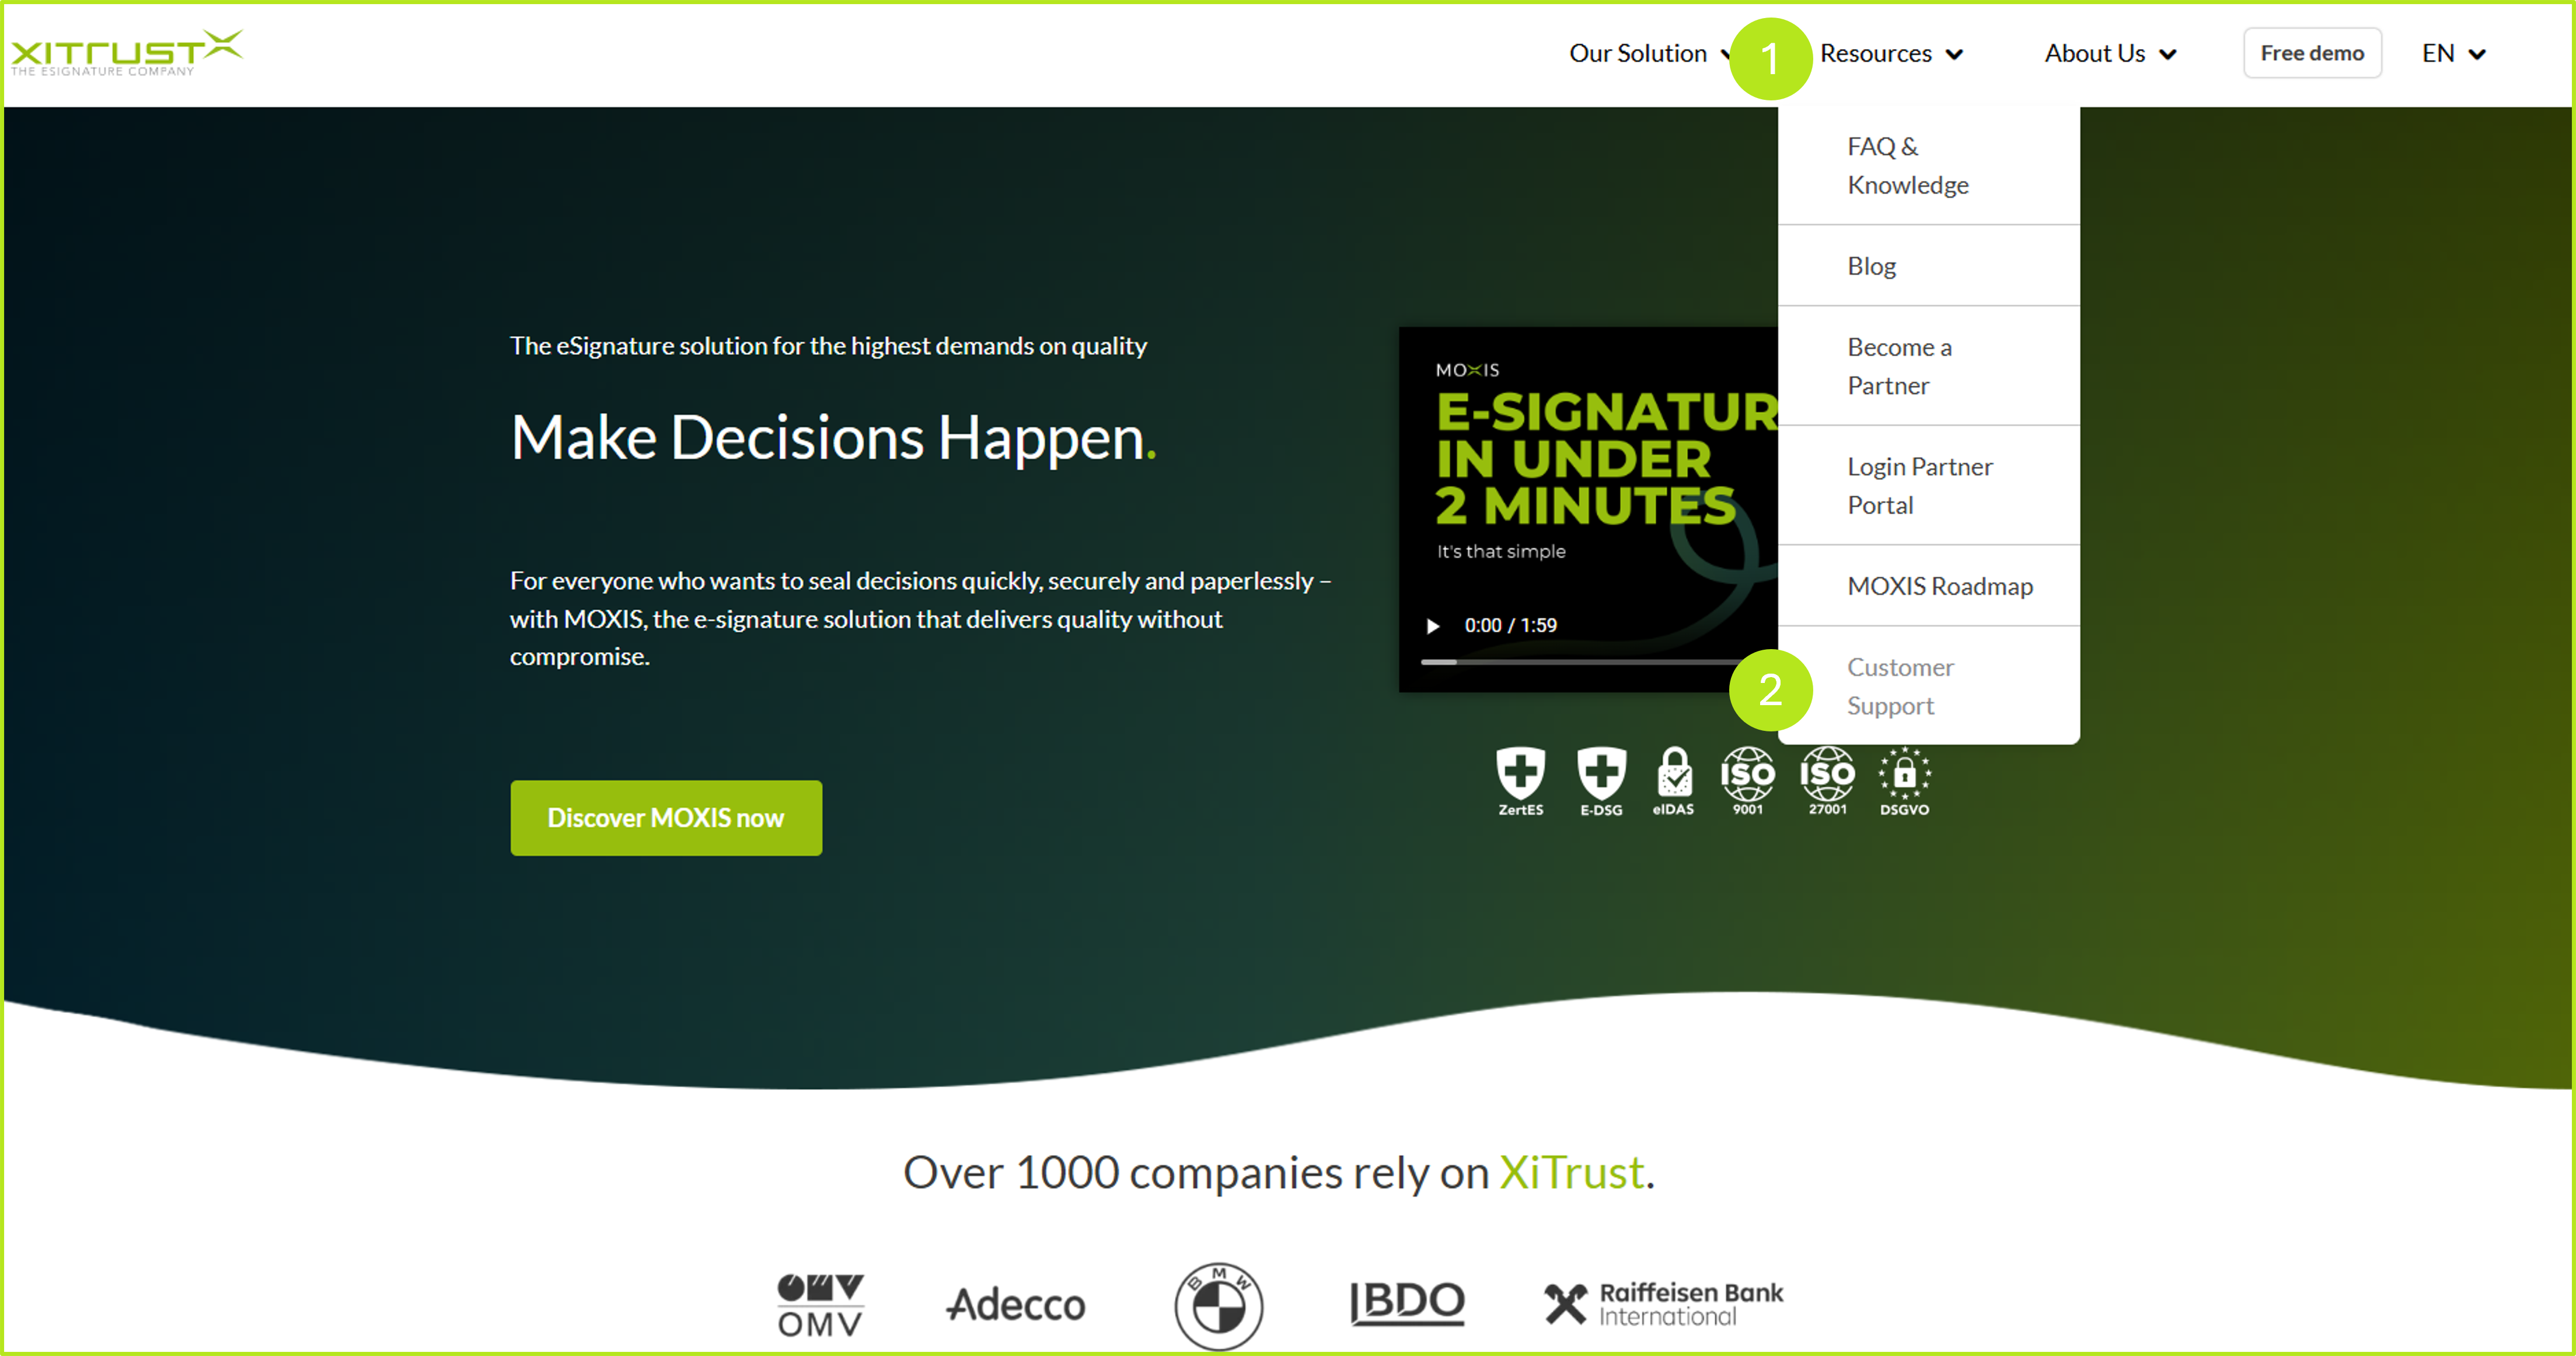
Figure 1: Open the Customer Support-tab at http://xitrust.com

Figure 2: Create ticket to inform the XiTrust Customer Support about your troubles
Step 2: The XiTrust Service Portal allows you to create a ticket in the service desk. A ticket usually contains all the information relating to a support case.
Click on XiTrust Service Portal (see figure 3 [1]) to open the XiTrust Service Desk. You will need to register the first time you open it. If you are logging in again, simply log in.
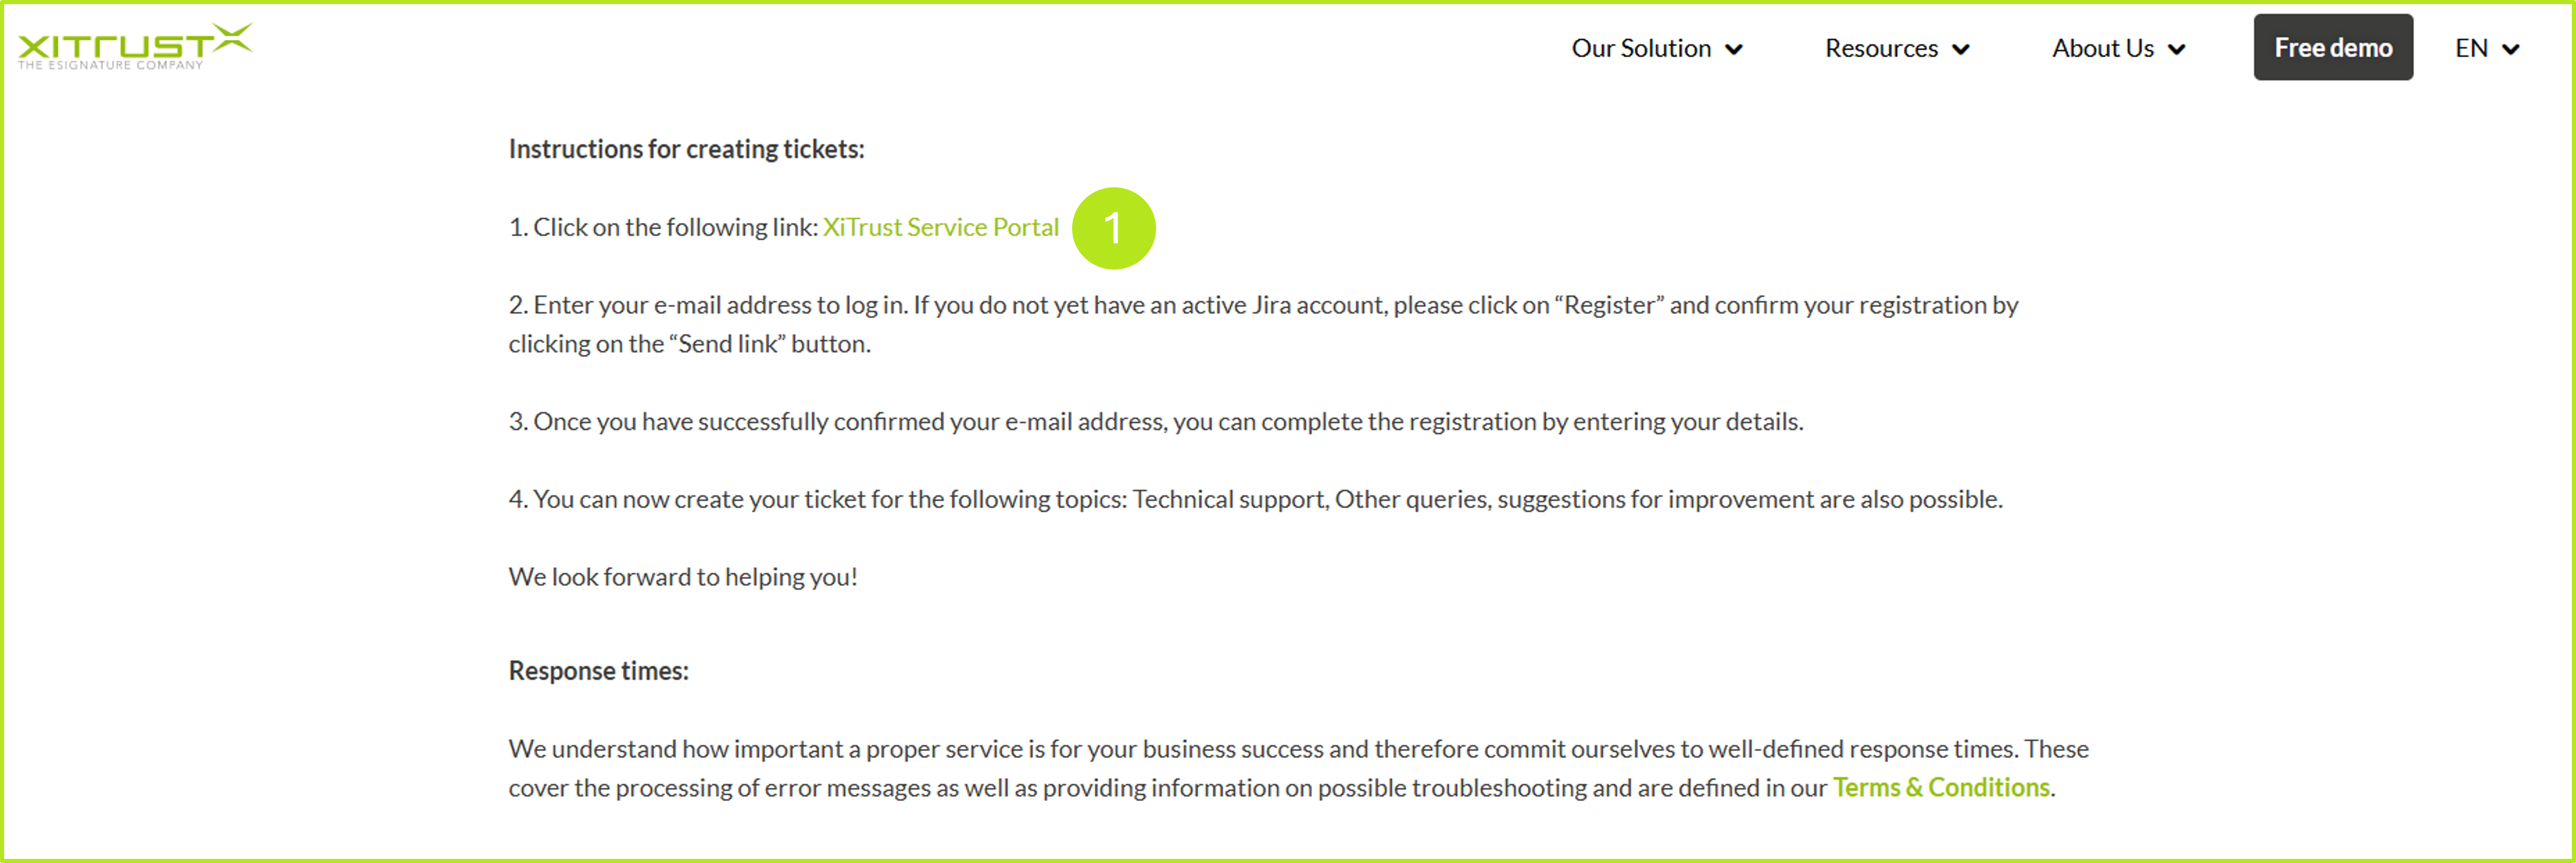
Figure 3: Open the XiTrust Service Portal
XiTip
We recommend that you contact us directly with a ticket rather than calling us, especially if you have technical questions. This is because a ticket allows you to attach a screenshot of your problem.
It often happens that a support agent has to ask for a screenshot during a phone call in order to get a clearer picture of the problem. The fact is: the more information our support staff receive from you in the first step, the more specifically they can process your support case and the faster it can be resolved.
Often, a telephone or text-only description of a problem is simply not informative enough to draw the right conclusions.
Please understand that we are happy to assist you by phone and email and want to respond as quickly and accurately as possible to the challenge you are currently facing.
Step 3: A window will now open. In the first field, please enter your email address. You will then receive a confirmation link at the email address you entered (see figure 4).
.png?inst-v=d601b899-05f7-48b8-bb07-f142edd7f092)
Figure 4: Check e-mail
Step 4: In the e-mail you have now received, please click on the [Sign Up]-button (see figure 5).
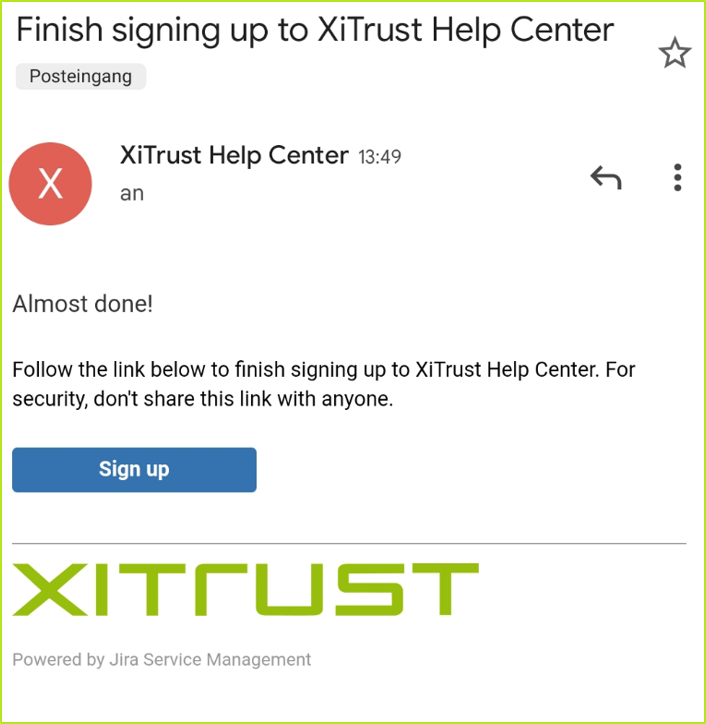
Figure 5: Verification email upon initial registration with the service desk
Step 5: Then enter your name and set a password (see figure 6). Furthermore, please click on the [Sign Up]-button to complete the registration process.
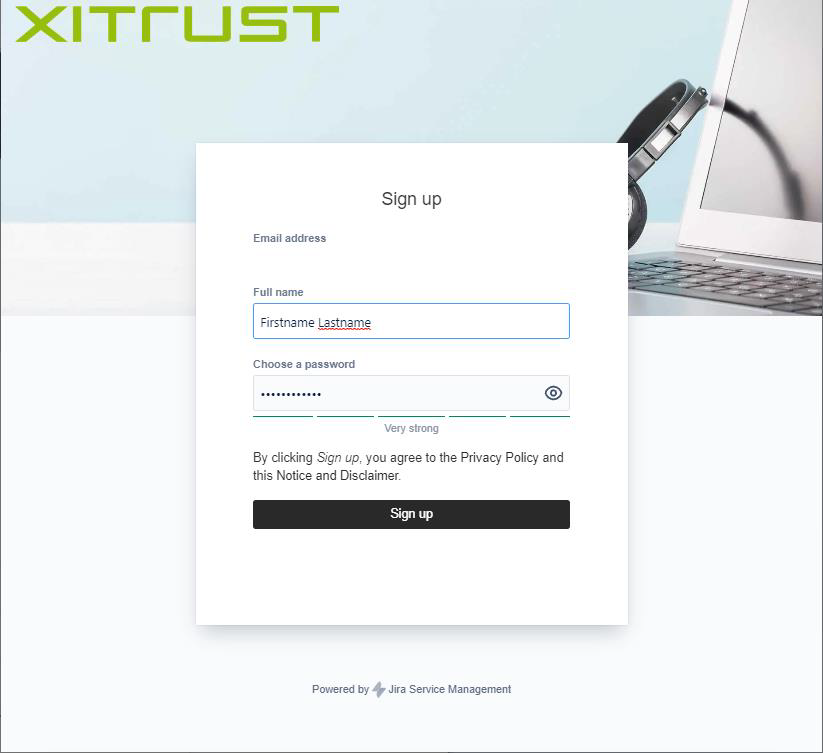
Figure 6: Please enter name and password
Step 6: You have successfully registered for the XiTrust Service Desk and can now create your first ticket. You will find out how to do this in the next guide.
2. Instructions: Create a ticket in the XiTrust Service Desk
After registering or logging in, the Service Desk dashboard opens (see figure 7 [1-3]). Here you can choose between the following categories and create a ticket:
Other questions: For general enquiries and/or less urgent technical problems, please create a ticket here (see figure 7 [1]).
Technical support: Select this option if you need help with installation or configuration. You can also request support for troubleshooting here (see figure 7 [2]).
Suggest improvement: Send us your ideas and suggestions for improvement easily and conveniently via this category (see figure 7 [3]).
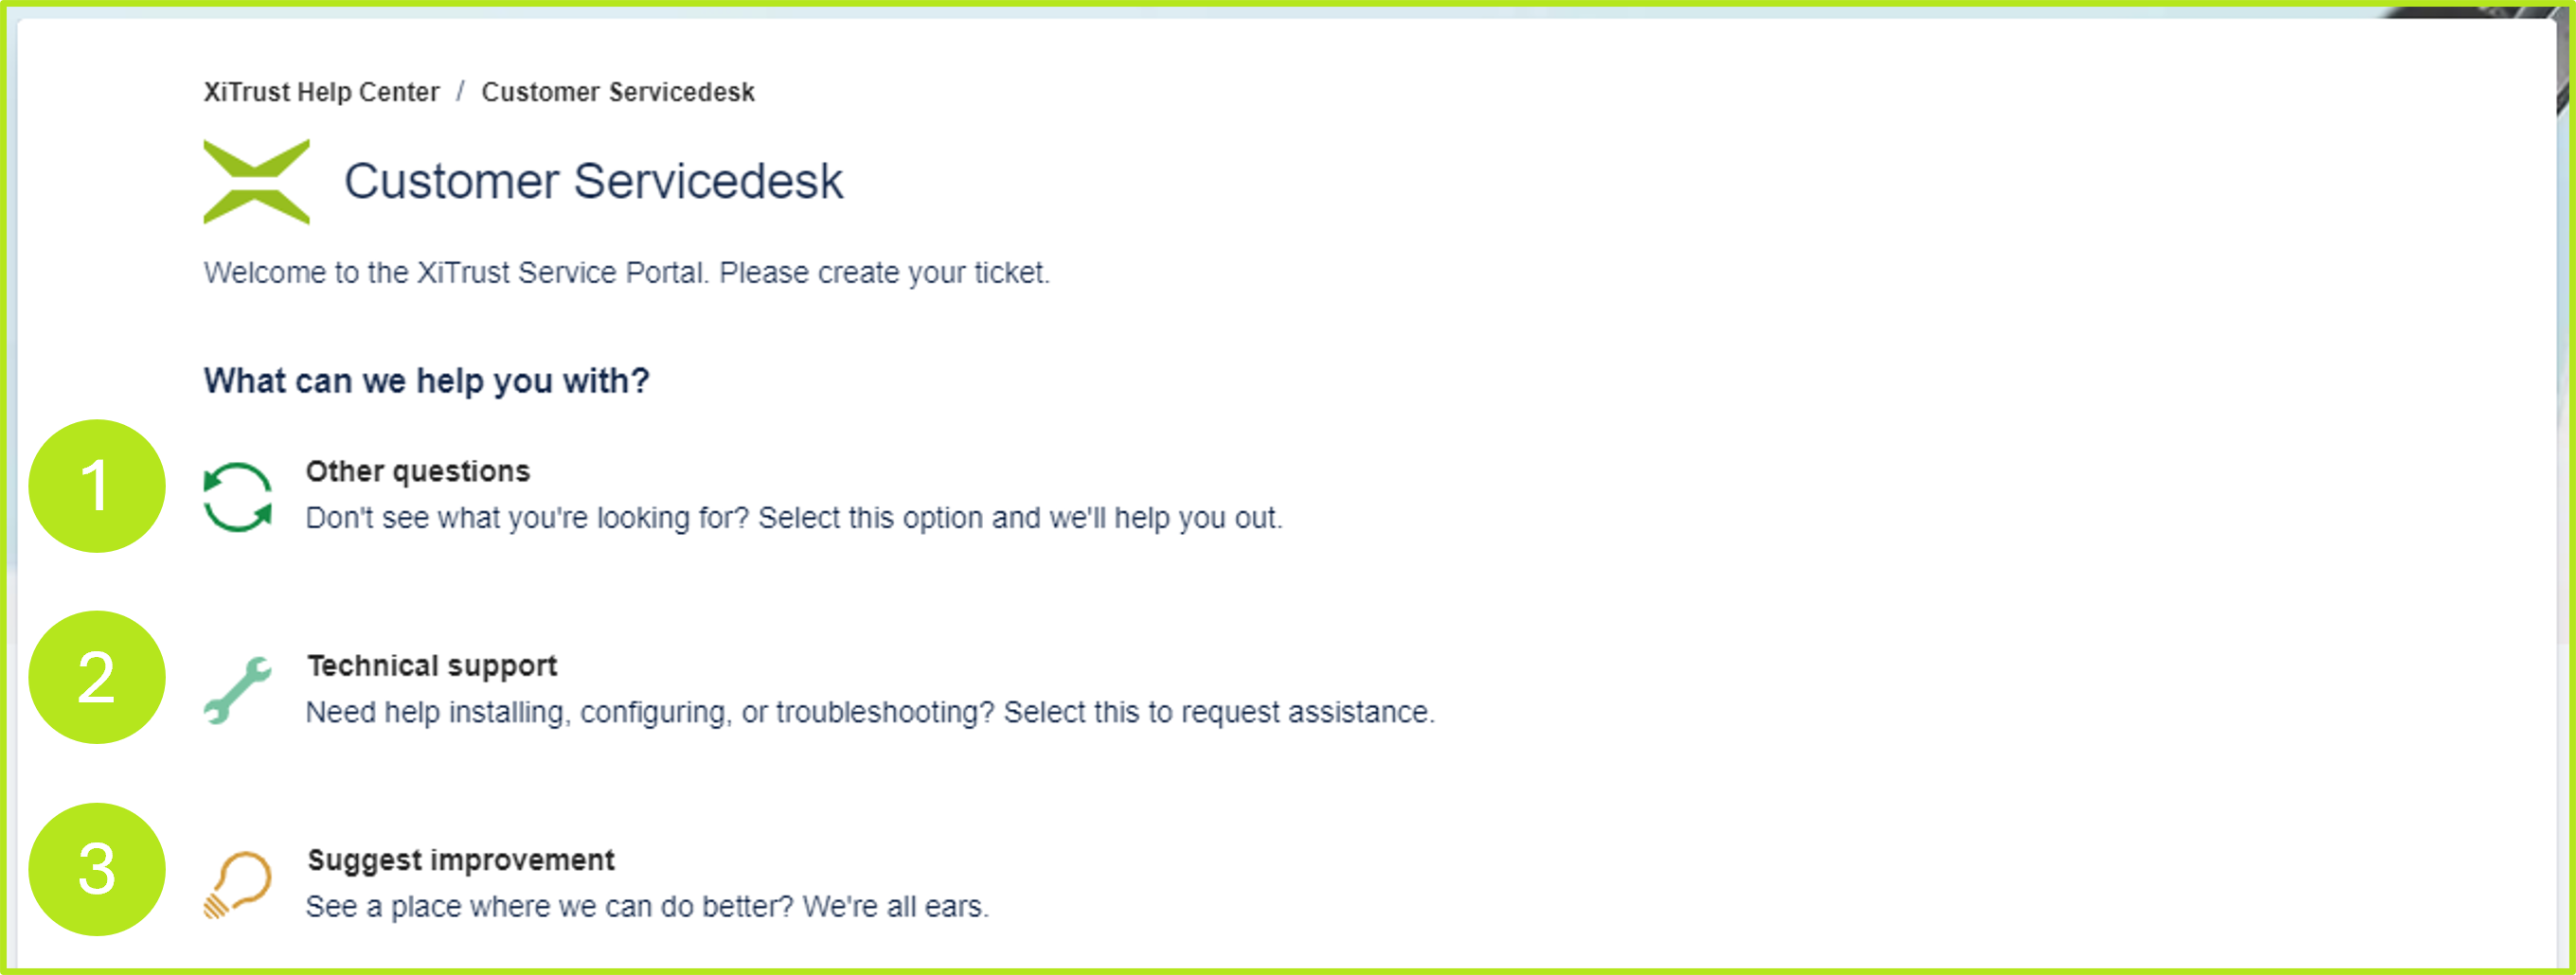
Figure 7: Three options for using the XiTrust Customer Service Desk
XiTip
When creating tickets, please ensure that you provide as much information as possible. The more our support team knows about a case, the better. The following information is particularly important:
Detailed description of the problem
Affected users and the exact time when the problem first occurred
Screenshots (error messages, problem description, etc.)
URL where the malfunction originally occurred
Server information
Sample documents (PDF documents), if available
2.1. XiTrust Service Desk ‘Other questions’ section in detail
In the ‘Other questions’ section, you can leave general questions and simple technical queries (see figure 8).
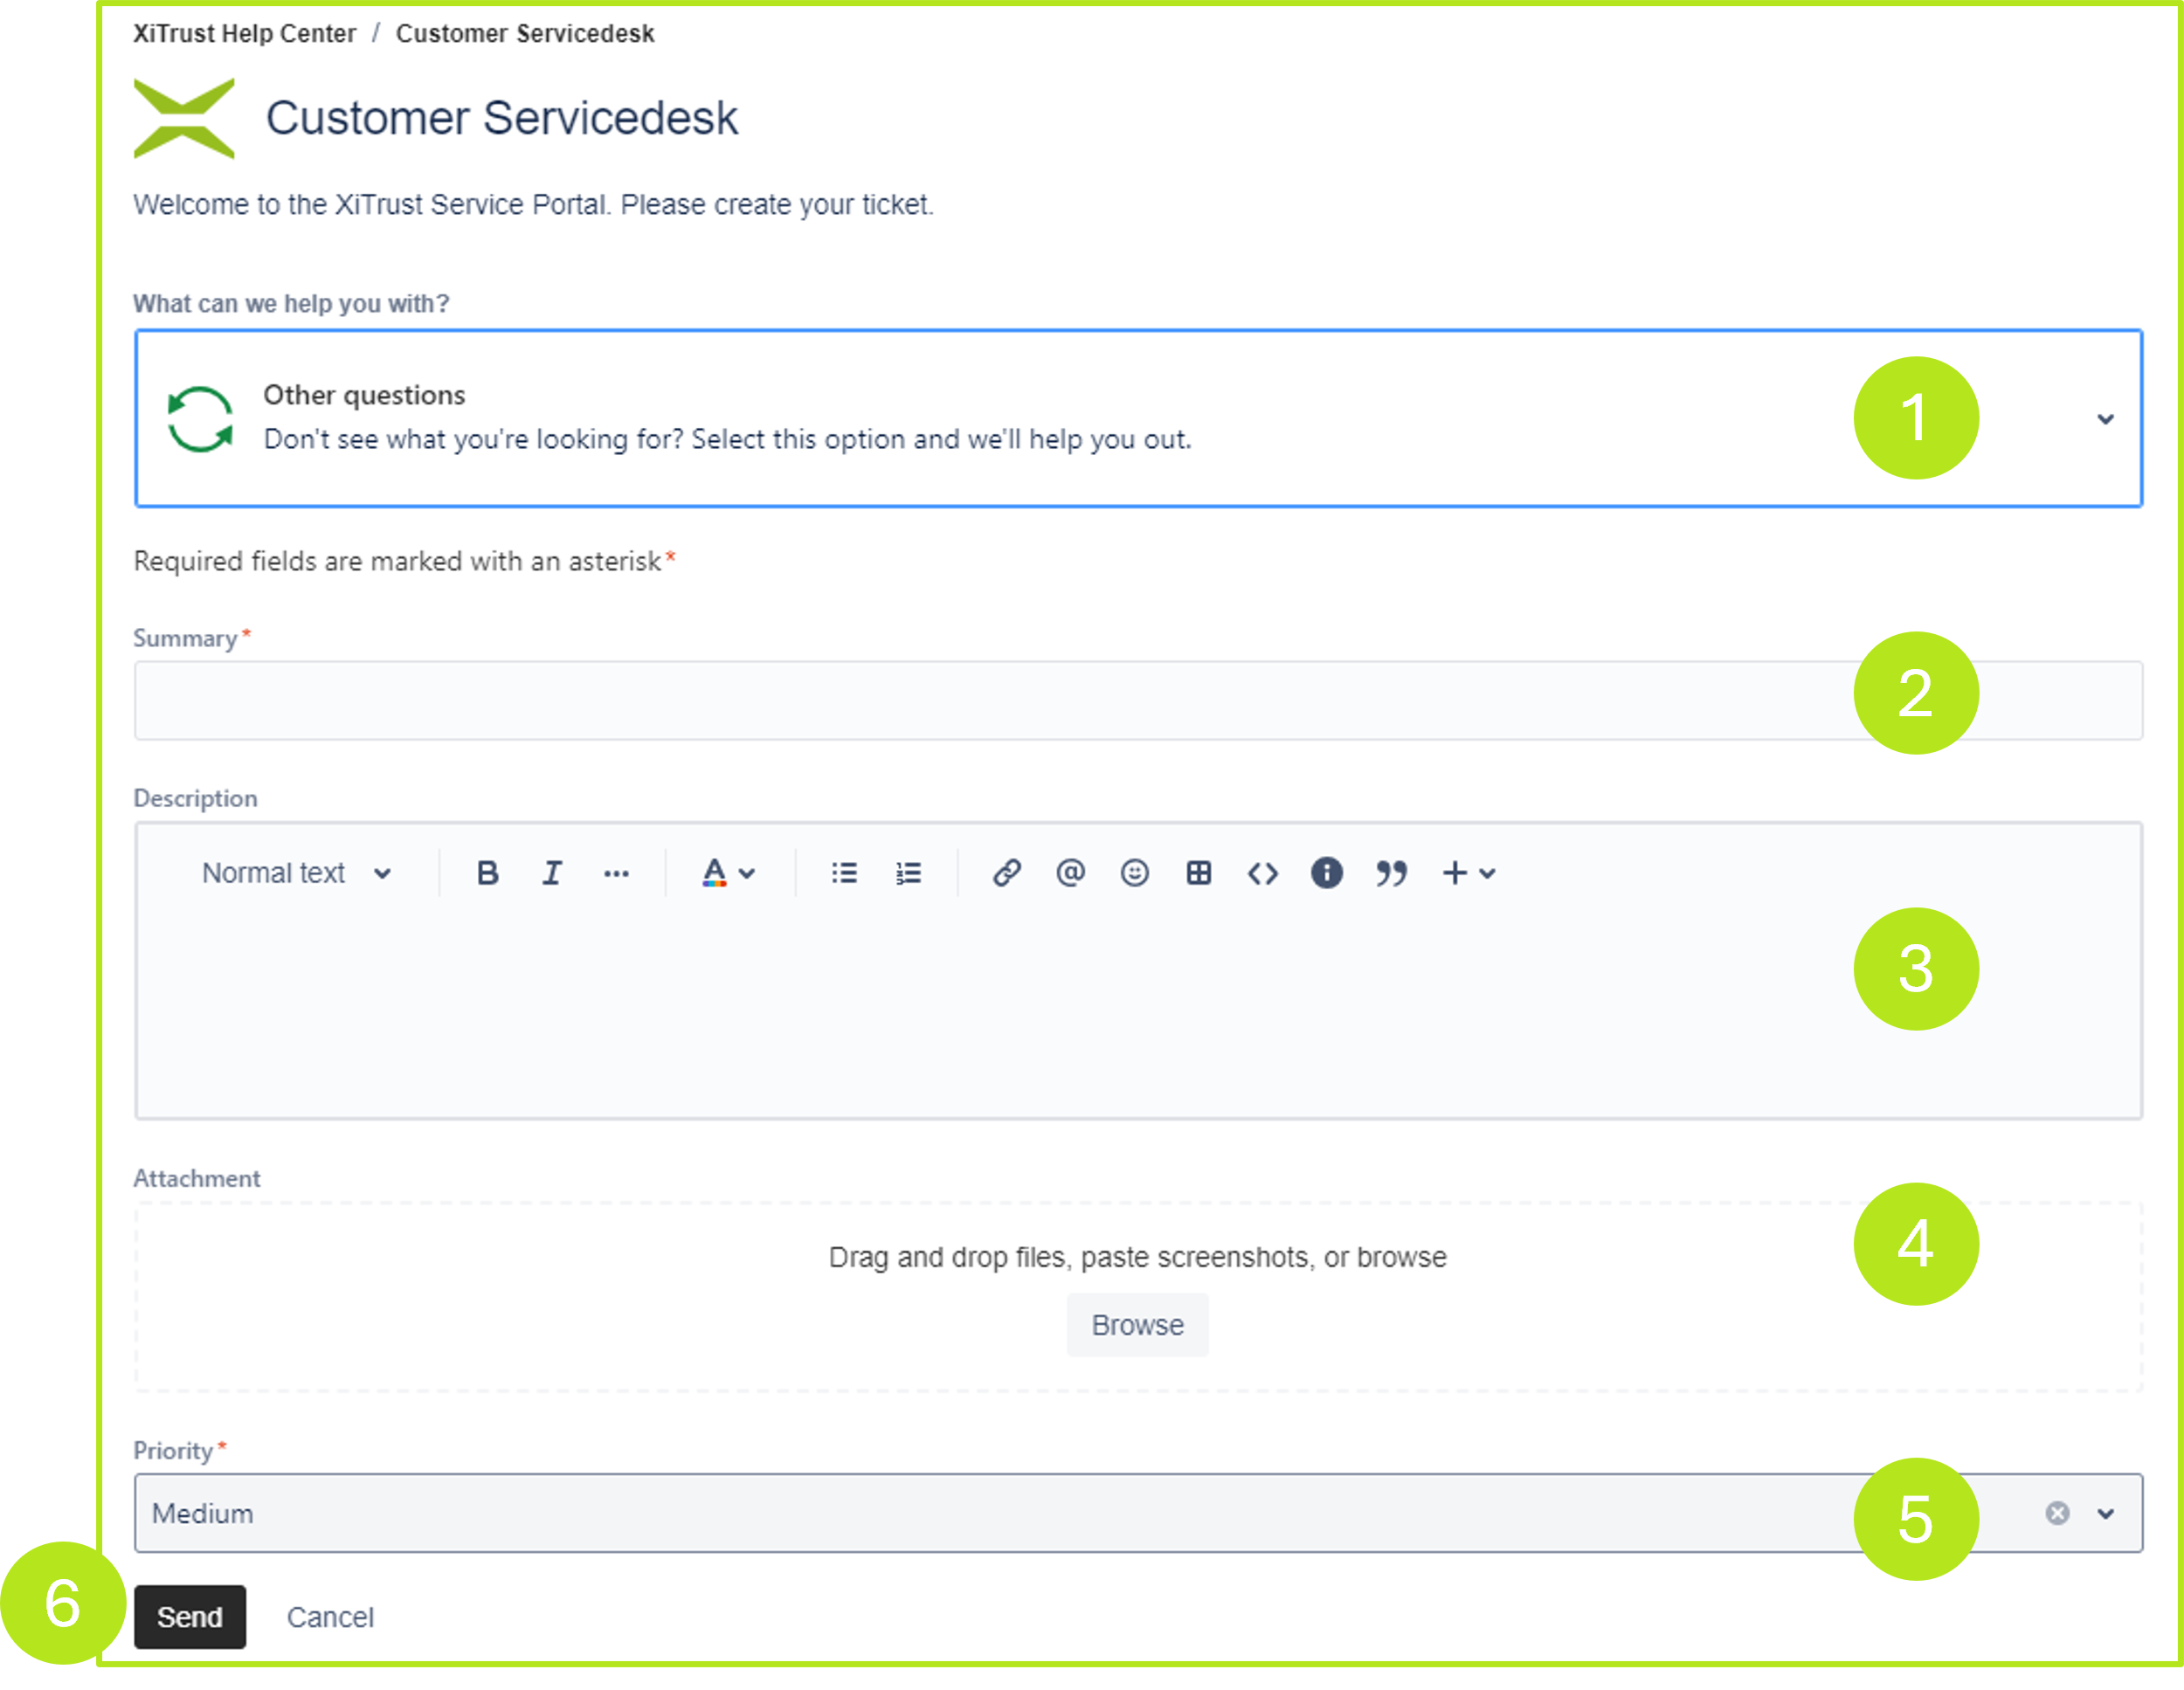
Figure 8: Service Desk section “Other questions” in detail
To ensure that your enquiry is processed efficiently, please provide the following information:
(1) Category: Please select the category that best describes your enquiry from the drop-down menu (see figure 8 [1]). You can choose between the three main categories: Other enquiry, Technical support and Suggest an improvement. If you would like to submit an other enquiry, please select this category.
(2) Summary: Please summarise the challenge you are currently facing in this field in a short sentence (see figure 8 [2]).
(3) Description: The WYSIWYG editor helps you enter your problem. Please describe your problem as accurately and in as much detail as possible. Our support team would be very grateful if you could provide detailed information in your enquiry (see figure 8 [3]).
(4) Uploading screenshots, files and documents: Here you can visually illustrate your issue with various files and screenshots (see figure 8 [4]).
(5) Priority: Set a priority here (see figure 8 [5]).
(6) [Send]-button: Once you are satisfied with your entry, please click on the [Send]-button to send the ticket to Support (see Figure 8 [6]).
2.2. XiTrust Service Desk ‘Technical Support’ section in detail
You can submit your request in the ‘Technical Support’ section if you require assistance with installation or configuration or have a complex technical question (see figure 9).
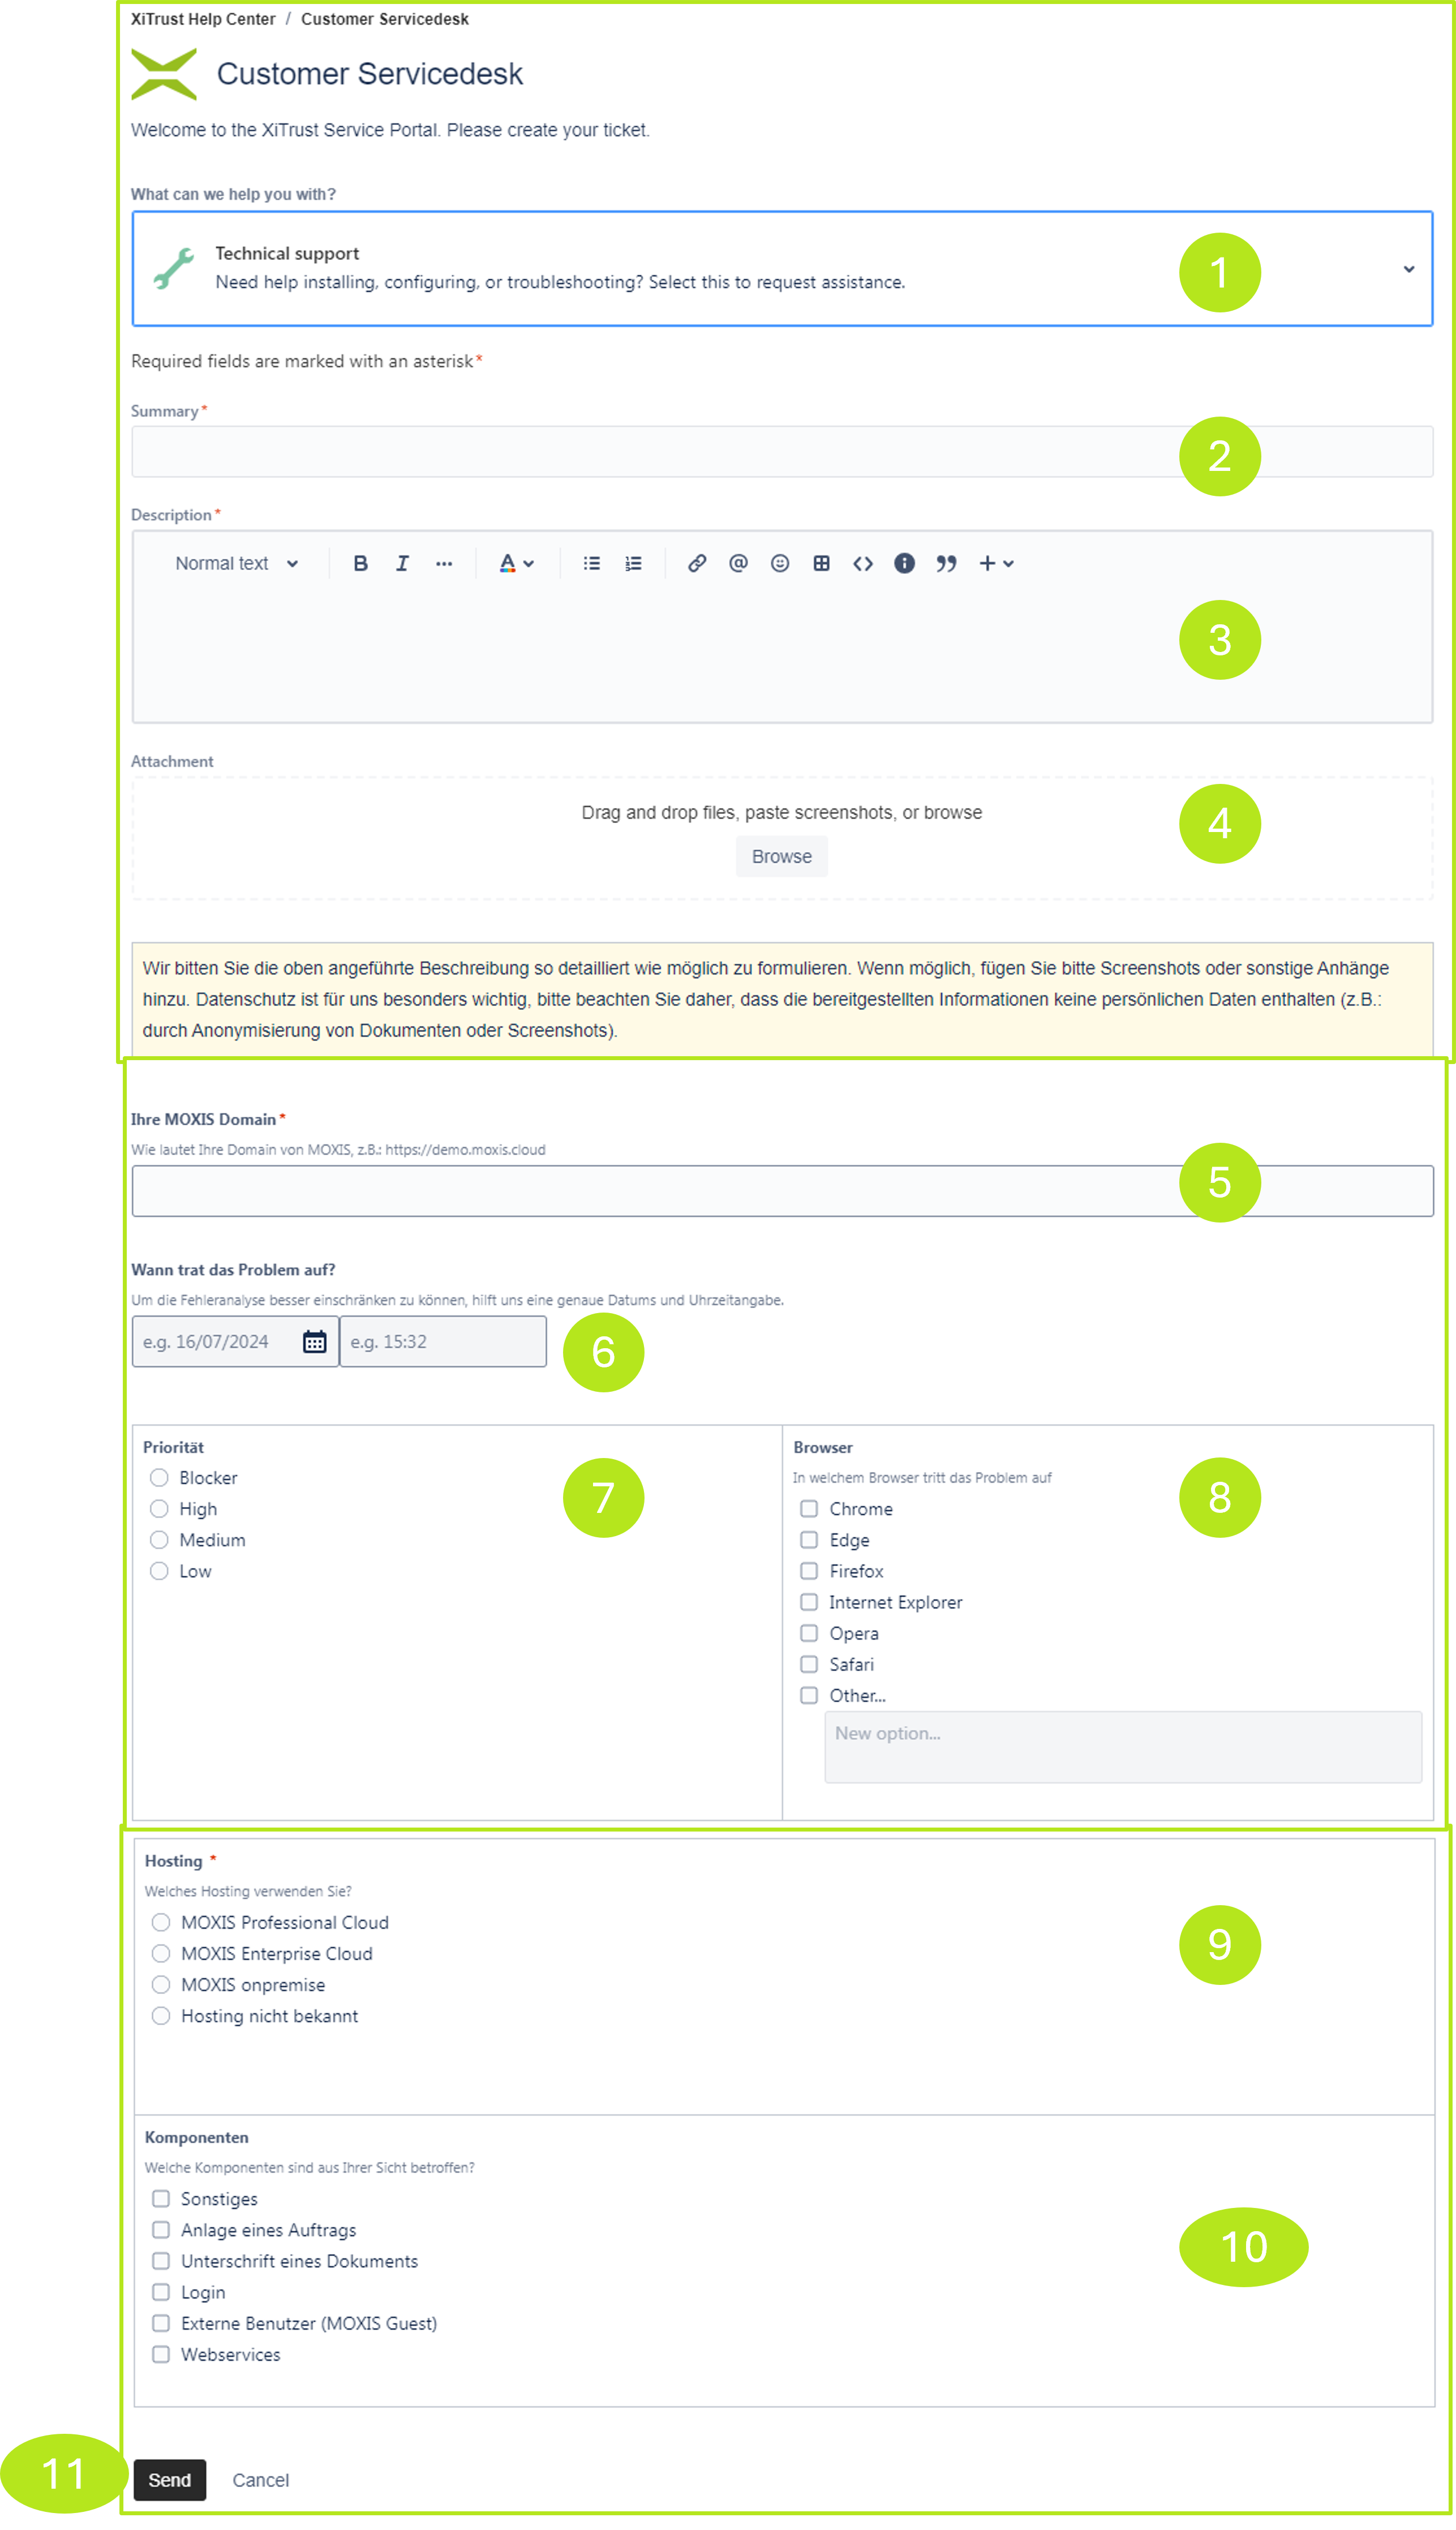
Figure 9: Service Desk Technical Support section in detail
To ensure that your enquiry is handled as efficiently as possible, please provide the following information:
(1) Category: Please select the category that best describes your enquiry from the drop-down menu (see figure 9 [1]). You can choose between the three main categories: Other enquiry, Technical support and Suggest an improvement. If you have a question for Technical Support, please select this category.
(2) Summary: Please summarise the challenge you are currently facing in this field in a short sentence (see figure 9 [2]).
(3) Description: The WYSIWYG editor helps you enter your problem. Please describe your problem as accurately and in as much detail as possible. Our support team would be very grateful if you could provide detailed information in your enquiry (see figure 9 [3]).
(4) Uploads of screenshots, files and documents: Here you can visually support your request with various files and screenshots (see figure 9 [4]).
(5) MOXIS domain: Please enter the domain where the error occurs here (see figure 9 [5]).
(6) Date: Please enter the date and time when the problem first occurred (see figure 9 [6]). If you do not remember the time, please provide an approximate estimate.
(7) Priority: Set the priority of the problem from your point of view – from Low (minor inconvenience) to Blocker (enormous challenge). This classification helps our support team to evaluate your request according to priority (see figure 9 [7]).
(8) Browser: Enter the browser(s) (if you have already tried several) in which the problem occurred. This is because errors can sometimes be browser-dependent. As a result, a feature may work in one browser but not in another (see figure 9 [8]).
(9) Hosting: Please enter the MOXIS version you are using here (see figure 9 [9]).
(10) Components: Here you can provide an assessment of which components you believe are affected (see figure 9 [10]).
(11) [Send]-button: Once you are satisfied with your entry, please click on the [Send]-button to send the ticket to us (see figure 9 [11]).
2.3. XiTrust Service Desk ‘Suggest improvement’ section in detail
In the ‘Suggest improvement’ section, you can share your ideas and suggestions for improvement (see figure 10).
.png?inst-v=d601b899-05f7-48b8-bb07-f142edd7f092)
Figure 10: Service Desk section Suggest improvement in detail
To ensure that your enquiry is processed correctly, please provide the following information:
(1) Category: Please select the category that best describes your enquiry from the drop-down menu (see figure 10 [1]). You can choose between the three main categories: Other enquiry, Technical support and Suggest an improvement. If you would like to suggest an improvement, please select this category.
(2) User: Specify which contact person is the responsible user (see figure 10 [2]).
(3) Summary: Please summarise the improvement you would like to report in this field in a short sentence (see figure 10 [3]).
(4) Description: The WYSIWYG editor helps you enter your suggestions for improvement. Please describe your idea as precisely and in as much detail as possible. Our support team would be very grateful if you could provide detailed information (see figure 10 [4]).
(5) Uploading screenshots, files and documents: Here you can illustrate your request with various files and screenshots and provide additional information (see figure 10 [5]).
(6) Priority: Set a priority here (see figure 10 [6]).
(7) [Send] button: Once you are satisfied with your entry, please click on the [Send]-button to send the ticket to Support (see figure 10 [7]).
3. Instructions: View support requests
To view your open or closed support requests, please click on the user icon in the upper right corner of the screen. The Requests menu item takes you to an overview of your support requests (see figure 11). You can also add additional information here and contact us in this way.
You can also continue to send requests to servicedesk@xitrust.com. These will also appear automatically in your account.
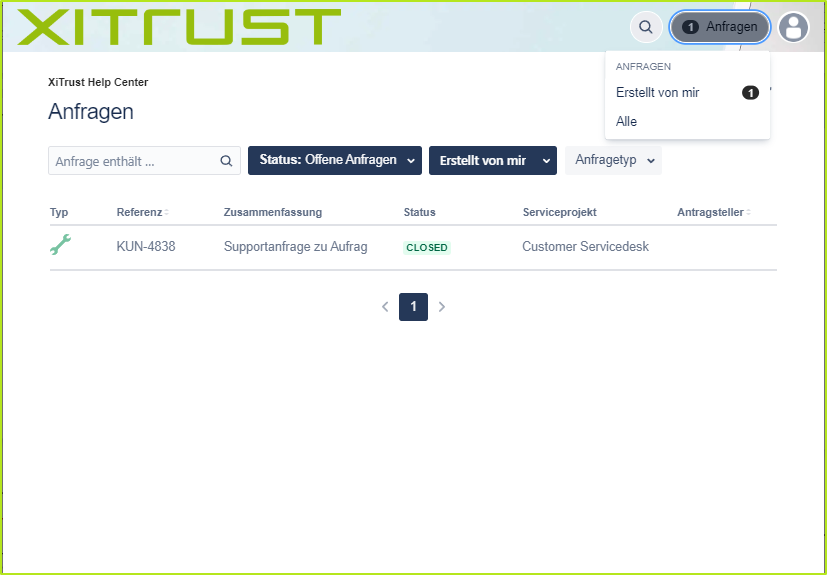
Figure 11: Overview of all requests created by a user in MOXIS
4. Ticket overview in the company
If several people from your company create tickets and you want to access your colleagues' tickets within the company, please submit a request via ticket. We can combine multiple accounts into one organisation, enabling shared access. In this case, all accounts combined into one organisation will see the respective company under Requests and can view the tickets there.
When creating a ticket, you then have the option of specifying with whom you want to share your ticket. In our example (see figure 12), ‘demo’ stands for your organisation or a person in your organisation.
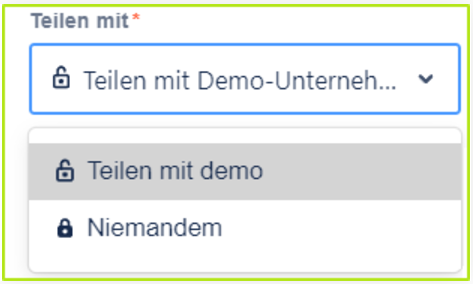
Figure 12: Share with-function in the ticket overview