
(en 2) [ADMIN FAQ] How to configure roles in MOXIS in the best possible way?
Content
This article provides a basic overview of groups and base groups in MOXIS and how to optimally configure them to suit your needs. Please note: This article provides a general introduction to the topic, whilst more detailed FAQ articles will familiarise you with the subject in greater depth (depending on the specific focus).
1. General overview of groups and base groups in MOXIS
By default, this feature is used to organise people into groups and base groups, thereby streamlining processes in MOXIS. Each person is assigned a specific role. In addition, people can be assigned to specific groups. When creating a new task, specific groups or roles can be automatically pre-defined, so that only assigned individuals are eligible for certain tasks.

MOXIS Tipp
In MOXIS Business, there are what are known as standard or base groups. These are predefined and linked to specific roles. They cannot be customised. MOXIS Enterprise, on the other hand, offers the option to create custom groups and roles. For information on MOXIS Enterprise and the custom use of base groups, groups and roles, please contact your XiTrust contact person.
1.1. Base groups in MOXIS
In MOXIS, a distinction is made between groups and roles. A role is comparable to an area of responsibility. For example, MOXIS users in the moxisSigner group can sign with legal effect and have a digital signature portfolio. Conversely, individuals with a specific role can be assigned to a group. Each user can be assigned different roles. Individual users can then be grouped together into thematically relevant groups.
The advantages are obvious: having predefined groups automatically reduces processing time, as you add a group rather than individual users.
1.1.1. Overview of the individual MOXIS base groups and their permissions
moxisUser is one of the non-editable, synchronised base groups, as initial login and basic editing are not possible without this group.
1.1.1.1. MOXIS Users
Base group: MOXIS Users
Technical name | Authorisations |
|---|---|
moxisUser | Users in this group are permitted to log in to MOXIS (see figure 1). |
Other assignable base groups
1.1.1.2. MOXIS Approver
Base group: Approvers & Simple signers
Technical Name | Authorisations |
|---|---|
moxisApprover | Users in this group are authorised to approve orders and sign simple documents, and have access to a digital approval folder or folder for approving simple signatures (see figures 1 and 2). |
.png?inst-v=1c57040a-43b4-493b-9938-25021fa84b57)
Figure 1: MOXIS Approver Dashboard
.png?inst-v=1c57040a-43b4-493b-9938-25021fa84b57)
Figure 2: moxisApprover - View in the MOXIS job folder
1.1.1.3. MOXIS Signer
Base group: Authorised signee
Technical name | Authorisations |
|---|---|
moxisSigner | Users in this group are authorised to provide qualified signatures (see figures 3 and 5) and have a digital signature portfolio (see figure 4). |

Figure 3: Dashboard showing a qualified signature in the queue.

Figure 4: MOXIS signature folder containing received requests for qualified signatures
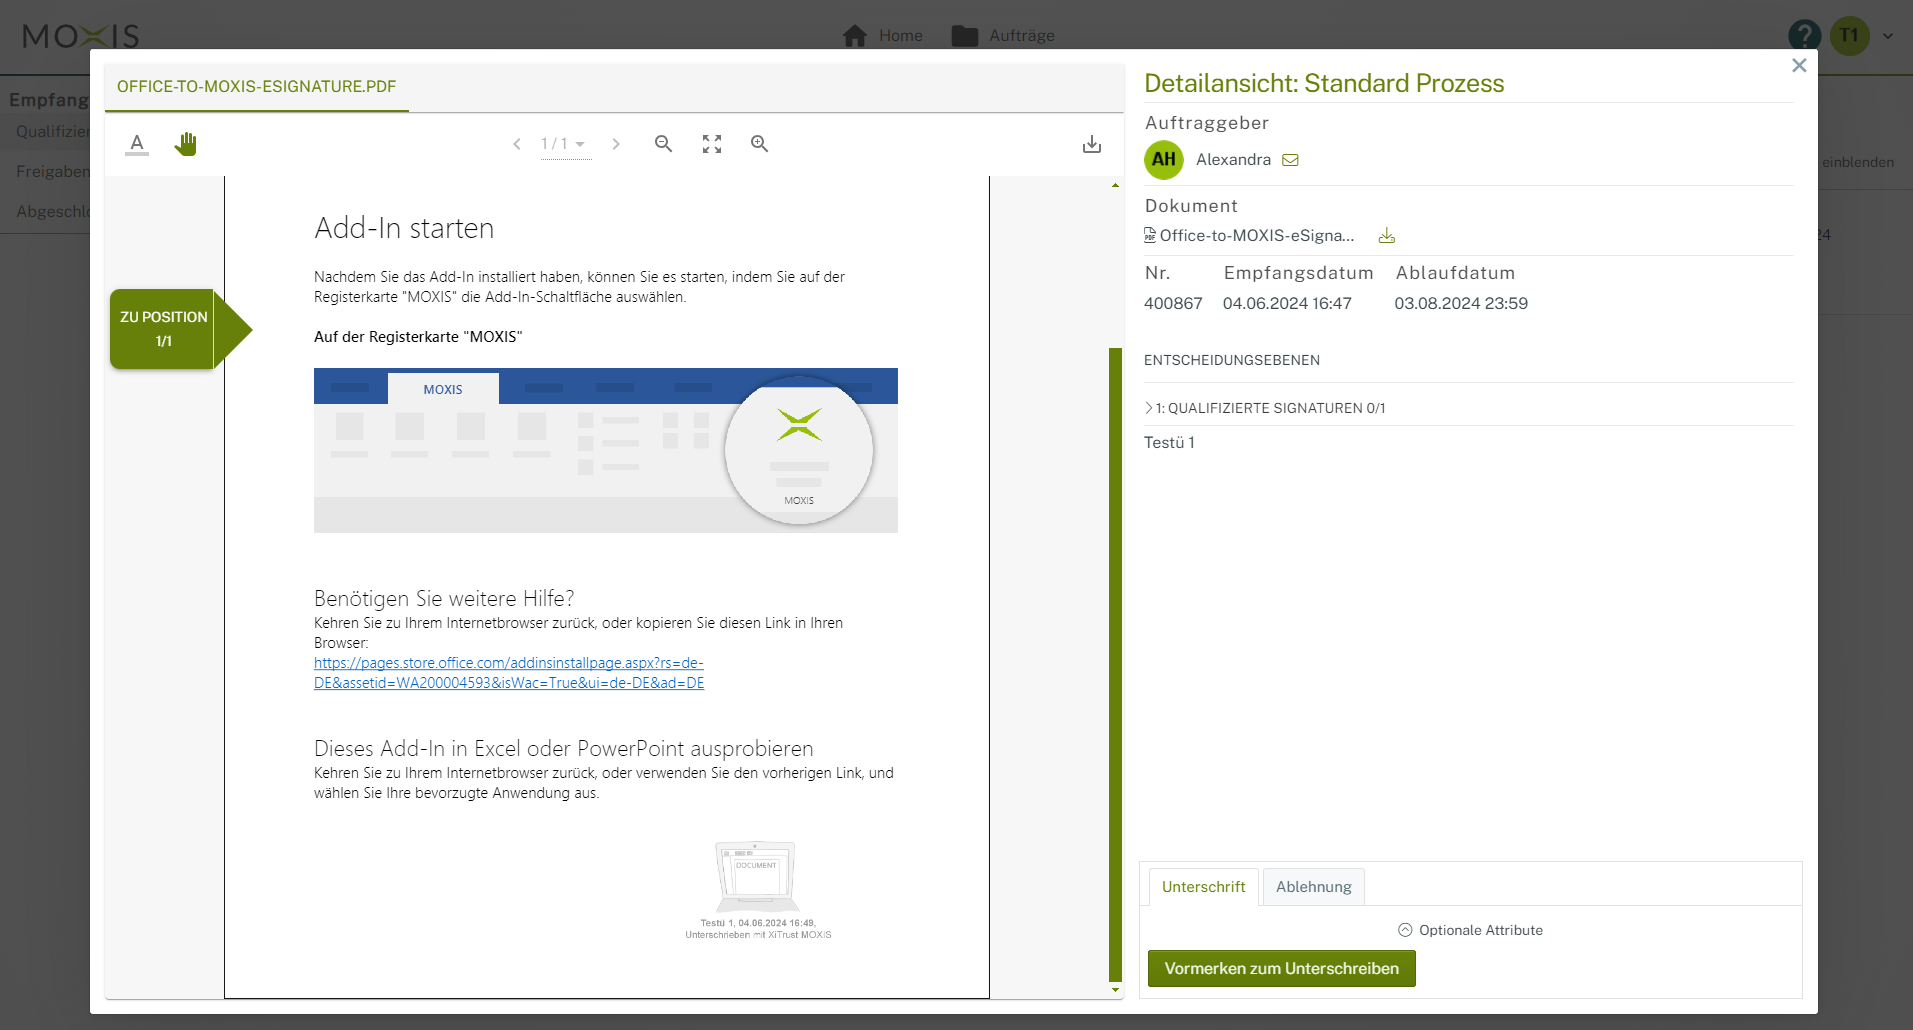
Figure 5: Detailed view of a document for providing a qualified signature from the signature folder
1.1.1.4. MOXIS Owner
Base group: Constituent
Technical name | Authorisations |
|---|---|
moxisOwner | Users in this group are authorised to create jobs (see figure 6). For further information on creating a job, please read on here. These users also have access to an overview of signature folders containing sent documents, including their respective statuses. |
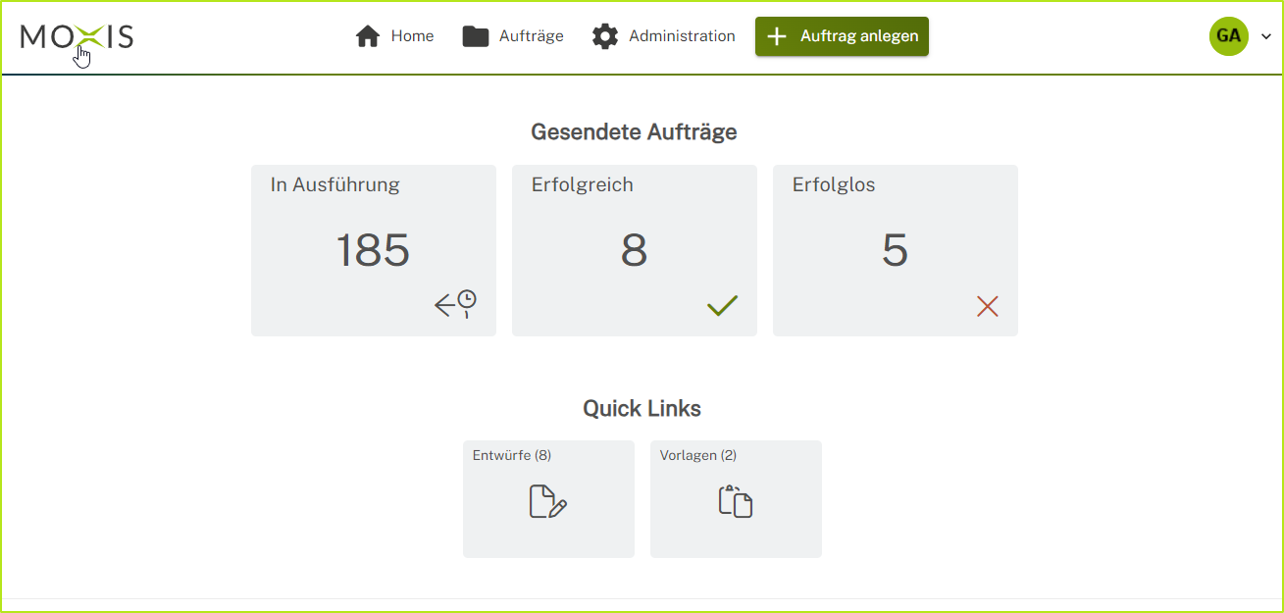
Figure 6: Creating a job in MOXIS plus – overview of sent jobs
1.1.1.5. MOXIS Process Admin
Base group: Process Admin
Technical name | Authorisations |
|---|---|
moxisProcessAdmin | Users in this group are authorised to manage jobs from other users within the process (see figure 7). |
.png?inst-v=1c57040a-43b4-493b-9938-25021fa84b57)
Figure 7: Managing jobs in MOXIS
1.1.1.6. MOXIS Observer
Base group: Observer
Technical name | Authorisations |
|---|---|
moxisObserver | Users in this group can view other users’ folders (see figure 8). They have no other rights. Please note: You cannot automatically view signature folders; you must be invited to do so. |
1.1.1.7. MOXIS Admin
Base group: Administrator
Technical name | Authorisations |
|---|---|
moxisAdmin | Users are authorised to administer MOXIS instances (see figure 9). |
.png?inst-v=1c57040a-43b4-493b-9938-25021fa84b57)
Figure 9: Overview of the administrator panel in MOXIS
1.1.1.8. MOXIS Process Designer
Base group: Process Designer
Technical name | Authorisations |
|---|---|
moxisProcessDesigner | Users assigned to this group are authorised to create and modify processes and are generally responsible for the administration of processes (process management, see figure 10). |
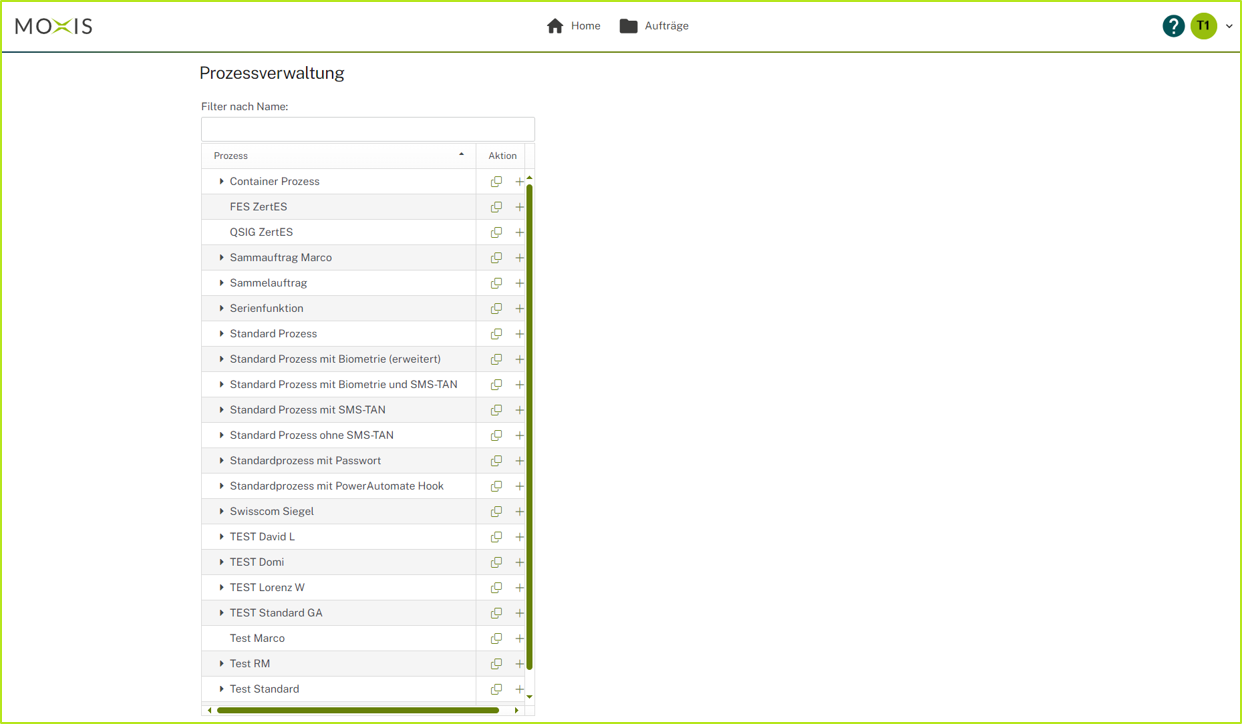
Figure 10: Process management overview in MOXIS. Processes can be managed from here.
1.1.1.9. MOXIS Template Admin
Base group: Template Admin
Technical name | Authorisations |
|---|---|
moxisTemplateAdmin | Users in this group are permitted to share their own templates (see figure 11) and delete shared templates. |
.png?inst-v=1c57040a-43b4-493b-9938-25021fa84b57)
Figure 11: Managing and sharing templates in MOXIS
1.1.1.10. MOXIS Email Admin (optional)
Base group: Email Editor Administrator
Technical Name | Authorisation |
|---|---|
moxisEmailAdmin | Users may create and edit MOXIS email templates (see figure 12). Further information on the individual functions of the MOXIS email templates (NEMO) can be found here. |
.png?inst-v=1c57040a-43b4-493b-9938-25021fa84b57)
Figure 12: Editing email templates in MOXIS
1.2. How do I manage and assign permissions for base groups?
The individual permissions of base groups can be modified as required. This ensures that only certain users have specific permissions. Depending on the MOXIS application and configuration, you assign permissions via various interfaces. Below, we provide a general overview. Should you wish to explore a particular topic in greater depth, relevant further FAQs are available.
There are two ways to manage the permissions of base groups:
Set up via an external IDM (i.e. an Identity Management System). This is usually done in enterprise environments linked to IDMs such as Entra (formerly Azure). As a rule, external users are managed within IDMs.
In the User Management section of the Administration panel.
MOXIS Tipp
You will find further articles on this topic in the Administration Manual.
1.2.1 Process Management
One way to manage and modify permissions is via process management. To open process management, you must have been assigned the relevant permissions in advance (adminUser, moxisProcessDesigner).
You can then open Process Management in the Administration Panel. To do this, first click on the Administration menu item (see Figure 13, [1]) and then on the Process Management menu item (see figure 13, [2]). By clicking on the text, you open the process that you wish to configure (see figure 13, [3]). In the process overview that opens, the menu (see Figure 13, [4]) provides access to various interfaces that allow you to configure the permissions for individual users or user groups.
MOXIS Tipp
You will find further articles on this topic in the Administration Manual.
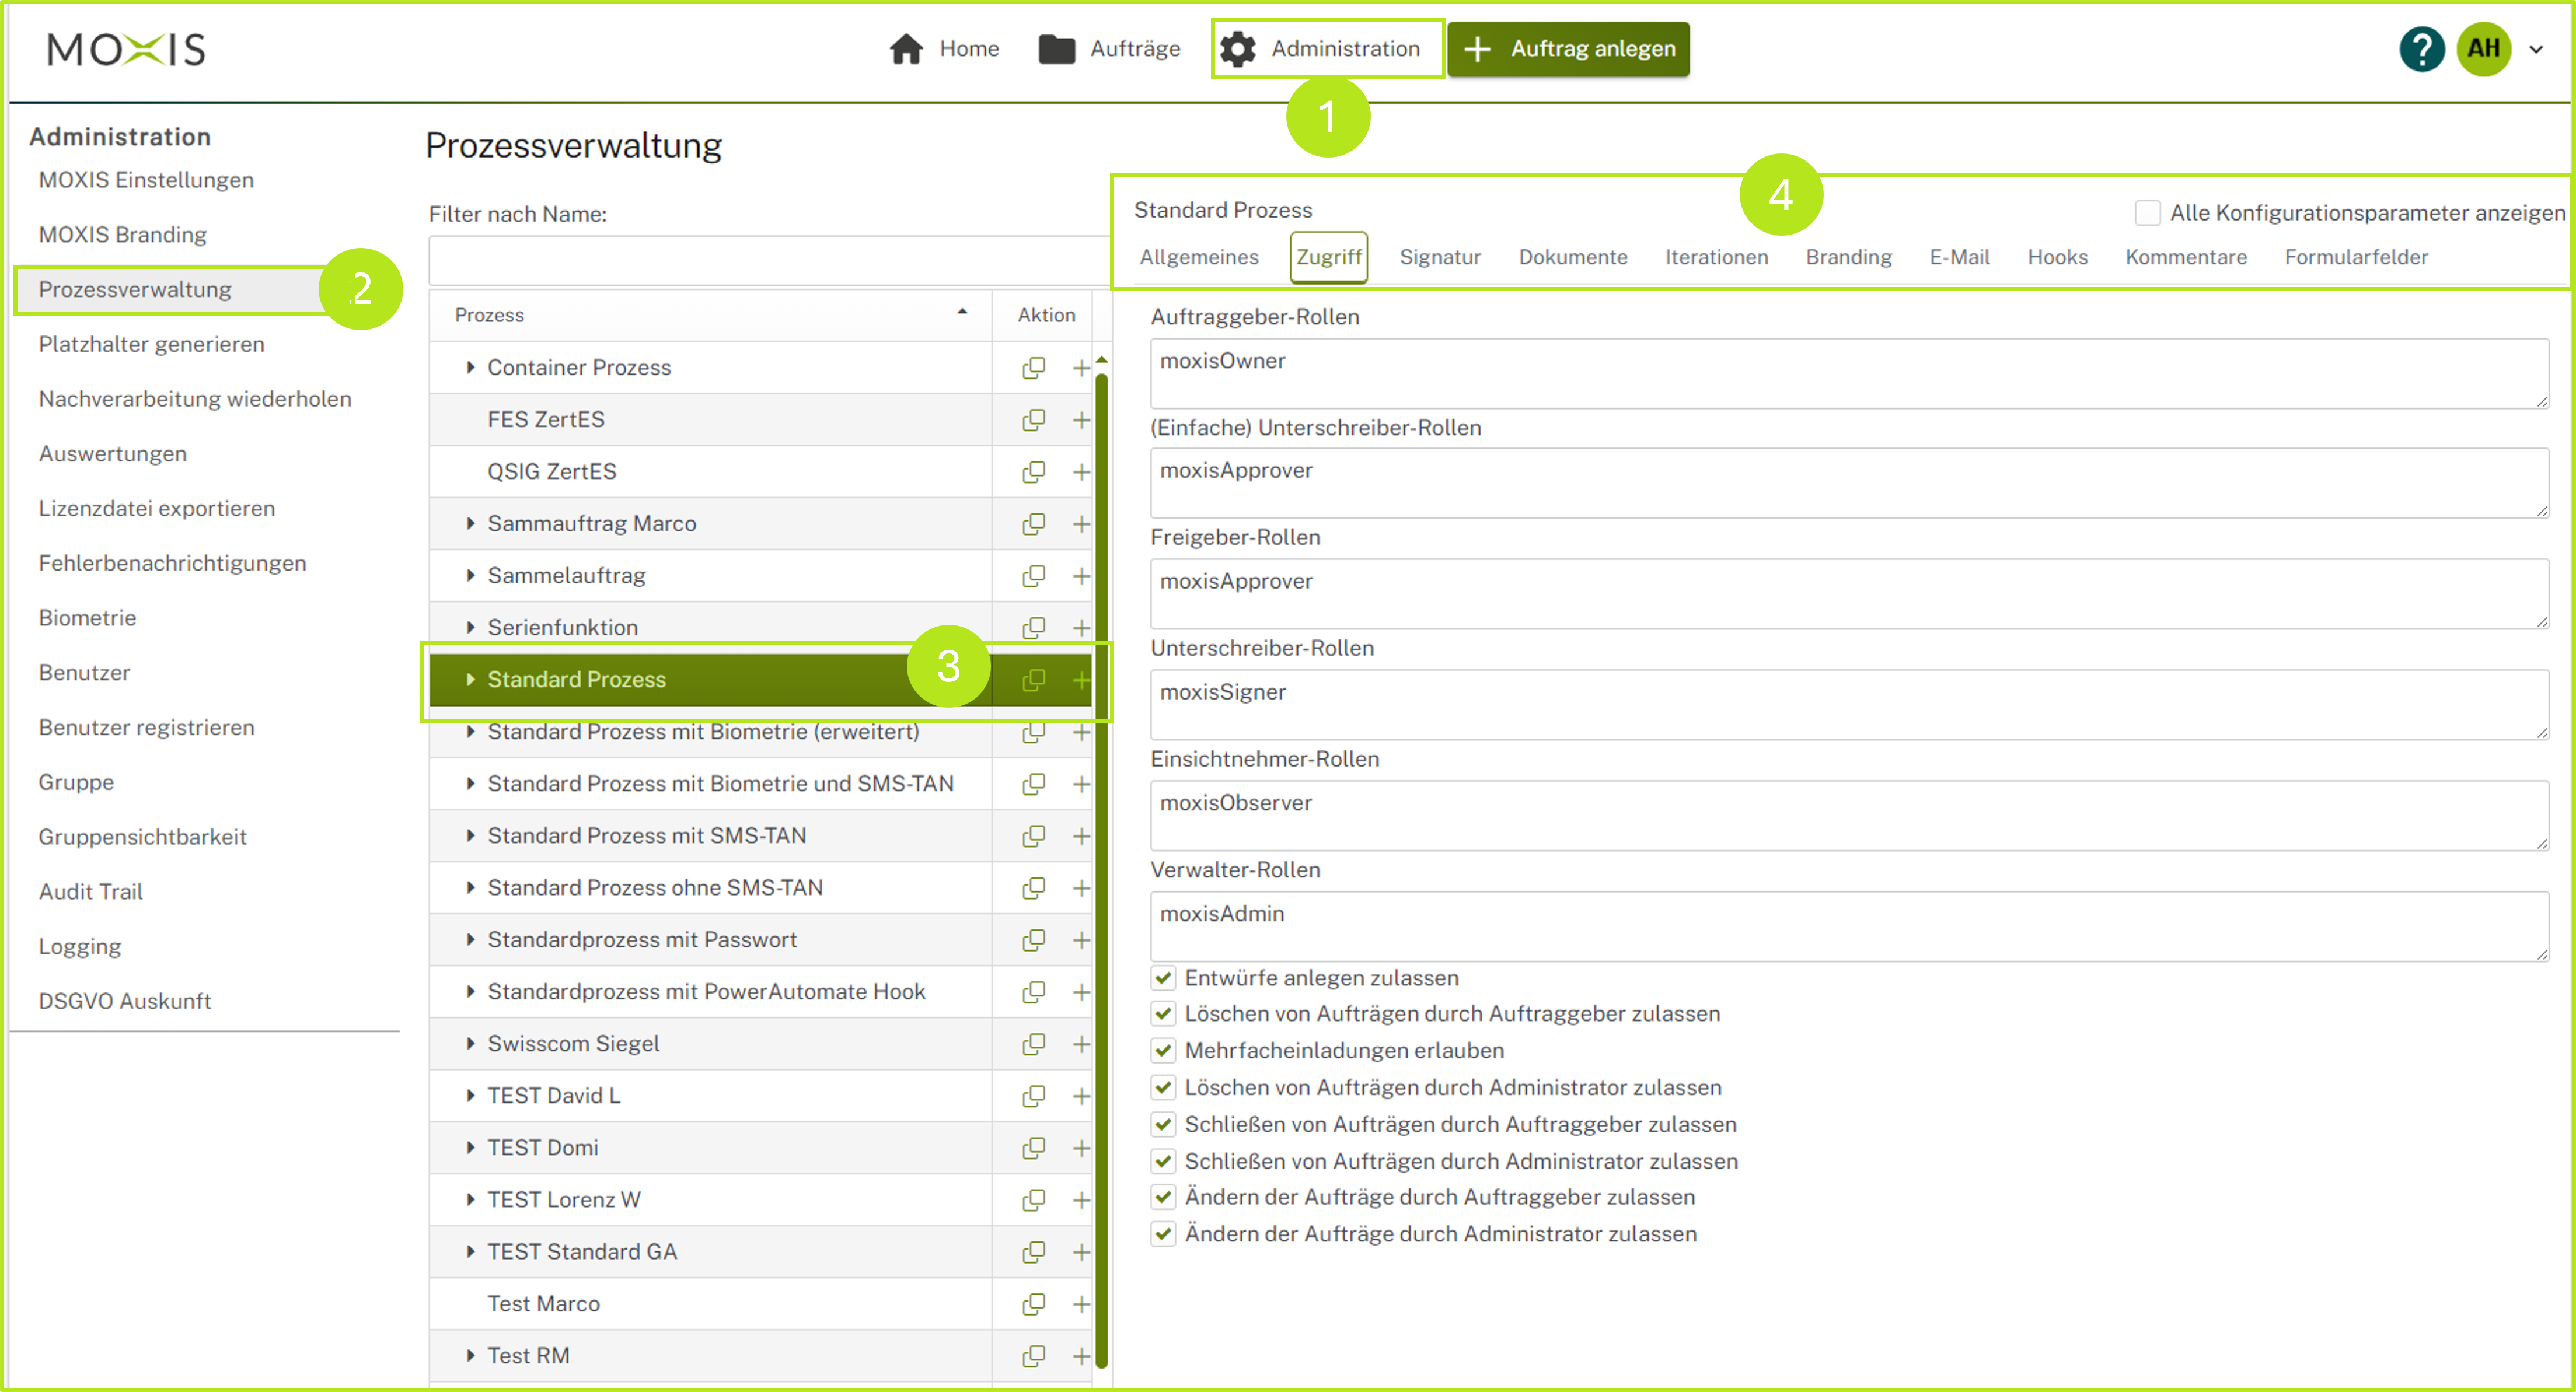
Figure 13: Process management in MOXIS
1.2.2 Creating additional groups (independent of the base groups) in MOXIS
In addition to base groups, additional groups can also be defined in MOXIS. These can then be added individually to various processes. Furthermore, placeholders can be generated (see also: [v4.50] Placeholder Generator (optional) Overview).
1.2.2.1 Step-by-step guide: Creating and using an additional group in MOXIS
MOXIS Tipp
Please note: Additional groups can only be added in MOXIS Enterprise. If you are using a different XiTrust product but are interested in the benefits of MOXIS Enterprise, please contact your XiTrust contact person.
Step 1: To create an additional group in MOXIS, please open the administration area and navigate to the ‘Group’ menu item (see figure 14 [1]). Choose a name for your group and enter it in the field provided (see figure 14 [2]). To complete the process, click on the [Add Group]-button (see figure 14 [3]).
(1).png?inst-v=1c57040a-43b4-493b-9938-25021fa84b57)
Figure 14: Add group in Process Management
Step 2: To add users to the group, click on the group that has now been added to the overview.
Step 3: In Process Management, you can now add your group to a process of your choice. Once the process has been configured, please click the [Save]-button. In your MOXIS application, the group can now be added to a job by users with the appropriate permissions.
.png?inst-v=1c57040a-43b4-493b-9938-25021fa84b57)
Figure 15: Adding an additional group to a customised process in MOXIS
2. How does the mapping work?
In addition to base groups and any groups added to MOXIS, you can also create groups in external systems (such as an IDM) with customisable names. For example, it is conceivable to map the ‘Managing Directors’ group created in section 1.2.2.1 to a ‘Managing Directors’ group from an IDM. As permissions are inherited in a cascading manner and are also dependent on the individual permissions of the various group members, mapping is almost a science in its own right. We are therefore happy to generate a corresponding mapping for you on request.
MOXIS Tipp
Depending on the identity and access management system you have integrated, various protocols such as LDAP, SAML or SCIM may be used. For further information, please refer to our FAQ articles on this topic or, if you have specific questions, please contact our support team at serivcedesk@xitrust.com.
3. Business Cases
In this section, you will find two real-world use cases that illustrate how roles in MOXIS can make it easier for you to work with the signature programme.
Use Case 1
Only assistants should be able to initiate a specific process. At the same time, only authorised signatories (such as managing directors, authorised signatories, etc.) should be able to be invited to sign. The aim is to ensure that documents defined as critical are not signed by individuals without the necessary internal authorisations.
Solution: Create two groups (here: CEO and Assistant) and select a process of your choice in the process management section (in our example, as shown in figure 14 [1], the “Standard Process”). Then assign the ‘Assistant’ group the initiator roles (see figure 14 [2]) and the ‘CEO’ group the signatory roles (see figure 14 [3]).
From now on, when creating a standard order, only users who belong to the ‘Assistant’ group can add members of the ‘CEO’ group from the address book as signatories. (See figure 15, [1], [2]).
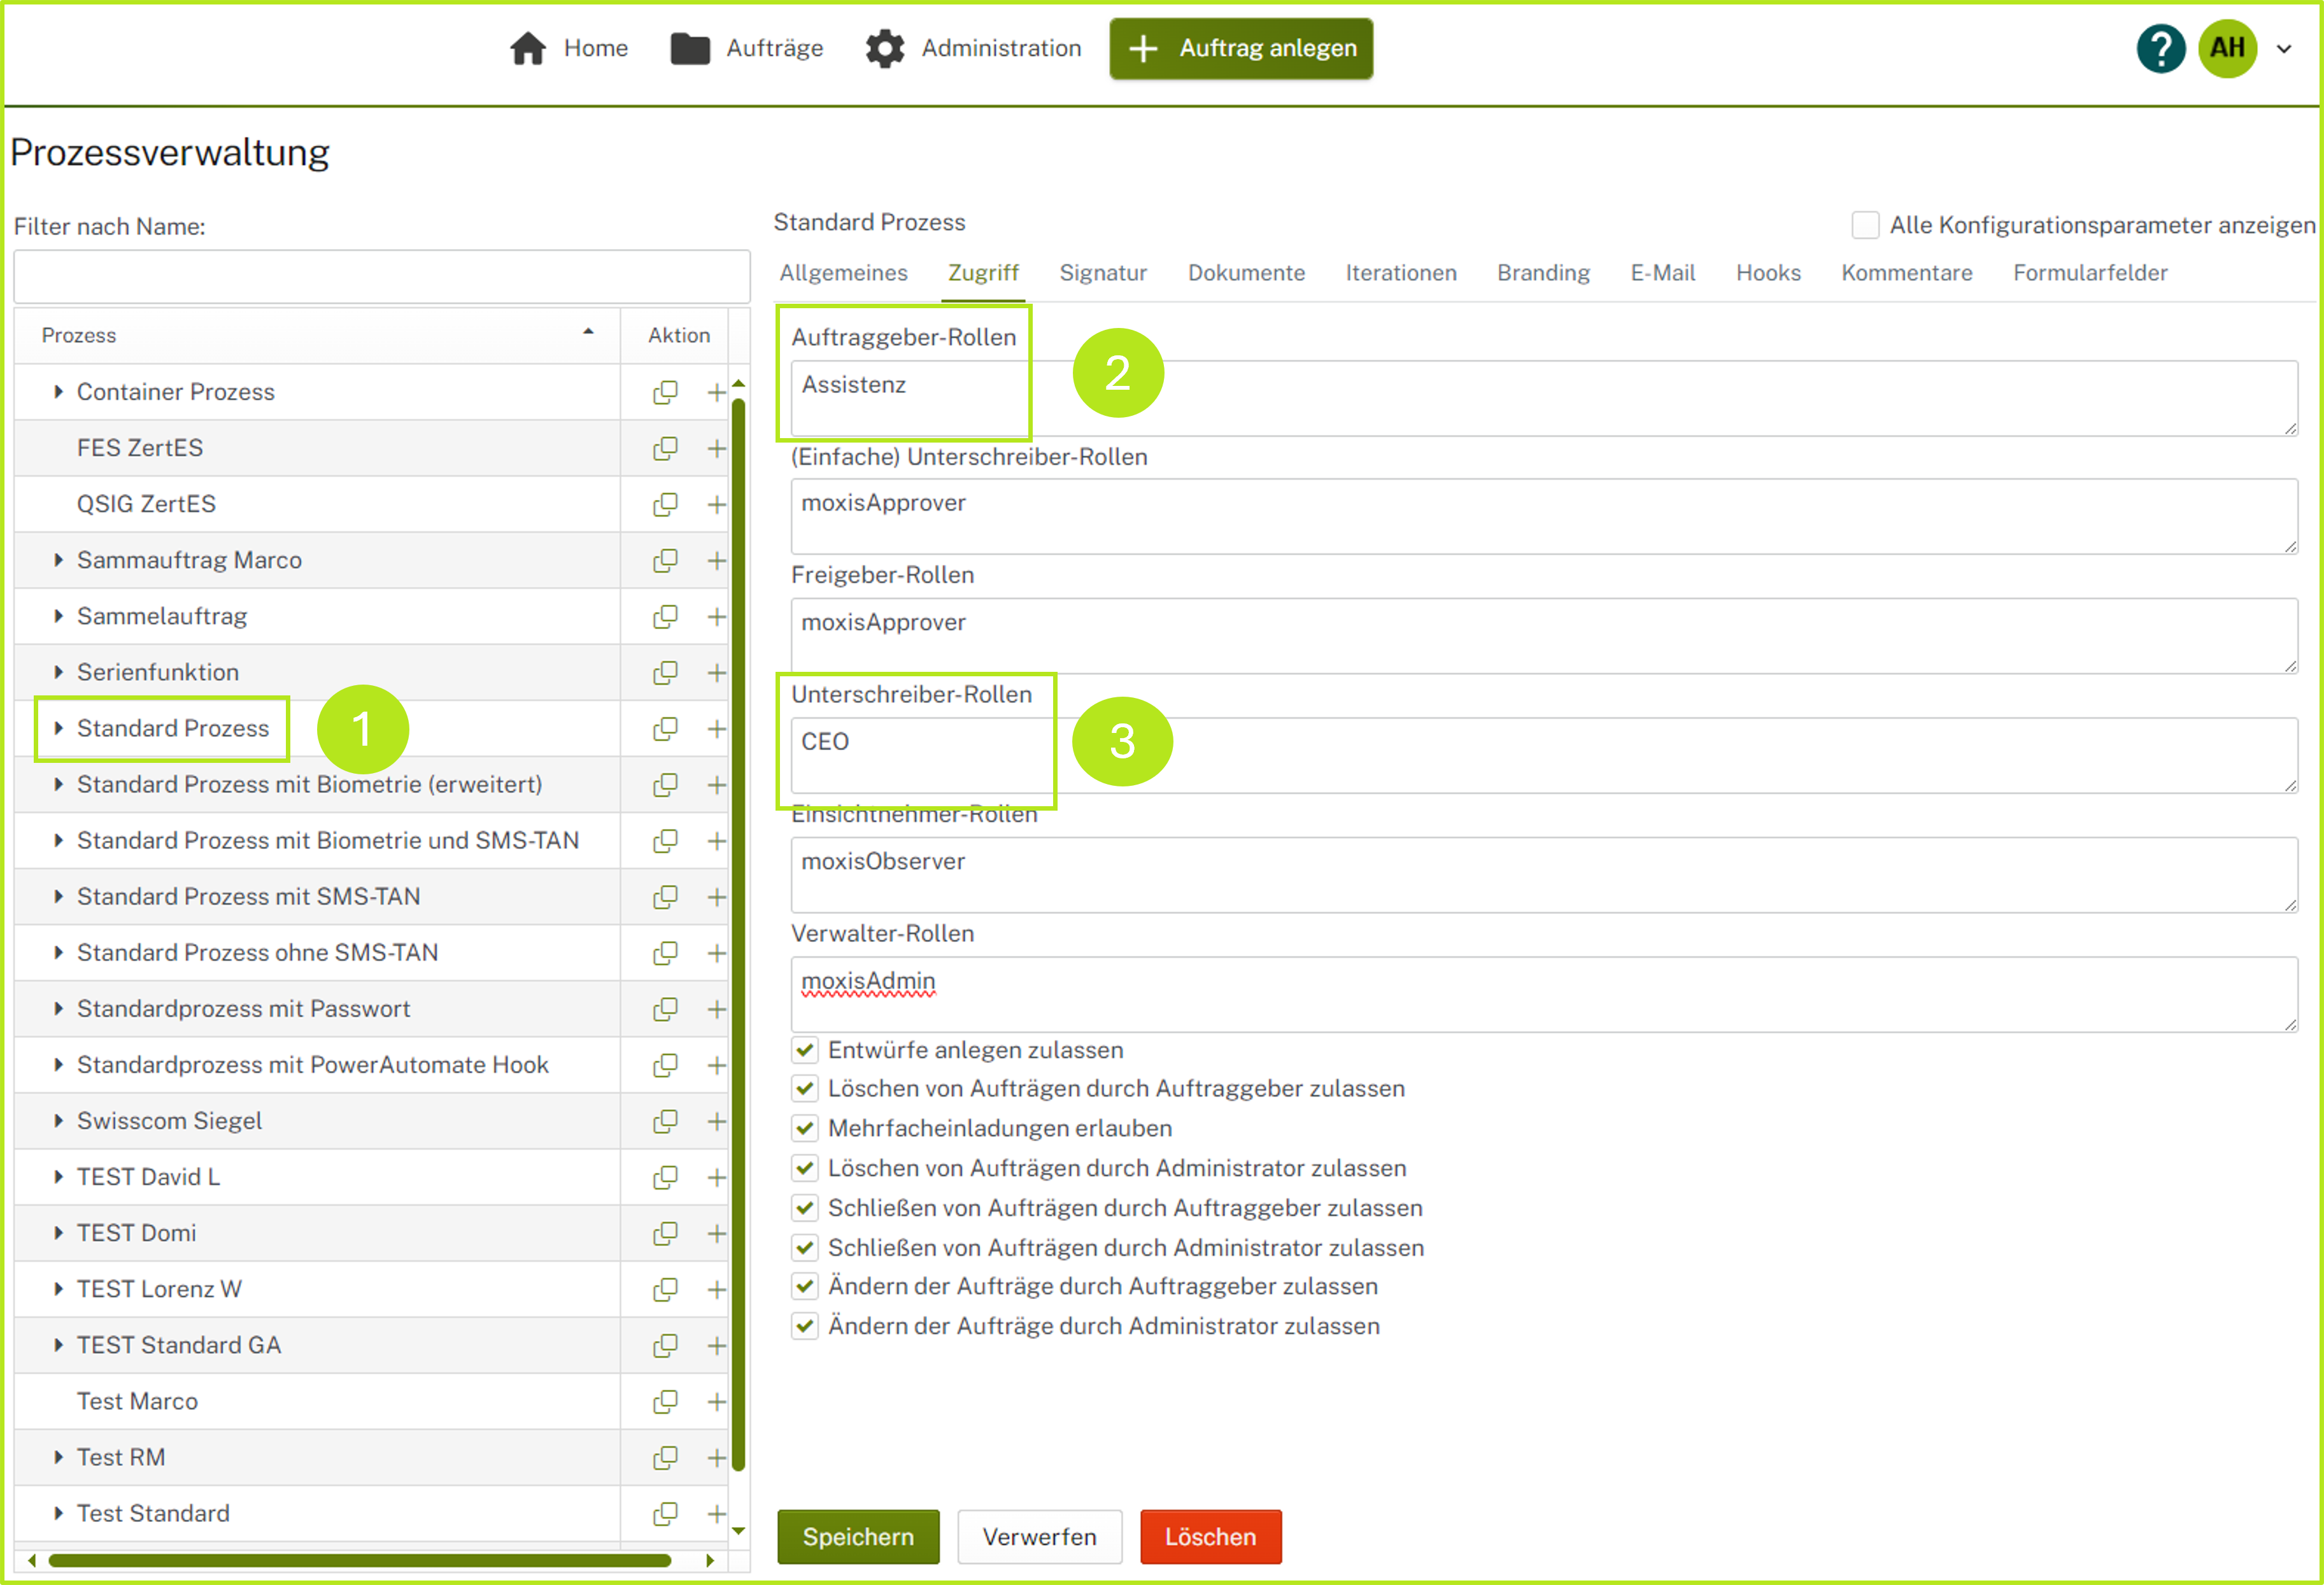
Figure 14: Assignment of roles in MOXIS process management
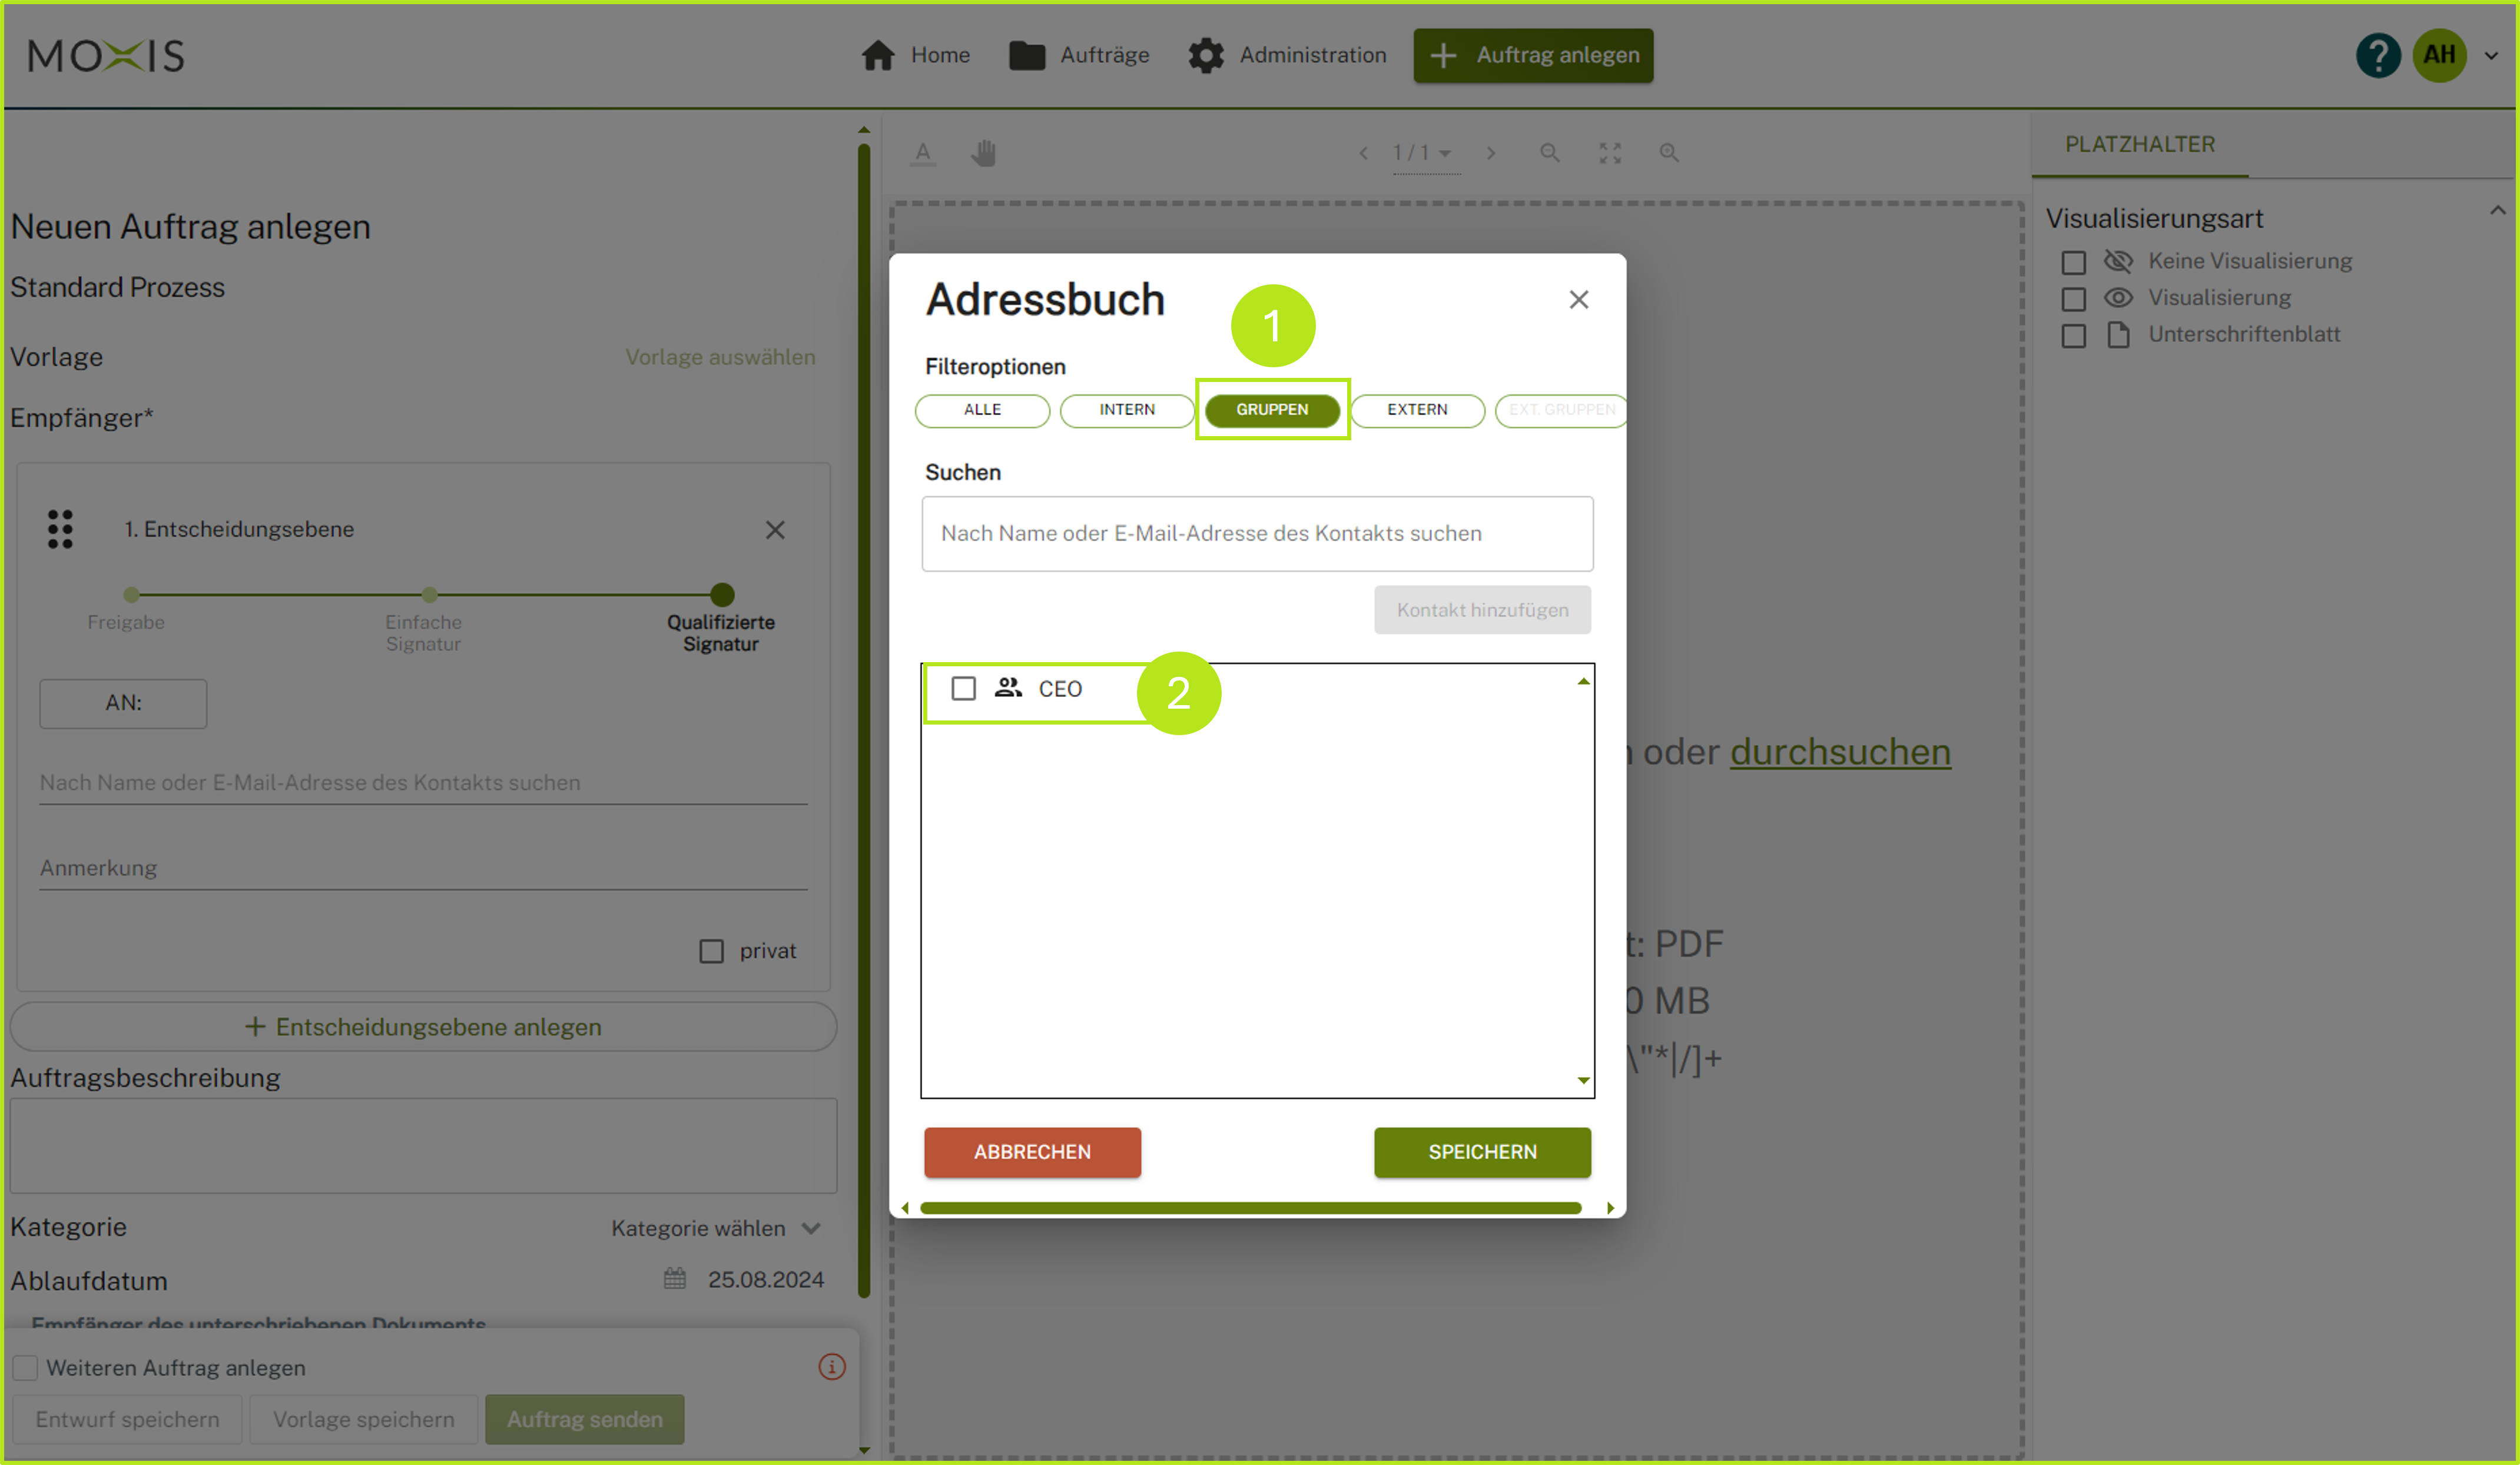
Figure 15: Job overview in MOXIS
Use Case 2
The works council and HR must jointly sign a works agreement. The process is initiated by HR, which may invite the works council and the managing director. Everyone can view the documents, but other employees do not have access to this process.
Solution: Create two groups (here: HR1 and BR1) and select a process of your choice in the process management section (in our example, as shown in figure 16 [1], the “Standard Process”). Then assign the roles of initiator, signatory and administrator to the HR1 group (see figure 16 [2]), and assign the roles of signatory and administrator to the BR1 group and the CEO (see figure 16 [3]).
From now on, all administrators will be able to view all documents managed within this process in the order folder. The job from this use case is currently being processed and can therefore be found in the relevant category in the administration overview (see figure 17 [1 and 2]). In the detailed view, administrators can see, amongst other things, the status of the order (see figure 18).
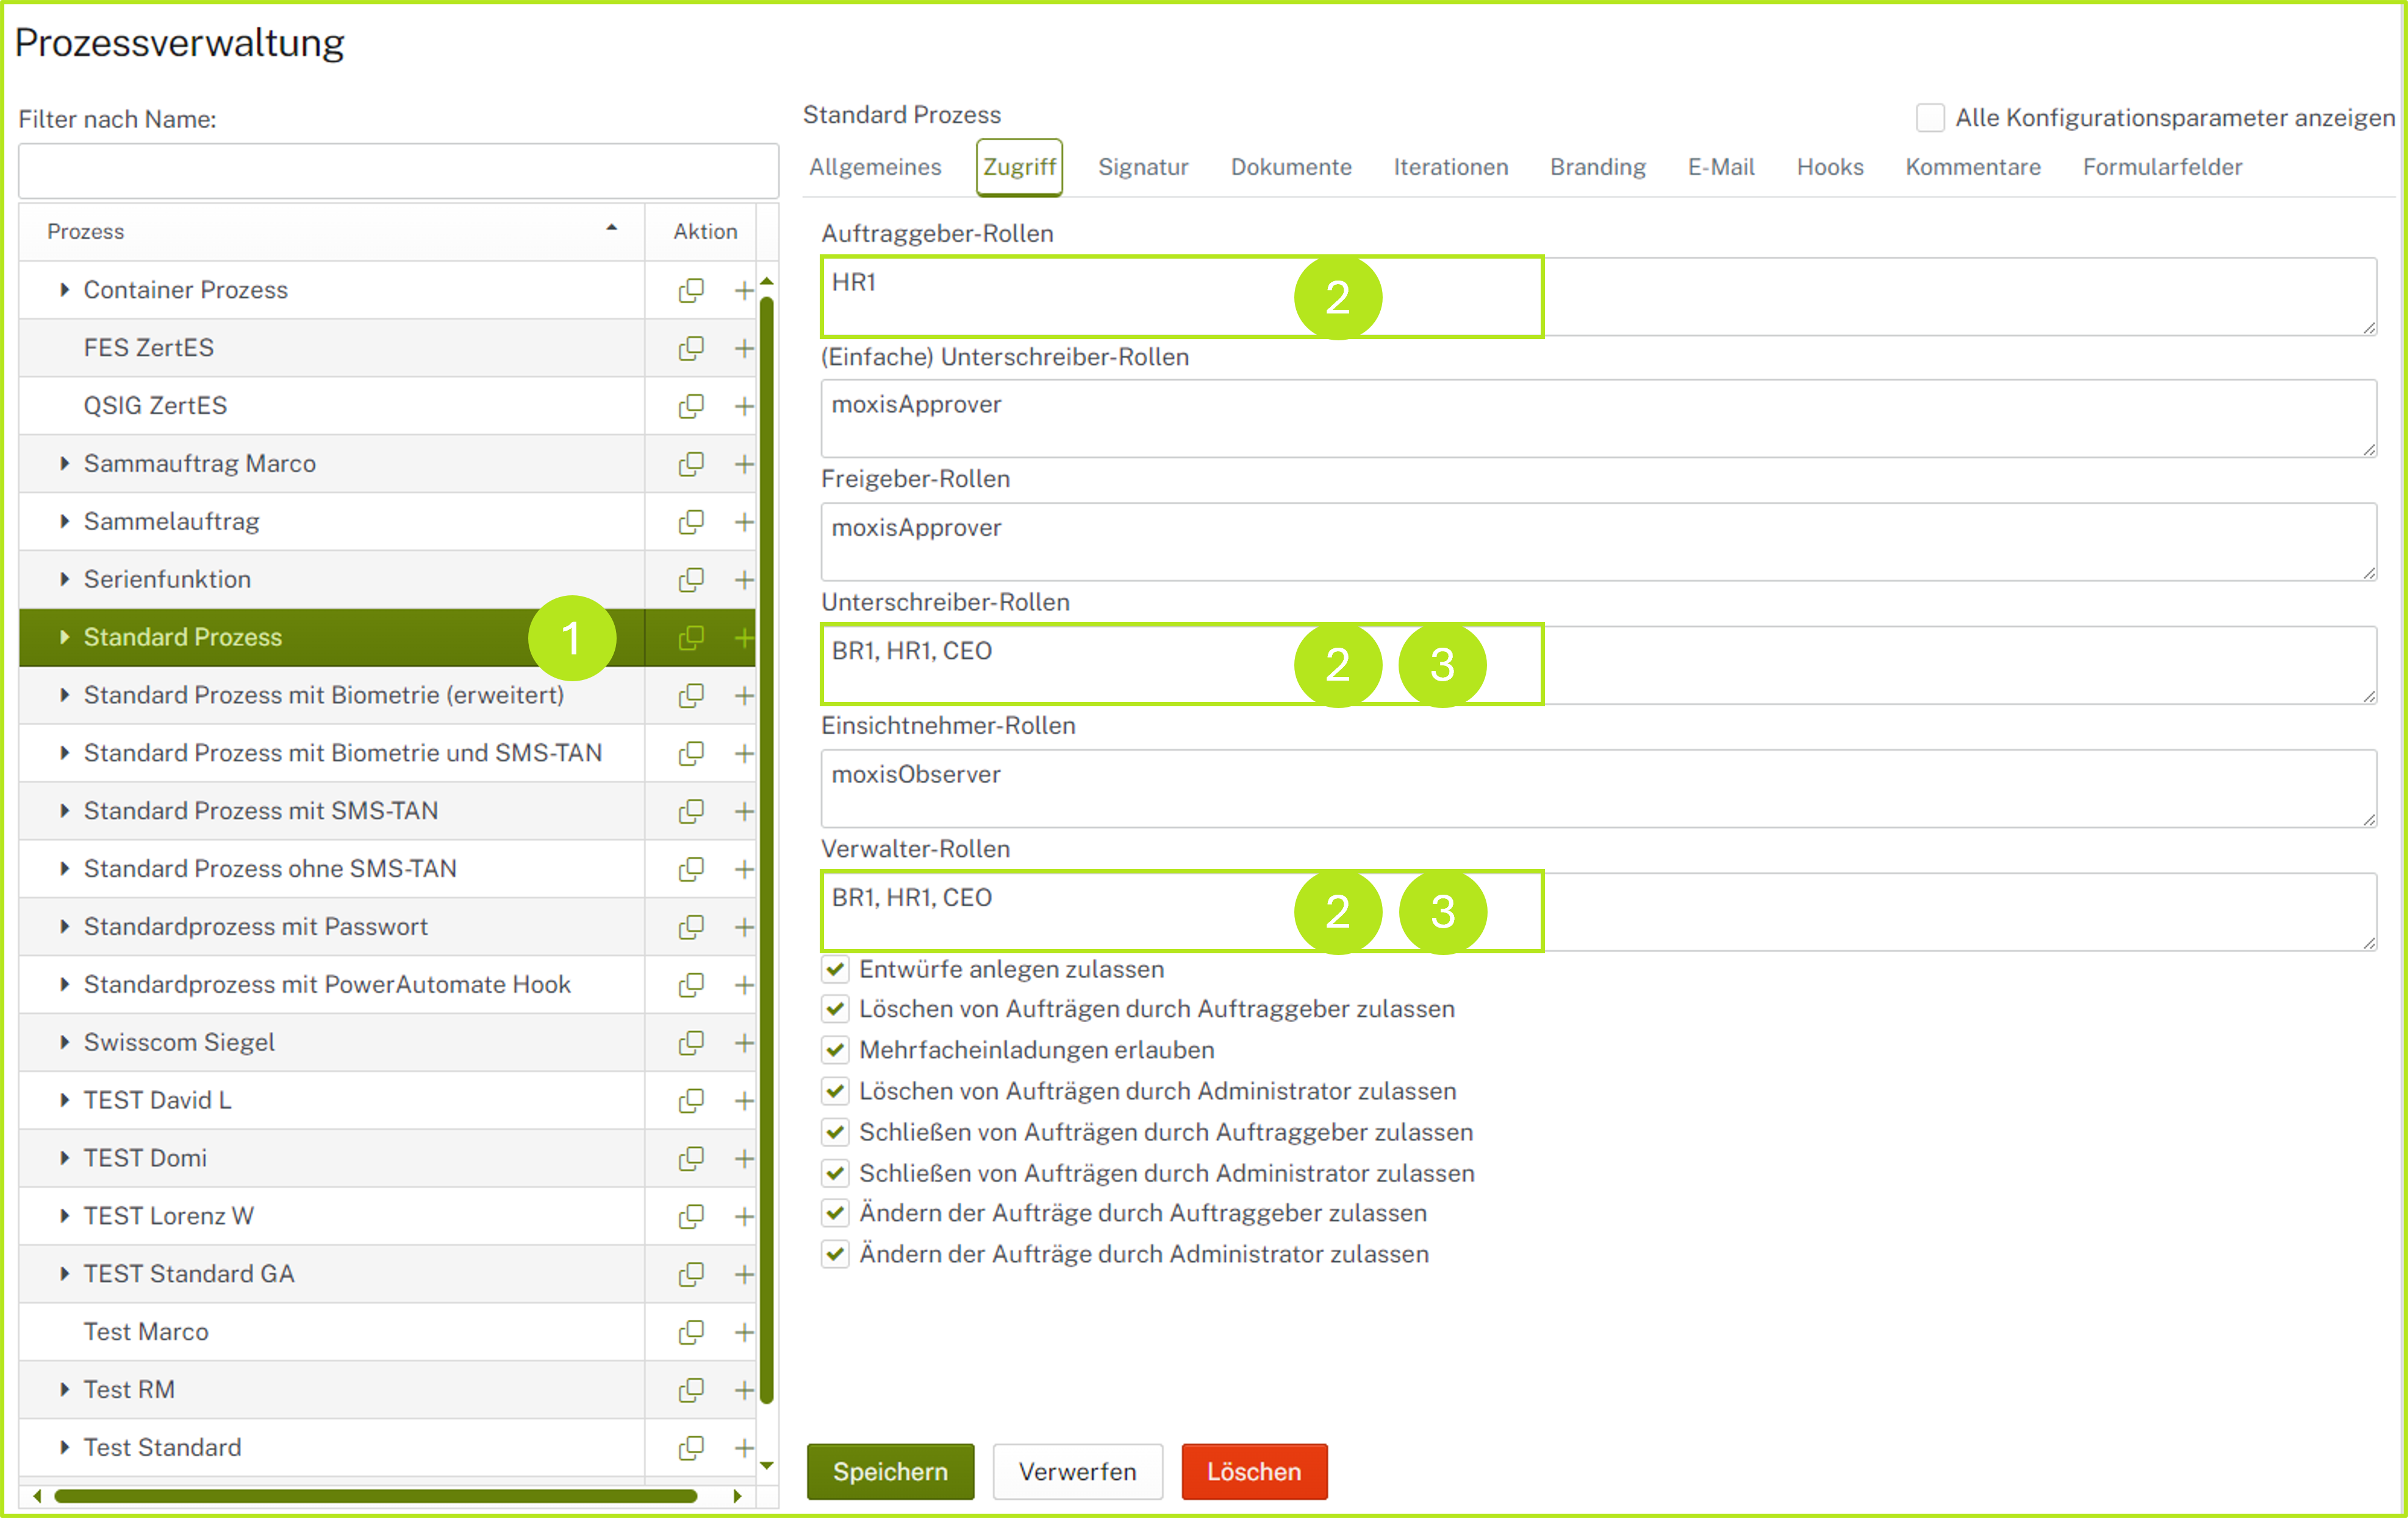
Figure 16: Configuration of the standard process in MOXIS; allocation of roles to different groups
.png?inst-v=1c57040a-43b4-493b-9938-25021fa84b57)
Figure 17: Administration overview; orders currently being processed are visible to all users with the relevant permissions.
.png?inst-v=1c57040a-43b4-493b-9938-25021fa84b57)
Figure 18: Detailed view of an order in MOXIS